powerpoint

Make PowerPoint Rounded Corners the Same!

Rounded corners are a subtle design accent that is easy to apply to shapes, photos, even videos. But why is there no way to make the corner radius the same across multiple objects on a slide!

Fortunately, the capability is within PowerPoint, just not exposed on the Ribbon or any of the object formatting dialogs. The ToolsToo add-in suite has added the functionality to easily select multiple rounded corner objects and make the corner radius the same on all (yay 3rd party add-ins!).

Here is my example slide with 3 rounded corner rectangles. Because the rectangles are different sizes, and the corner radius scales with the shape (where is the “locked corner radius” option Microsoft!) the corner radius is different on each of the rectangles.

I have selected all 3 shapes, selecting box #1 first, because this is the reference object and all objects will match its corner radius.

Go to the ToolsToo ribbon > Make Same > Make Same Rounded Corner

Done! All 3 rectangles now have the exact same corner radius (yay!).

TIP: because I use this tool often, and I have added it to my QAT so it is now an instantly available 1-click formatting thing.

Troy @ TLC

By |2023-08-18T09:40:42-07:00September 7th, 2023|Tutorial|

Convert Keynote file to PowerPoint File Online, Free and Fast!

Do I know Apple Keynote for Presentation design? Absolutely!

Is Apple Keynote your main presentation design app? No, not for a long time.

Can I give you a Keynote file? Absolutely, but all of our Mac computers are at the studio and everyone is working remote, so I will convert the file to PowerPoint.

Now, the big question is, how do you convert an Apple Keynote file to PowerPoint if you do not have a Mac computer available? The answer is easy – and free – and fast – and very accurate conversion! I use cloudconvert, an online file convert app. The website lists they support “nearly all audio, video, document, ebook, archive, image, spreadsheet, and presentation formats.” And I have used this resource for many file types – and just last week, for converting another Keynote presentation to PowerPoint format so I could integrate a presenters slides into the master show presentation (which is being run in PowerPoint).

Go to cloudconvert.com

In the CONVERT menu select PRESENTATION and KEY (Keynote)

In the TO menu select PPTX (PowerPoint)

Click SELECT FILE

Click CONVERT

When done processing, download the .pptx version of the presentation to work with (knowing the conversion process does not provide a full feature PowerPoint template file, no matter how good or bad the Keynote file is setup).

Troy @ TLC

By |2021-11-04T06:48:15-07:00November 9th, 2021|Resource/Misc, Software/Add-Ins|

A Cool PowerPoint Gradient

As we approach the 2021 Presentation Summit, I am finalizing my session talks (and packing equipment for our team to coordinate all live streaming of the entire conference – don’t miss the fun!). One of my talks is on using PowerPoint gradients as a design tool within PowerPoint. The gradients tool is very robust and over the years I have found myself less and less in Adobe Illustrator or even Photoshop, creating gradient styling elements, in favor of staying inside PowerPoint and having the gradients be editable there. Well, I am not giving away the talk (it is going to be good!), but I am highlighting one of the gradient examples our design team created, because it is amazing!

This beautiful slide background is 100% created in PowerPoint. It is a very creative use of PowerPoint gradients, and multiple overlapping PowerPoint shapes. As example, here is one of the vertical bands pulled from the background composite. It has a gradient fill created with 5 gradient stops, at a custom angle, and with varying opacity per gradient section.

On its own, the above gradient is not spectacular. It is technical, but not really amazing. The full background is a composite of 11 PowerPoint shapes over a white background slide to create a wonderful slide background.

For inspiration, the editable slide can be downloaded HERE.

Troy @ TLC

By |2021-09-12T13:11:42-07:00September 13th, 2021|Templates/Assets|

Combining Static Images with Videos in PowerPoint

The design team is thinking of cooler weather (it is summer in Southern California right now, so warm – okay, hot). This a nice slide design demonstrating creative combining of static images with videos all in PowerPoint for dynamic slide design concept.

Here is the .jpg image for this example.

Combining Static Images with Videos in PowerPoint 1

Here is the .mp4 video for this example. Note: the bottom grass area is not going to be seen, or a factor in deciding with video. We are only interested in the moving clouds at the top.

Combining Static Images with Videos in PowerPoint 2

In PowerPoint, the blue sky above the mountain range was removed using the Remove Background tool.

Combining Static Images with Videos in PowerPoint 3

The video was then added and positioned under the mountain image (see, the grass area at the bottom of the video is not see).

Combining Static Images with Videos in PowerPoint 4

Some PowerPoint text was added and here is the final composited slide!

[videopack id=”10661″]https://thepowerpointblog.com/wp-content/uploads/2016/12/unnamed-file-2.mp4[/videopack]

Troy @ TLC

By |2021-05-17T13:08:01-07:00July 24th, 2020|PowerPoint|

Presentation Bandwidth of Screen Share vs. PowerPoint Online Present

This is on the technical, and geeky, side of presentations. In our current environment of remote presenting, we have been addressing questions and supporting remote meetings non-stop. Remote presenting has lots of technical obstacles, that are now the responsibility of each presenter to deal with (vs. showing up at a conference and knowing a professional AV team was in control of everything technical and you, as a presenter, just needed to focus on getting on stage and presenting).

I am sharing a video from Microsoft that demonstrates PowerPoint specifically. In my discussions over the past year with the Microsoft PowerPoint team I have been hearing about the advances they have accomplished in remote presenting and collaboration. Well, I am a believer and integrating PowerPoint Online presenting into several virtual meeting workflows. 

The big takeaway is presenting to a remote audience, using a PowerPoint presentation uploaded to (OneDrive, SharePoint, Microsoft Teams) has amazing bandwidth savings for high quality visuals, video and animation over presenting a presentation shown as a shared screen.

[youtube src=”https://www.youtube.com/embed/1PtDGmpXJj4?rel=0″]

Troy @ TLC

By |2020-05-25T12:05:59-07:00May 26th, 2020|PowerPoint, Resource/Misc|

Image Transparency in PowerPoint

From a recent conversation about how a slide design was created, I realize that it is difficult to keep up with the number of new features being added to PowerPoint. If you have a familiar workflow, you might not be looking for a new workflow. This blog post is about a new, but not really that new, feature in PowerPoint – setting the transparency level of an image.

Here is a slide design scenario (inspired by the conversation noted above) and how to use PowerPoint’s image transparency. Starting with this example slide and inserting an image onto it.

Here is the image, positioned and cropped to fit the open right side of the slide.

The goal is to make the right side have a stylized background element (this photo) with content on top. Open the “Format Picture” pane on the right side.

Go to the PICTURE section and expand the PICTURE TRANSPARENCY options.

Use the presets to quickly change the opacity/transparency of the image.

Or use the Transparency slider, or select the number field and enter an exact percentage. The image on this slide was set to 90%.

All within PowerPoint we have placed an image. Sized, positioned and cropped an image. And adjusted the image transparency – no Photoshop needed. This faint image over the white background can now be the stylized background for the slide content.

Going one styling further, a golden gradient image was placed under the image, making this slide layout quick to update to any color accent (and the content text was updated to white to provide adequate contrast for legibility).

Troy @ TLC

By |2020-04-16T23:13:24-07:00April 17th, 2020|Tutorial|

New INSERT Image Options!

There is something new* in your PowerPoint, but it may not have been discovered yet. The Insert Picture button has expanded to offer more options, and NEW images.

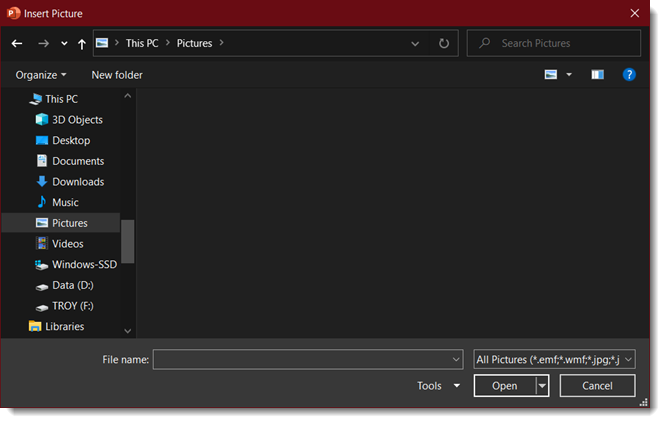
Here is before the update. Insert PICTURES was just a button with no options.

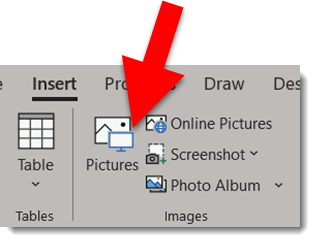
It opened this standard, go-find-the-image-on-your-computer dialog

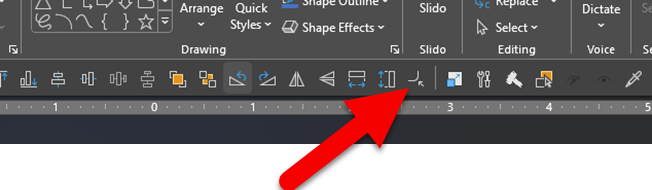
But now (*as of today this applies to Windows Monthly Targeted and Office Insider builds, I have not tested on standard release, Mac or online versions) the PICTURES button is a split button with more options!

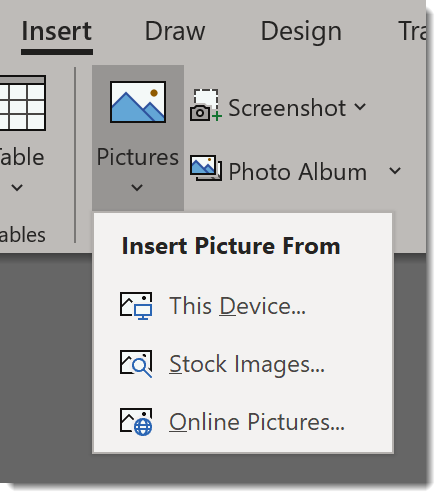
Let me show what each option offers. Click the THIS DEVICE option and we get the same go-find-the-image-on-your-computer dialog

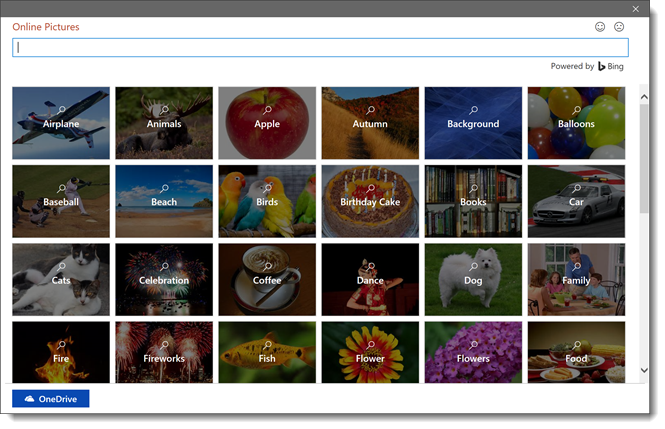
I am going to jump to the third option, ONLINE PICTURES, and save the new stuff for last. Online Pictures is an image search via Bing Images. Nothing new here.

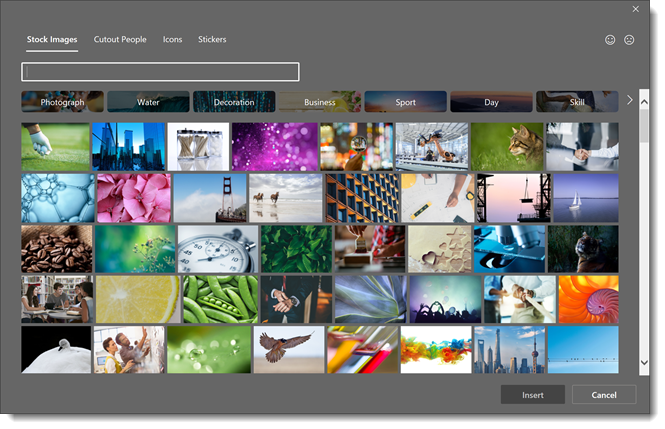
Click the STOCK IMAGES option and we are treated to a new library of high quality photo images. These are all Royalty Free for use in Microsoft app products (eg. my understanding is they can be used in a PowerPoint, Word, Publisher, Excel document and there is no legal issues. But if they are extracted and added to an Illustrator or InDesign document or provided as a stand alone image, the royalty free status may not be enforce). I found the images very nice, great quality and good to use and look unique right now (after 18 months I feel everyone will have seen these images so many times, they will feel “old”).


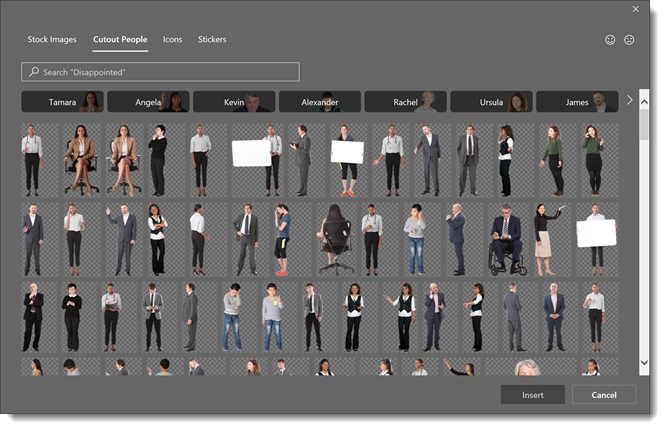
The CUTOUT PEOPLE tab are all .png images of people with transparent background. These are going to get a lot of use and it is a great first release package.

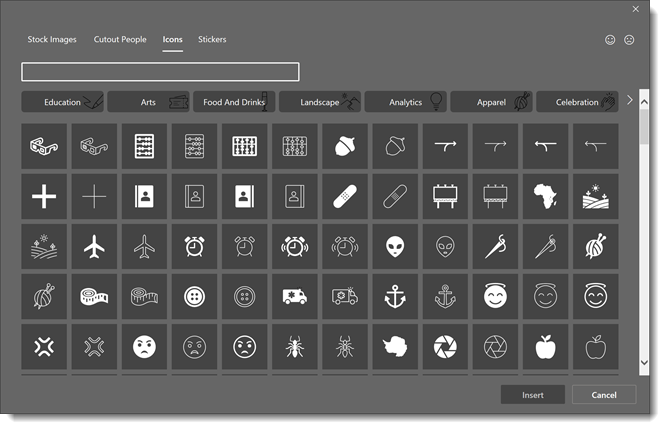
The ICONS tab is also what the INSERT > ICONS button opens. It has a new layout to the icons and expanded set of icons (yay!). PRO TIP: 1 click access vs. 2 clicks. It is 2 clicks to open this dialog if we go to PICTURES and click for the drop down menu and a second click to open the dialog to STOCK IMAGES. But it is 1 click to click the ICONS button to bring up this dialog (opened to the icons tab).

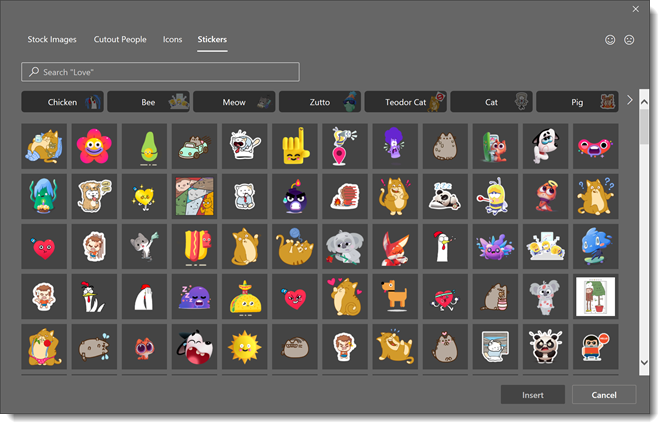
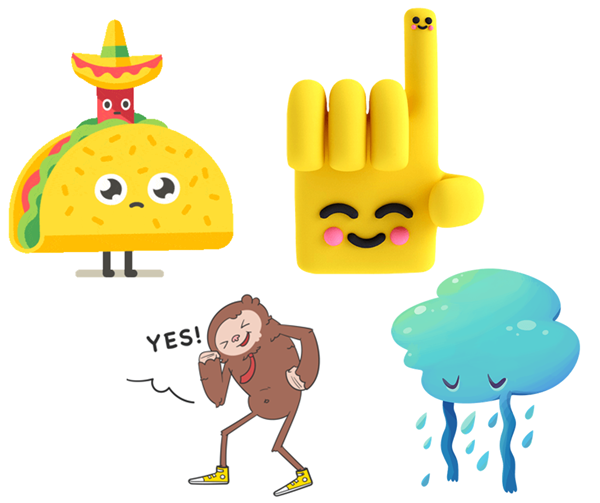
The STICKERS option is new. I know some people are going to love these, and others (like me) cannot see a need for them… These are not animated .gifs, just static fun, full color “cartoons”.

Behind the scenes, Microsoft has done a lot of work on the search. This includes metatags for all images in the library, AI assisted recognition of entries, and a more streamlined process.

Something new for everyone to check out, experiment with and possibly use in your next presentation!

Troy @ TLC

By |2020-04-15T11:40:43-07:00April 15th, 2020|Resource/Misc, Software/Add-Ins|

New Episode on The PowerPoint Podcast!

A new episode of The Presentation Podcast is available today! Troy, Nolan and Sandy are joined by a presentation industry luminary, Cliff Atkinson. Cliff is author of Beyond Bullets, which is now in its 4th edition, and as we talk Cliff continuously drops in one amazing insight and presentation strategy thought after another.

Listen on Apple Podcasts, Stitcher, Google Play, Spotify and Soundcloud – just search for “Beyond Bullet Points, a Conversation with Cliff Atkinson” – or go direct to the episode page here: https://thepresentationpodcast.com/podcast/94

By |2020-01-20T20:17:07-07:00January 21st, 2020|Resource/Misc|

Fire & Ice Text (Gradient)

Text does not need to be a solid color and boring! As example, here are the two words Amber started with for this mini tutorial series.

Editable PowerPoint text does not need to be a solid color fill. Gradients take a bit of work, but can a great way to make text more visually interesting. And, this text is still editable! Because this text uses PowerPoint gradients, they can be applied to any other text with the Format Painter tool (to copy the style from one text box to another).

Each word is a separate text box and each has its own gradient fill styling. Here’s how the gradient was created:

  • Select the text
  • Under SHAPE FORMAT (A) on the ribbon, click the down carrot under TEXT FILL (B).
  • Mouse over GRADIENT (C) to show the gradient fly out menu and select the gradient you want (D).
  • These first options are created using the text fill the text is set to, this example being black (E). To see more PowerPoint created variations, click the MORE GRADIENTS (F) at the bottom of the fly out menu.


Click MORE GRADIENTS to see the FORMAT SHAPE pane. This is where we really have control to create custom gradients. The FIRE gradient is 5 gradient stops (eg. colors) set at an angle:

(A) PRESET GRADIENTS: These are gradients created using the 6 theme colors set in your file.

(B) TYPE: Change the type of gradient:
1. LINEAR: horizontal, vertical, diagonal
2. RADIAL: circular gradient starting from the center or from any of the 4 corners
3. RECTANGULAR: rectangular gradient starting from the center or any of the 4 corners
4. PATH: creates gradient in the shape of the object its filling

C. DIRECTION: Change the direction of LINEAR or RADIAL gradients

D. ANGLE: Change the angle of the direction of the gradient

E. GRADIENT STOPS: set the color points of the gradient. You can ADD (click anywhere on the gradient) or SUBTRACT (click and drag the gradient stop off) points and set the color of each.

F. COLOR: select the color for a gradient stop.

G. POSITION: you can fine tune the position of a gradient stop.

H. TRANSPARENCY: set transparency of a gradient stop.

I. BRIGHTNESS: set brightness of a gradient stop.


Download the FIRE & ICE gradient fill sample slide Here.

Troy @ TLC 

By |2020-01-04T17:18:10-07:00January 6th, 2020|Tutorial|
Go to Top