Animations always add a bit of extra flair to PowerPoint presentations, and using motion paths can help you create unique, custom animations. In today’s presentation design, the Morph transition is the way to accomplish motion. For this Friday’s looking back post is a tutorial from 2011 on PowerPoint motion paths, because sometimes the Morph transition is not able to accomplish the needed motion. The how-to still holds up today – though we’ve added some updated images to give the post a facelift!
Motion path animations are a great feature, but using them beyond basic functions can be confusing. For example, here is the slide from an earlier timeline sample of ours:
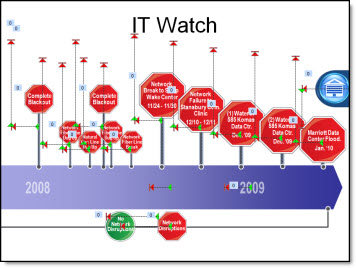
The animation effect was great, and the design of it relied on a lot of motion paths. This is a quick step-by-step example of moving an object to two positions with motion paths.
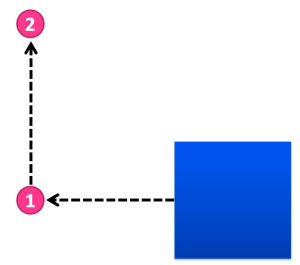
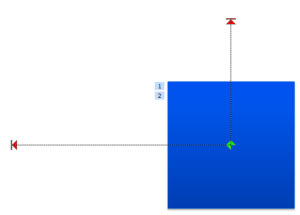
1. The blue box is the object to move. First to area “1” and then to area “2.”
2. Moving to area “1” is easy. Select the box and add a Motion Path to the left.
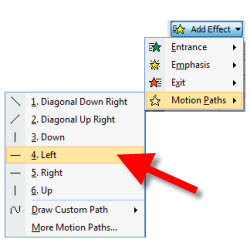
3. To move to area “2” is a bit more involved. First, add a Motion Path up. Note: It is added to the existing position. During slide show the box will move to the left, then jump back to the original location and move up – not the seamless effect wanted.
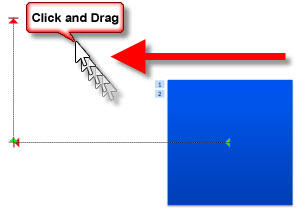
4. Select the “up” motion path. Note: You must be in the Animation tab to view motion paths and select them. Then, click and drag it over so it’s green start is exactly aligned with the first motion paths red end.
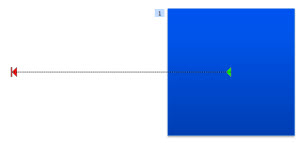
5. Done. Now, the box will seamlessly move to area “1” and then up to area “2.”

Download presentation with this sample animation (17K). Note: if your browser changes downloaded file to”.zip” rename to “.pptx”.
– Troy @ TLC
This is from our Look Back series, rediscovering previous blog posts with relevant PowerPoint tips, tricks and examples. The original post from February 4th, 2011 can be viewed here.