This month, the staff at TLC Creative Services has been looking into creating stop motion videos and GIFs using PowerPoint as the creator app. We’ve looked at how to create slides for stop motion, we created a process diagram to be used in a presentation, and we’ve shown you some fun examples.
Now, let’s create, using PowerPoint, an animated GIF specifically for a LinkedIn post. LinkedIn posts commonly use a square (1080×1080) image size.
Determine the PowerPoint Slide Size
Before we set up our slide size, let’s look at PowerPoint’s GIF export options. GIF files can export to 4 specific pixel sizes:
- Extra Large 1080 pixels
- Large 720 pixels
- Medium 480 pixels
- Small 240 pixels
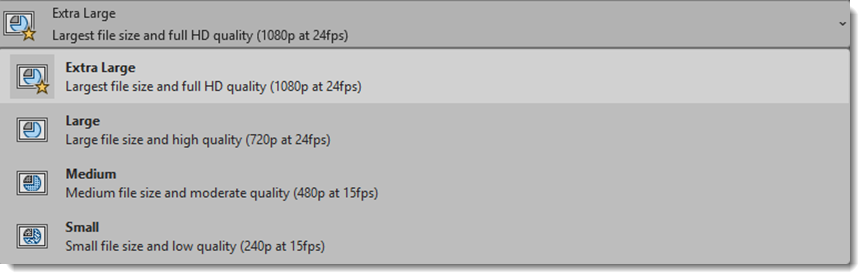
Since PowerPoint Exports only to the specific options above, our slide can be any size so long as the slide size is a square (and isn’t unreasonably small). We set up our slide size to be 8″ x 8″, which we will eventually export at the “Extra Large” option.
Create Your Stop Motion in PowerPoint
Summertime is a great time to get outdoors for a run, so we researched and found some vector assets on Adobe Stock.
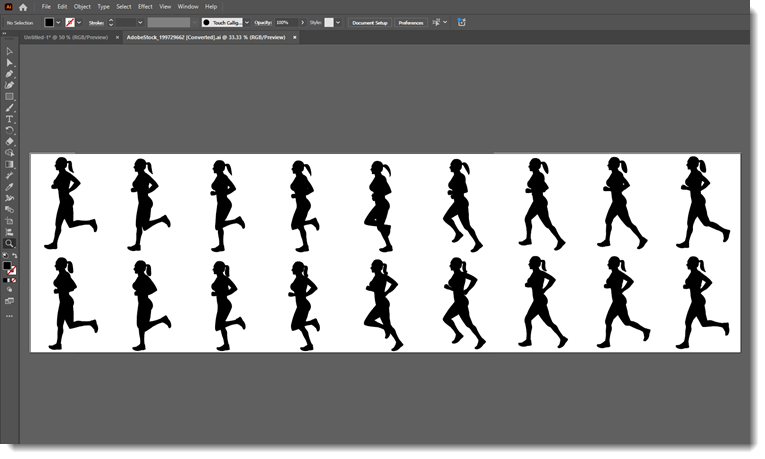
We then created an 18-slide (or in traditional animation terms, an 18-frame) animation in PowerPoint, using each position of our runner – one position for each slide.
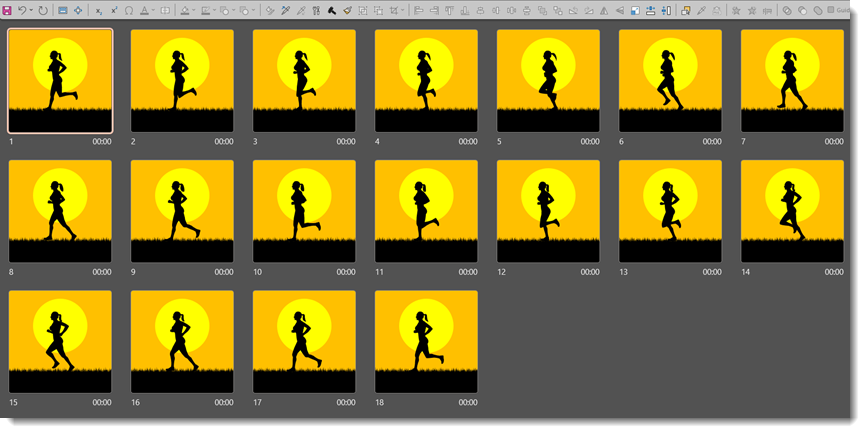
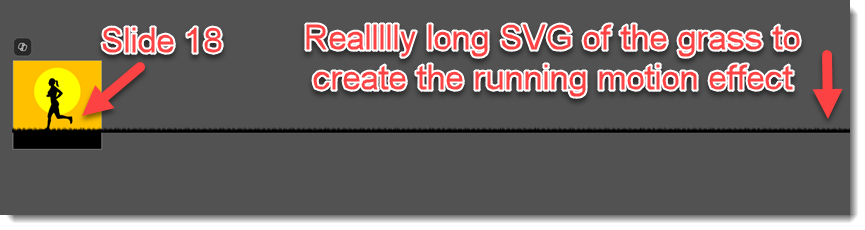
A graphic of grass was then added, duplicating the graphic and aligning it end-to-end, making sure the art was long enough to create a seamless loop for the final animation. Specifically, the edge of the grass graphic was lined up to the right edge of our first slide (the first frame). Then, skipping to the last frame, the grass graphic was moved all the way to the left, so the edge was lined up with the left side.
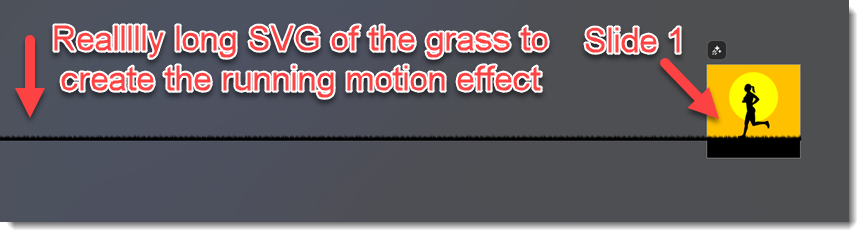
To come up with the distance the grass should move between each slide, a little math was needed. We know there are 18 frames, but we won’t count the 1st slide, so we have 17 frames to move the graphic. Ultimately, we need to take the length of the grass and divide it by 17. Pulling up the “Format Shape” tab and under “Shape Options” click the “Size & Properties” icon.
Under “Position” we can see the starting horizontal position is -68.15″. Then, going to slide 18, we see the ending position is -0.11″. So, we have 68.04″ to move our grass along the 17 slides.
Doing some more math, 68.04″ divided by 17 is 4.002″…let’s round it to 4″ for our sanity. Our grass should move 4″ each frame and we can control this through the same “Position” box, moving our grass to the right by subtracting 4″ from the horizontal position for each slide as you move from slide 2 through slide 18. This ensures an even-flowing animation that can loop seamlessly. The final touch was adding the background with the sun.
Next, we set the slide transition to “None” and set the slides to auto advance “After 00:00” seconds.

After setting our presentation to loop, we previewed the animation in slide show mode, to confirm it looped seamlessly. We are now ready to export our animation as a GIF, making sure to select “Extra Large” so it will export at the 1080×1080 pixel size:
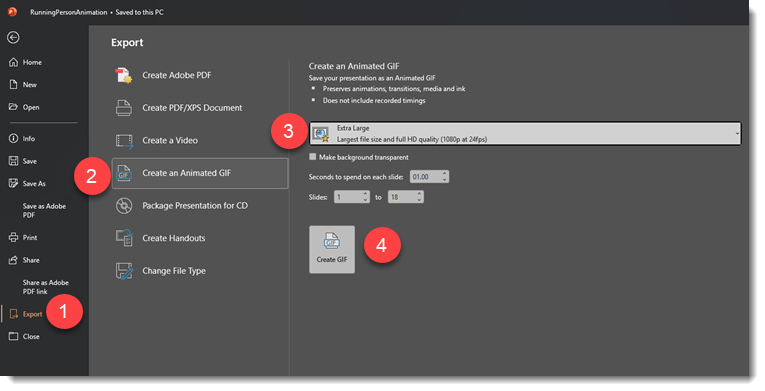
1. Go to File Export
2. Scroll down to “Create an Animated GIF”
3. Select the resolution you want the GIF to be (we want “Extra Large”)
4. Then simply click “Create GIF” and you are all set!
Here is a look at the final animation:

Creating stop motion-like animations, whether they end up as a video or GIF, is relatively easy and can be fun when done in PowerPoint. We’ve only scratched the surface of what you can do and create, but we hope we’ve given you the knowledge and inspiration to explore stop-motion in PowerPoint!
-Jake and the TLC Creative Design Team