Here’s how we created a Video Picture Frame in PowerPoint
My example is a standard 4×3 slide. The goal was to create a picture frame that was full slide size and for the picture frame to have motion. By layering a video under the photo and sizing it to the same aspect ratio as the photo, the result is a dynamic motion picture frame. The steps to make it happen are pretty easy.
Step 1
Add the photo to the slide (we prepped this image in Photoshop by making it semi-transparent and saving out as a .png).

Step 2
Add the video to the slide, send to back, resize and crop to proportionally be a bit larger than the photo.

Step 3
Fine tune position of video and photo. Select both and use the ARRANGE > ALIGN > ALIGN CENTER and ALIGN MIDDLE to make them exactly centered on each other.

Step 4
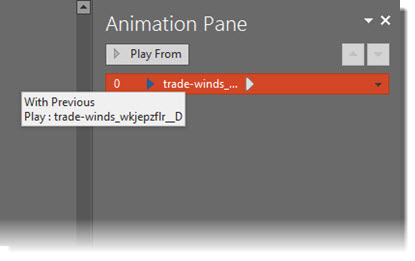
Set video animation. Select the video, remove the current trigger animation, add a new PLAY animation set to WITH PREVIOUS.
Step 5
Set video to loop. Select video, go to PLAYBACK > VIDEO OPTIONS > LOOP UNTIL STOPPED.

Step 6
Stylize video with an outline and drop shadow. Stylize photo with an outline and inner shadow.

Step 7
View in slide show!
[KGVID]https://thepowerpointblog.com/wp-content/uploads/2016/02/unnamed-file-1.mp4[/KGVID]
-Troy @ TLC