The PowerPoint® Blog

I work with PowerPoint on a daily basis and I am very honored to be a Microsoft PowerPoint MVP. We have a talented team of presentation designers at TLC Creative Services and ThePowerPointBlog is our area to highlight PowerPoint tips, tricks, examples and tutorials. Enjoy! Troy Chollar

3 Slides for a Template

PowerPoint by virtue of providing a Content Master and a Title Master has conditioned the world that presentations only need two looks. When I design a template it generally includes 3 to 4 master slides that go beyond the standard two slide system. Here is a recent example:
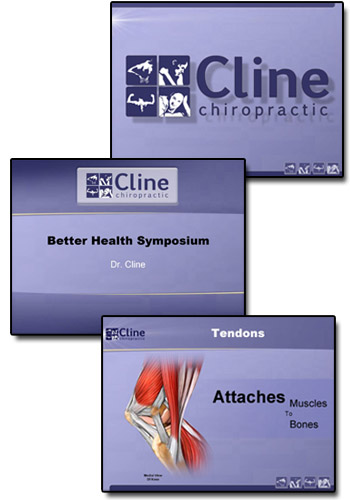
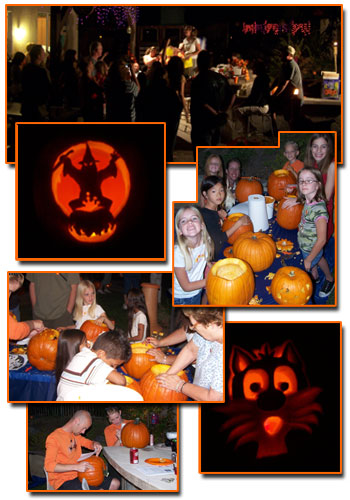
(1) Theme Graphic
This slide is used for pre/post-meeting (walk-in/walk-out) or during extended Q&A. Usually with a strong branding image.

(2) Title Slide
Used for introducing major topics, speakers, etc.
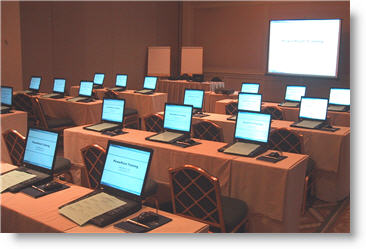
(3) Content Slide
Used for all of the content…

– Troy @ TLC

By |2016-11-17T14:47:23-08:00November 9th, 2006|Portfolio|

Create a Glow with PPTXtreme SoftShadow

With creative use of PPTXtreme’s SoftShadow add-in instanst “Soft-Glows” can be created. If you have not checked out this very useful add-in go here.

(1) Select text, autoshape or image. Here are my setting for adding a white drop-shadow.

(2) Select the object again and apply a second softshadow. Note the negative (-5 and -5) X and Y positions, so the 2nd softshadow is positioned in the upper left. Here are my settings for this second softshadow.

(3) The result is a photoshop quality glow.

– Troy @ TLC

By |2016-11-17T14:47:06-08:00November 7th, 2006|Software/Add-Ins, Tutorial|

PowerPoint Timers

Countdown timers can be created fairly easy in PowerPoint. There are lots of needs for timers and I recently had a client call me from there event (that was already underway) asking for a countdown timer to run for the breaks.

Microsoft has some good resources available on its website. I simply emailed a link to the Microsoft Online where they have a few dozen ready-made countdown timers. My client found one they liked, added their logo to the master slide and was ready to go in less than 15 minutes.

To check out the countdown timer presentations Microsoft has available (for free), click here.

– Troy @ TLC

By |2016-11-17T14:37:15-08:00November 3rd, 2006|Software/Add-Ins|

Hands-On PowerPoint Training

There is a big difference between hearing a PowerPoint skill explained – having it demonstrated – and being able to do it hands-on.

Here is a photo of a recent hands-on training session that I developed the training course materials for (of course setting up the rental computer settings made for a very early morning before attendees arrived).

– Troy @ TLC

By |2016-11-17T14:36:47-08:00November 1st, 2006|Resource/Misc, Software/Add-Ins|

Pumpkin Fest 2007 at the Chollar’s

Hey, this is off-topic, but completely seasonal. Every year for the past 15 years (which is before we had kids), we have hosted a fun-filled pumpkin carving party. The parties have gotten a bit bigger over the past years (now around 70 people), the pumpkin carving a lot more creative, and the food just remains great!

Here a few photos from this years event:

– Troy @ TLC

By |2016-11-17T14:36:21-08:00October 31st, 2006|Personal|

Fix Links Pro Fixes A Hidden Problem

Sometimes you don’t want to give away to much information. And when an Excel chart or movie is inserted you are giving away information about your network/file structure.

As example, right click on a movie that is inserted into PowerPoint and choose EDIT.

The movie information includes the path where it came from.

To eliminate this information I use the Fix Links Pro add-in (website is here).

(1) Open Fix Links Pro and choose REPAIR

(2) It generates a report about all multimedia and embedded files in the presentation. The key is where the report says “now path-free”.

(3) Now right click the movie, choose EDIT and see that the path information has been removed

– Troy @ TLC

By |2016-11-17T14:32:26-08:00October 25th, 2006|Software/Add-Ins|

One Last Look at DVI

Just as a final parting look at all the flavors of DVI, here is a diagram of each connectors pin configuration. The important thing is DVI-A and DVI-I have the four connectors around the slotted connection, while DVI-D does not.

Dual-Link, the simple explanation: for high-resolution displays (eg. 2560×1600).

– Troy @ TLC

By |2016-11-17T14:31:56-08:00October 24th, 2006|Resource/Misc|
Go to Top