The PowerPoint® Blog

I work with PowerPoint on a daily basis and I am very honored to be a Microsoft PowerPoint MVP. We have a talented team of presentation designers at TLC Creative Services and ThePowerPointBlog is our area to highlight PowerPoint tips, tricks, examples and tutorials. Enjoy! Troy Chollar

Online Movie Tutorial : Remove Image Background in PhotoShop

In this screen capture tutorial I go through the process of exporting an image from a presentation, opening it in PhotoShop, removing the background, properly saving it with transparency and then inserting back into the presentation.

This is a 4 minute narrated online movie – because seeing a real demonstration saves hours of frustration! To view click here.

– Troy @ TLC

By |2016-11-17T14:05:43-08:00July 12th, 2006|Tutorial|

Make Your Images RGB in Photoshop

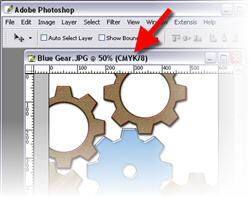
When creating or editing an image in PhotoShop – be sure it is set to RGB. I recently encountered a situation with a clients files that was perplexing (aka: extremely frustrating). They were scanning photos at a print resolution (300 dpi and very large) and also as CMYK images. I figured out their problem, corrected the images in the current presentation and gave them a scanning tutorial so future efforts will work better.

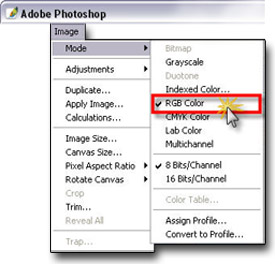
For any images you will be using in a PowerPoint presentation, make sure your images being edited in Photoshop, or any image editor, are set to RGB. In Photoshop:

○ Check the top information bar of your image to see what color mode it is currently set to. Common mode are RGB, CMYK and INDEX

○ To change your image to RGB go to IMAGE >> MODE >> RGB

Done.
You now know your image is compatible with PowerPoint and one potential conflict/problem has been eliminated!

Troy @ TLC

By |2016-11-17T14:05:22-08:00July 10th, 2006|Tutorial|

3D Spheres from AutoShapes

I create a lot of graphic elements for presentations and since the inception of PPT XP I have been able to do many directly in PowerPoint with some creative use of AutoShapes and transparency settings. PPT MVP Shawn Toh has posted a sample presentation with some really great 3D spheres at Indezine.

Here is one of the spheres created entirely with autoshapes:
One of the 3D Spheres in the Presentation
Here are the autshapes used to create the above 3D spere:
Autoshapes used to create the 3D Sphere

Here is the description and download link on Indezine, click here.

Troy @ TLC

By |2016-11-17T14:05:00-08:00July 8th, 2006|Resource/Misc, Tutorial|

PPT Keyboard Shortcuts

There are lots of great ways to work faster in PowerPoint (and all Office applications for that matter). Most everyone knows the basic keyboard shortcuts; copy, paste, duplicate slide, etc. But how about moving through action panes (F6) or move one word (Ctrl + Right Arrow).

Here is a reference this page on Microsoft for the complete listing of keyboard shortcuts, click here.

Troy @ TLC

By |2016-11-17T14:04:41-08:00July 6th, 2006|Resource/Misc, Tutorial|

4th of July template

Happy 4th of July!! The states are awash with patriotism and we are off for our annual trip to the state fair where we end the day listening to the Navy Band and watching a huge fireworks show.

There are lots of great template sites out there, and it is not something I have focused on (providing a library of downloadable templates). But I designed this Americana themed template to share with all. Download here (580k).

Troy @ TLC

By |2016-11-17T14:04:24-08:00July 4th, 2006|Templates/Assets|

Where’s the job application…

My work environment when I interact with people face-to-face is generally in ballrooms and convention centers across the country. I hear and get the “I’d like to do what you do” question fairly common. I recently responded to someone, who was very serious about a change of direction in their design work, which I will share with all:

“Dear XXXX,

Over the past few years I have seen a surprising need for qualified people to work showsite presentations. But for straight design work I believe there is a very competitive market. For me the two have become inseparable. I do lots of creative design work for live events, both in pre-production from my office and while on showsite.

For showsite presentations the graphics person needs to be very knowledgeable about design principles – PowerPoint – computer/hardware issues – A/V equipment (projectors, scalers, switchers, etc.) and of course people skills. I would recommend:

○ Spending lots of time on the PowerPoint newsgroup just reading the questions and answers. Knowing the solutions to the various common problems is mandatory. https://support.microsoft.com/newsgroups/default.aspx?NewsGroup=microsoft.public.powerpoint&SLCID=US&ICP=GSS3&sd=GN&id=fh;en-us;newsgroups
○ Get familiar with the PPT FAQ that Steve Rindsberg maintains(you will see plenty of newsgroup replies are just links to pages on this site) https://www.rdpslides.com/pptfaq
○ Beyond skills and knowledge it is a matter of getting your name in with production companies. The industry is relatively small, so working with one means referrals to others.

Lest you think it all exciting, the hours are anywhere between midnight-and-midnight. Airplanes – hotels – banquet food – and lots of travel are a daily part of things too…”

Troy @ TLC

By |2016-11-17T14:03:47-08:00July 2nd, 2006|Personal|

Animation : Morph Images By Rotating In/Out

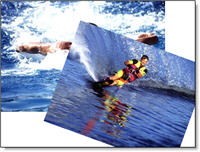
Sometimes you want to give a little pizzazz to entrance of a new image. Here I added movement with a rotation to the images for something unique.
iame

This requires a bit of preparation, but everything is done inside PowerPoint.
○ Insert both images on the slide
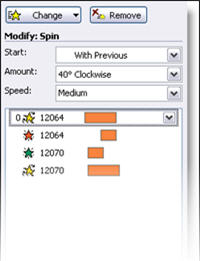
○ The first image, that will be fading out, apply a FADE OUT and SPIN animation. I set the spin to be 40º and CLOCKWISE
○ For the second image, right-click and choose FORMAT PICTURE. Go to the SIZE tab and set the ROTATION (I set mine to 20º)
○ Apply a FADE IN and SPIN animation. Set the spin to COUNTER CLOCKWISE and the same rotation you set in the step above (mine is set to 20º)
○ Set all animations to WITH PREVIOUS
○ Set the animations for the second image to begin at a .2 second delay

The sample presentation can be downloaded here.

Troy @ TLC

By |2016-11-17T14:03:28-08:00June 30th, 2006|Tutorial|

Online Movie Tutorial : Export image from PPT to add PhotoShop Dropshadow

I have just completed a screen capture tutorial that walks through the process of exporting an image from a presentation, opening it in PhotoShop, adding a soft dropshadow, properly saving it out and then inserting back into the presentation. This is a 4 minute narrated online movie, because if a picture is worth a 1,000 words, seeing a real demonstration is worth hours of frustration! To view click here.

– Troy @ TLC

By |2016-11-17T14:03:10-08:00June 28th, 2006|Tutorial|

Animation from One Photo

Working on presentations is always rewarding when the client or an audience member comments on the presentation. Sometimes I am caught off-guard by what is being praised, something I view as simple but they view as great. Here an example from a recent show.

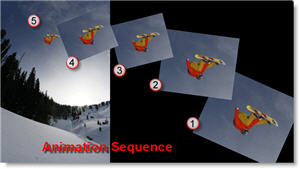
Part of the project involved using a series of photos of the company product in use to create a walk-in looping presentation. I was given the photos, was to use black background and add some animation and slide transitions – GREAT freedom to have fun! One of the animation techniques I used in various ways was to duplicate the image a number of times, crop each duplicate, position and apply a streaming animation to add a little movement. Here is the one of those slides:

Here is what was done:
○ Duplicate the image four times (to have 5 images)
○ Crop four images down to just the person
○ Resize each cropped image to they became progressively smaller
○ Position in an arch
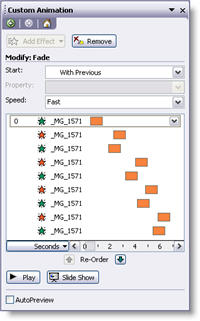
○ Apply a FADE IN and FADE OUT animation to each
○ Adjust the timing of the animations in the advanced timeline

○ Position the original, full image, and apply a FADE IN animation
The result is a simple slideshow on a single slide that moves the snowboarder across the slide finally resolving to the full shot. After 7 seconds the show auto advanced to the next slide.

The nifty thing is all of the work was done inside PowerPoint using the crop, resize tools and animations tools. Download the presentation here
(note: this is a widescreen 16:9 presentation)

Troy @ TLC

By |2016-11-17T14:02:48-08:00June 26th, 2006|Tutorial|

Animation with AutoShapes Gone Wild!

I have had this file from fellow PPT MVP “Tohlz” for a while and just got around to viewing it. Wow!

The content is nifty, the animations great, but what really impressed me was that the entire presentation/movie is made from a complex use of PowerPoint autoshapes! This includes the 3D effects, the highlights, everything. I would develop this using a couple dozen PhotoShop created .png images and call it a day, but making them all with autoshapes creates a small file size and shows lots of creative thinking!

Made Only With PPT Autoshapes
View it out at the “Evolution Warriors” here.

– Troy @ TLC

By |2016-11-17T14:01:44-08:00June 24th, 2006|PowerPoint|
Go to Top