16×9 in a 4×3 world
If you have a 16×9 aspect ratio presentation like this:
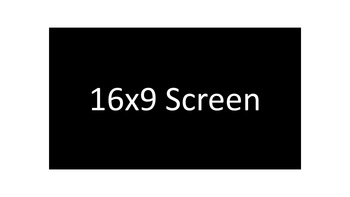
This is what it looks like when projected on to a 4×3 screen:
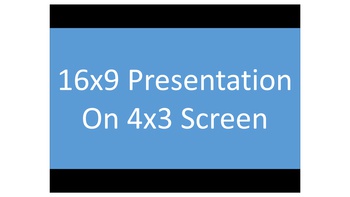
The presentation is vertically centered and goes left to right. The top and bottom are not used (but the projector will show black in these areas). This is called Letter boxing.
– Troy @ TLC
4×3 in a 16×9 world
If you have a 4×3 aspect ratio presentation – like this:
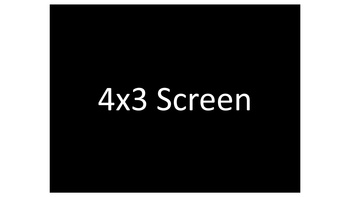
This is what it looks like when projected on to a 16×9 screen:

The presentation is vertically centered and goes top to bottom. The left and right sides are not used (but the projector will show black in these areas). This is called Pillar boxing.
– Troy @ TLC
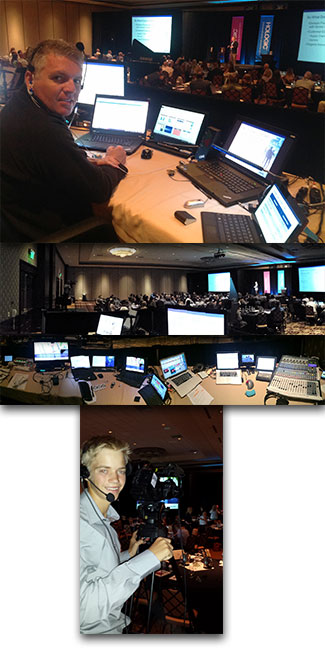
Showsite in Denver
It has been a great week here in Denver. Thanks to Paul for the great photos (I take no credit for any photos this time) and to my nephew Justin for stepping in as our last minute camera op!
– Troy @ TLC
Using PowerPoint’s Shape Merge (3)
Part 3 of the Shape Merge real-world, presentation design examples is a Key shape.
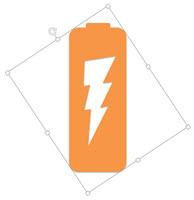
BATTERY
Goal is to create a single PowerPoint shape of a classic battery that can be stylized in any way using Point’s features.
Shape(s) 1 – two rounded corner rectangles to create the battery shape.

Shape 2 – the power/lighting shape is a standard shape in PowerPoint. Rotate, size a position on battery shape (color does not matter – we are going to delete it in the next step).
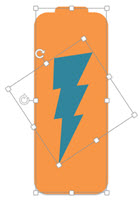
Shape 3 – select the battery shape, then the lightning bolt shape, use the Shape Merge SUBTRACT. Note: PowerPoint does some interesting things, in this example, the final shape is created visually in the correct orientation, but is actually rotated 326′.
– Troy @ TLC
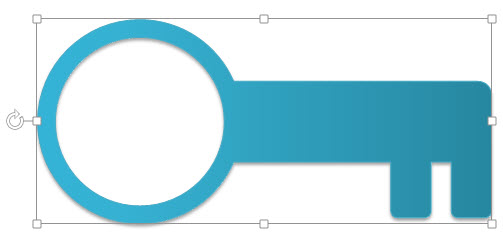
Using PowerPoint’s Shape Merge (2)
Part of the Shape Merge real-world, presentation design examples is a Key shape.
KEY
Goal is to create a single PowerPoint shape that can be stylized with different fill colors for an analogy slide of the 3 corporate program “keys.”
Shape(s) 1 – design the key using a circle and set of rectangles.
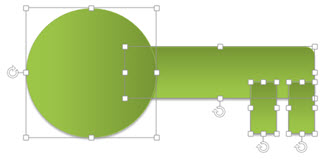
Select all shapes and use the UNION tool to create a single shape.
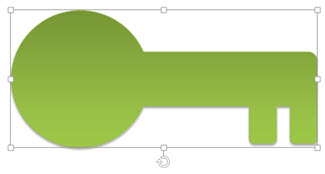
Create a new circle, size and position over the handle part of the key.
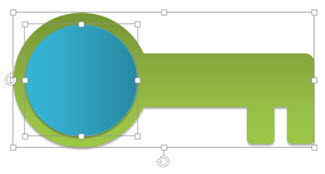
Select the key 1st, then the circle and use the SUBTRACT tool to create the final, single shape Key (shadow added, fill changed).
– Troy @ TLC
Using PowerPoint’s Shape Merge (1)
Christie was tasked with creating a 3-part blog series of creative, real-world, presentation design examples using PowerPoint’s Shape Merge tools (see this post on the Shape Merge Tools).
TARGET
Goal is to create a single PowerPoint shape with the concentric circles of a classic bullseye target. Note: With the Shape Merge tools, the first selected shape will make a difference in which item will be removed.
Shape 1
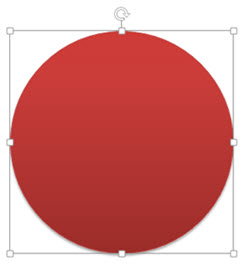
Shape styling – gradient fill:

Shape(s) 2: series of 4 circles with thick outlines (color does not matter).
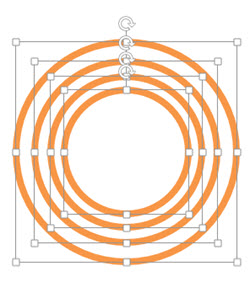
Move Shape 1 (red circle) under Shape 2 and align all:
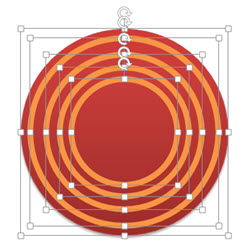
Select shapes (this is important – select Red circle 1st) and the Shape Merge COMBINE tool:
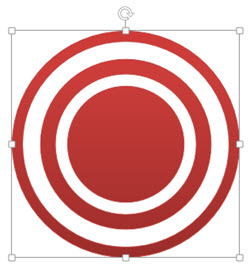
Final touches – bevel, gradient fill, shadow or any other effect styling can be applied to this new SINGLE SHAPE (I added the gradient fill in the original shape, but added a drop shadow after):

– Troy @ TLC
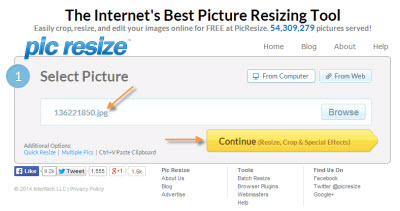
Using Pic Resize to Optimize Images for PowerPoint
Pic Resize is a very useful tool to resize and edit images that are larger than needed. This website offers a quick and easy-to-use method to optimize a large image so that it fits your needs.
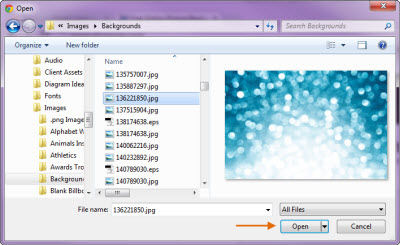
To get started, make sure you have selected From Computer to choose an image on your computer to resize. Click Browse to locate the image on your computer, select the image desired and click Open.
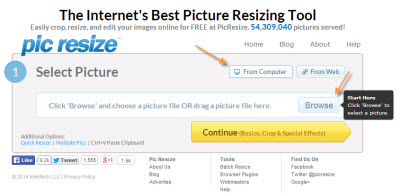
Once you have selected the image, click the Continue (Resize, Crop & Special Effects) button.
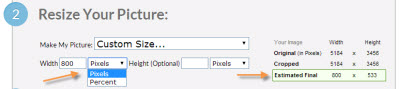
On the top portion of the next page, you can crop or rotate your image, if needed. Continue on to the second section to resize your image. The website defaults to resizing the image to 50% of the original size. If you need a different size, click on the drop down menu and select another preset percentage or resolution. You can also select Custom Size… to enter in the dimensions of your choice.

To optimize this image for use within PowerPoint, I will resize this image to 800 pixels wide. By leaving the Height field empty, Pic Resize will automatically keep the image proportionate by determining the correct height value. You can also select a custom percentage of the original image by selecting Percent from the drop down image next to the Width or Height fields. The new dimensions of the image can be found on the right next to Estimated Final, which will be highlighted in green.
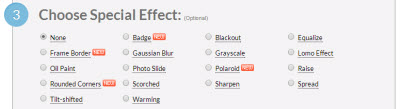
In the next section, you can select one of many special effects to enhance the image, if desired. Some of these special effects include Oil Paint, Scorched, Grayscale, and Sharpen, which can be seen below.

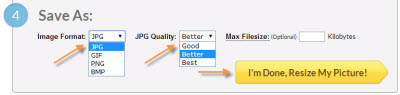
In the last step, you will select the format, quality (if JPEG) and maximum file size (optional) to save your image as. The original format of the image will be automatically populated but JPEG, GIF, PNG, and BMP are all supported. PNG images with alpha transparency are supported, so transparency will be maintained if resized. If resizing to a JPG as the format, you can also select the quality of the image being saved.
Once you have selected the format and quality, click the I’m Done, Resize My Picture! button. When successfully resized, you can select View Image to preview, Resume Edit to continue editing, Save to Disk to save onto your computer, or Save to Web to upload the image onto a social media website of your choice. For this instance, we would save the image to the desired location by clicking Save to Disk.
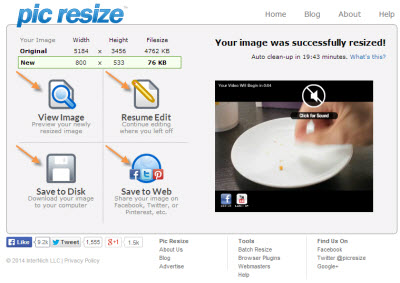
Once saved, you now have an optimized version of your image that can be easily used within PowerPoint. Below, you can see the new, optimized image, which was resized from 5184 x 3456 pixels down to 800 x 533 pixels.

– Troy @ TLC