The PowerPoint® Blog

I work with PowerPoint on a daily basis and I am very honored to be a Microsoft PowerPoint MVP. We have a talented team of presentation designers at TLC Creative Services and ThePowerPointBlog is our area to highlight PowerPoint tips, tricks, examples and tutorials. Enjoy! Troy Chollar

Let’s Talk Canva

Yes, I could spend the next several weeks showing more of the really cool Morph demo files everyone on the TLC Creative design team has created. But tomorrow is the release of the next Presentation Podcast episode, and advance sneak peak, we are talking about Canva presentations. 

So, for the rest of the month I am switching topics and focused on Canva – specifically creating presentations in Canva. Get the link tomorrow to hear Troy, Sandy and Nolan have a presentation design studio conversation about creating presentations in Canva!

Troy @ TLC

By |2019-06-12T08:12:15-07:00June 17th, 2019|Resource/Misc|

ThinkStock Closing

This week I received this email in my in box. TLC Creative is not currently leveraging a Thinkstock annual subscription, but we have in the past. Thinkstock, a Getty Images, offering has been a major offering of stock photography in the design industry for a number of years. This could be another sign of a major shift in the stock image/footage/audio industry when major names are shuttering some established brands while many smaller offerings are being merged into larger ones.

Troy @ TLC

By |2019-06-12T08:10:15-07:00June 14th, 2019|Resource/Misc|

Forcing Morph To Move The Right Shape

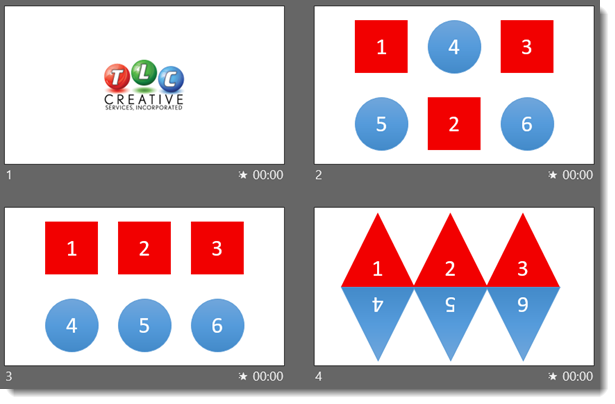
This is Part 2 of this tutorial (see Part 1 here). This is the same 4 slide deck with the exact same Morph transitions applied:

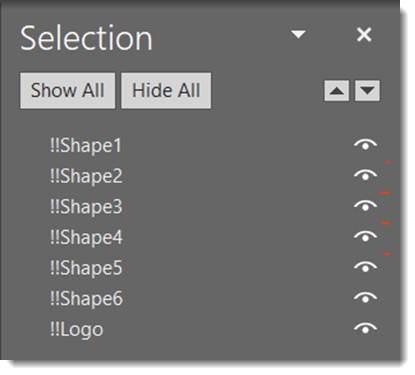
The critical difference is I went in and named each of the 6 shapes in the Selection Pane. This is the new Morph Object Tagging feature – it allows us to force associations of objects across slides, which forces Morph to transform exactly the objects we choose.

The behind the scenes coding (as I understand it) is a really clever hack by the Microsoft team. Each object (photo, shape, vector graphic, text box) is assigned a unique ID number, something we as a user cannot control, and is separate from the Selection Pane naming. Each slide, even with the same objects, is reassigned ID numbers, so there is not a guarantee of association from slide to slide. The Morph Object Tagging steps in as the slide transition starts, reading the Selection Pane names for each object. Then reads the Selection Pane names of objects on the next slide. If the objects start with a double exclamation mark “!!” and have the same name, Morph overrides the PowerPoint ID number and associated those two objects – a fantastic hack for everyone to take advantage of! 

Slides 1-2; the logo and shapes go to the expected locations, with or without Morph Object Tags applied (see Part 1).

slides 2-3: All of the shapes rearranged themselves with Morph, again with or without Object Tags applied (which as a good surprise).

slides 3-4: without Object Tags, there was no motion and a legacy Fade Off/Fade On effect which really was not the desired motion. With Object Tags applied, the Morph transition works perfect!

[KGVID]https://thepowerpointblog.com/wp-content/uploads/2019/06/unnamed-file-5.mp4[/KGVID]

Troy @ TLC

By |2019-10-28T15:33:28-07:00June 12th, 2019|Tutorial|

Morph Does Not Move the Right Shape!

We love the Morph transition. Animation is so fast and so easy to setup! But there is no control over what morph does. Usually this is not a problem and the motion effect works well enough. But sometimes it really is not working and it is frustrating! This is a 2 part tutorial. Part 1, this post, walks through morph not working, and there is no fix without the new Object Tagging feature. Part 2, the next post, updates the exact same slides with Morph Object Tagging and what was not possible works as expected!

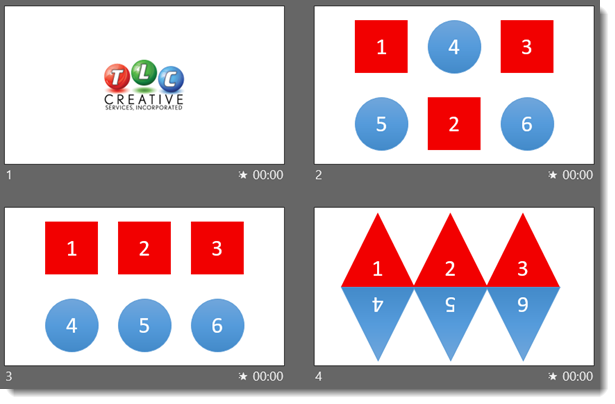
Here is the sample slide deck, 4 slides with PowerPoint shapes (okay, slide 1 is our logo). No animation is used on the slides, just Morph.
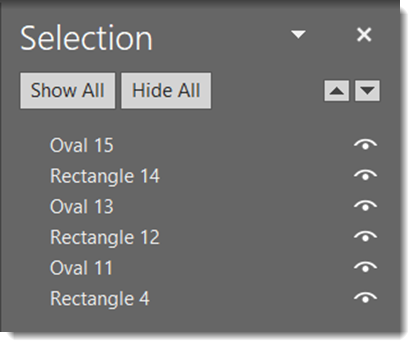
Object names: open the Selection Pane and we see the PowerPoint auto assigned names. Note: Morph really does not care what these names are as each object has a code ID number. But the Selection Pane naming plays an important role in some clever coding by the Microsoft team – explained in the next post.
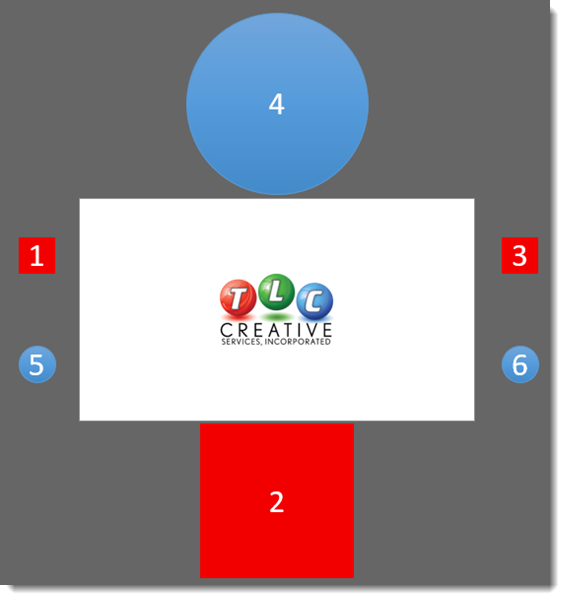
Slide 1 to 2, the motion animation is because on slide 1 all the shapes are ready for Morph to use by being positioned off the visible area.
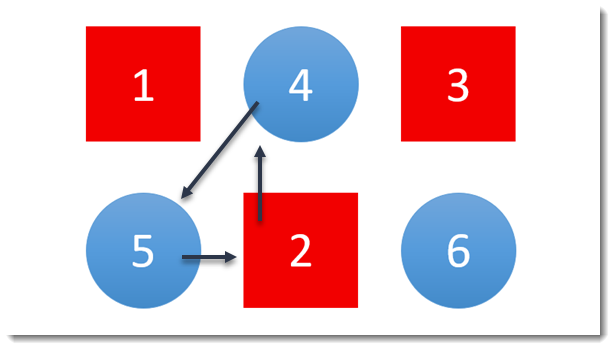
slides 2-3 work just fine. The goal is to move the shapes into numerical order, and Morph does a perfect job of keeping track of the shapes and moving their were we want (note: I actually had expected this to be a problem for Morph).
slides 3-4 is a disaster. Each of the shapes was first changed to a triangle using Change Shape, and then repositioned and resized. Morph does not keep shapes associated when Change Shape is applied, so we get a very boring fade off/fade on effect.
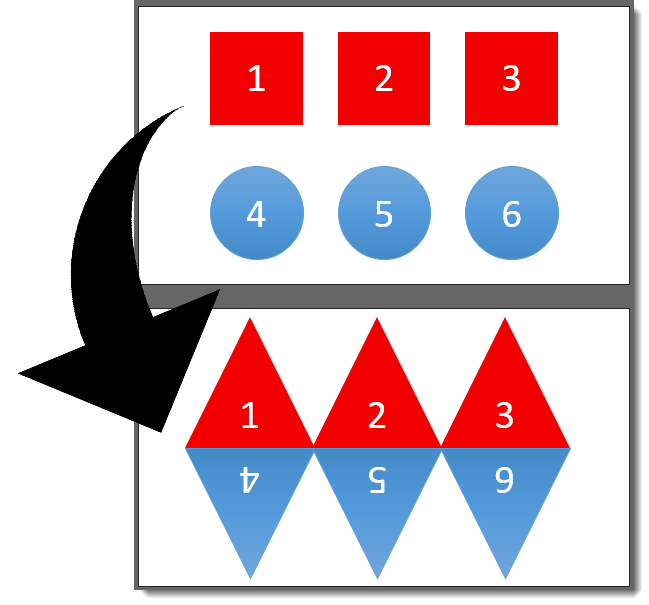
Here is everything in motion:

[KGVID]https://thepowerpointblog.com/wp-content/uploads/2019/06/unnamed-file-4.mp4[/KGVID]

Up next, the same slide deck and forcing Morph to do exactly what we want!

Troy @ TLC

By |2019-10-28T15:34:13-07:00June 10th, 2019|Tutorial|

Photo-to-Photo Morph Effect, with Object Tagging

In the previous post it was all about the frustration of not being able to morph one image to another image. Today is all about Morph’s new feature addition, Object Tagging, gives us a way to do this!

Same 3 slides. Same images. Same position and sizing. Same Morph transition applied to each slide. The difference is the 3 images have been given Object Tag names in the selection pane with a double exclamation “!!”.

The results this time, are exactly what was envisioned. The wolf photo grows and transforms into the scenery image, and the photo outline changes from blue to orange.

[KGVID]https://thepowerpointblog.com/wp-content/uploads/2019/06/unnamed-file-6.mp4[/KGVID]

Troy @ TLC


By |2019-10-28T15:35:14-07:00June 7th, 2019|Resource/Misc, Tutorial|

Photo-to-Photo Morph Effect, with No Tags

Here is a limitation of Morph, it cannot change 1 photo to another. This example demo’s that issue. Slide 2 has an image. The animation goal is to have the image on slide 2 move-grow-and morph into the image on slide 3. Without morph object tagging there is no way to accomplish this (okay, we can insert a shape, fill with image and on the second slide change the fill to the other image – but this is a lot of effort and not needed if you read the next blog post!)

Here is how the Morph effect fails and reverts to a fade transition like effect.

[KGVID]https://thepowerpointblog.com/wp-content/uploads/2019/06/unnamed-file-1.mp4[/KGVID]

Up next, the exact same slide set and how to force Morph to accomplish what we want!

Troy @ TLC
By |2019-10-28T10:12:34-07:00June 5th, 2019|PowerPoint, Tutorial|

The Presentation, Episode 79 – Writing for Presentations

A new episode of The Presentation Podcast with Troy, Nolan, Sandy and special guest Mort Milder is available today! Episode, #79 – Writing for Presentations (w/ Mort Milder). Listen in on Apple Podcasts, Stitcher, Google Play, Spotify and Soundcloud – just search for “The Presentation Podcast” – or go direct to the episode page here: https://thepresentationpodcast.com/podcast/79

By |2019-06-03T10:31:08-07:00June 4th, 2019|Resource/Misc|

Morph Using Object Tags vs. No Object Tags

Jake on the TLC Creative design team created this demo slide deck. The goal is to use a complex .svg vector art element and do all styling (color, size, position) directly in PowerPoint – mission accomplished. The second goal is to apply Morph transitions to create a session of seamless motion graphics:

Version 1:  No Morph, all legacy animation and fade transitions. This is also how the Morph enabled version will present on systems that do not support Morph (where Morph basically is replaced with fade transitions). For best results on this version, no movement or resizing of the molecule elements or connectors was done, just recoloring (which was accomplished direct using PowerPoint fills, outlines and gradients).

Version 2: Use Morph throughout. But just adding Morph transitions leads to some unexpected animation effects that cannot be controlled no matter how things are setup on the slide. The overall result is a sense of motion and the molecule changing, but there are several areas where the molecule is not visually connected with connector lines flying to different (wrong) molecule elements.

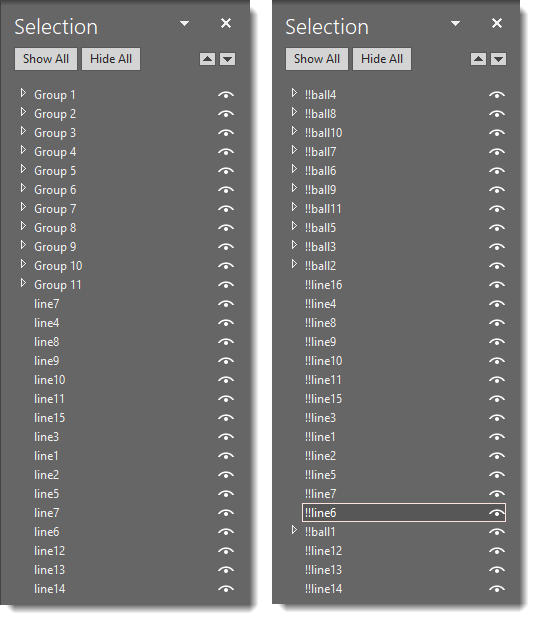
Version 3: Same Morph transitions, but taking time to add Object Tags (naming each art element in the Selection Pane) allows the designer to control Morph and force it so we know how exactly each object on the previous slide will animate and land on the following slide (see below image for Selection Pane comparison). YAY for the new Object Tagging feature to Morph!

[KGVID]https://thepowerpointblog.com/wp-content/uploads/2019/06/unnamed-file-7.mp4[/KGVID]

Left = version 1 & 2 selection pane with PowerPoint automated naming (which changes from slide to slide). Right = version 3 selection pane with each object named in the selection pane using the “Object Tagging” double exclamation “!!” (object names stay the same from slide to slide).

Troy @ TLC

By |2019-10-28T15:36:49-07:00June 3rd, 2019|PowerPoint|

Morph Object Tagging Is Here!

There is so much great motion effects that the Morph transition can create – and with PowerPoint’s recent update to include the “Morph Object Tagging” feature, I decided a blog post series of some new Morph tutorials and examples was needed. Check back over the next few weeks for lots of fantastic PowerPoint Morph content!

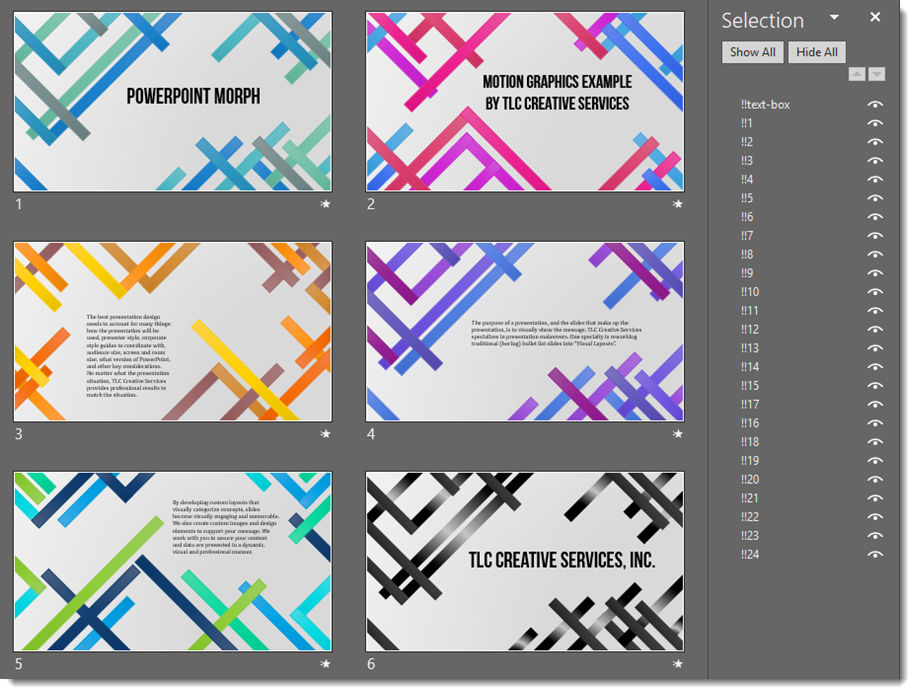
To get things started, here is a demo file one of the TLC Creative Design Team created. The only animation (aside from slide 1) is adding a Morph transition to each slide.

[KGVID width=”596″ height=”334″]https://thepowerpointblog.com/wp-content/uploads/2019/06/unnamed-file-8.mp4[/KGVID]

Only 6 slides and 0 animations

Troy @ TLC

By |2019-10-28T15:37:34-07:00June 1st, 2019|PowerPoint|

Making The Memorial Day 2019 Video in PowerPoint

To create the Memorial Day 2019 video was first about finding the art assets.

  • The US Flag was a vector art file downloaded from our Adobe Stock subscription. It was opened in Adobe Illustrator and saved as two art files; the flag with transparent “white” bands saved as an .svg, and the gradient white bands fills saved as an opaque .png.
  • The white bands gradient was saved as a .png so PowerPoint image transparency could be applied.

  • Next was searching our VideoBlocks.com account for the 4 videos.
  • Each was downloaded as .MP4 video files and in PowerPoint each was sized, cropped and duration trimmed.

Setting the animation on the slide was simple, but did require a few rounds of revision.

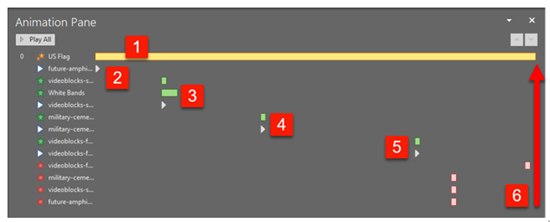
1 For an additional layer of motion, the U.S. flag has a very slow, horizontal only, scaling. This slow animation was used as the duration for the overall video.

2. The first video begins playback immediately.

3. The second video fades in, on top of the first video that is still playing (goal is no static pauses) and starts playback at the same time.

4. Like videos 2-3-4, the third video is set to fade in and start playing just before the end of the previous video.

5. The duration of the fourth video was set to match the U.S. flag emphasis animation.

6. All 4 videos fade out just before the U.S. flag animation completes, leaving a static U.S. flag with white bands, where the white is actually the slide background color.

Done! All layout, video compositing, animation timing and export completed in PowerPoint (note: video from PowerPoint exported at 1280×720, 30 FPS with audio channel. The exported video then brought into Adobe Media Encoder to render a blog friendly under 12MB version).

[KGVID]https://thepowerpointblog.com/wp-content/uploads/2019/05/unnamed-file-1.mp4[/KGVID]

Troy @ TLC

By |2019-11-12T14:43:04-08:00May 30th, 2019|Portfolio, PowerPoint, Tutorial|
Go to Top