Tutorial

Line Spacing and the Magic of F4

Here is our sample text.

To help visually cluster the information by the primary bullets we position the cursor on the second bullet and add additional spacing BEFORE PARAGRAPH of 0.5

Now to do the same for the third bullet we can either position the cursor on the third bullet line, open the Line Spacing dialog and enter the new distance OR we position the cursor on the third bullet line and click the F4 button!

F4 is a keyboard shortcut in PowerPoint that repeats whatever the last action was. In this case it automatically changes the BEFORE PARAGRAPH line spacing from 0.2 to 0.5, matching the bullet above!

-Troy @ TLC

By |2016-11-17T14:07:36-08:00July 24th, 2006|Tutorial|

What Does Line Spacing Do?

Here is a sample three lines of text and the default line spacing dialog.

If I select the entire text box and change the LINE SPACING all of the lines move further apart as you can see here.

If I place the cursor in line 2 and add BEFORE PARAGRAPH space, the distance between line 2 and line 1 increases. The distance between line 2 and 3 remains the same.

If instead I place the cursor on line 2 and add AFTER PARAGRAPH space, the distance between line 2 and 3 increases. While the distance between line 1 and 2 remains the same.

-Troy @ TLC

By |2016-11-17T14:07:17-08:00July 22nd, 2006|Tutorial|

Access Line Spacing Dialog

With your cursor positioned at the line to be adjusted, or with the entire text box selected (will globally change all lines in text box), go to FORMAT LINE SPACING.

This brings up the Line Spacing Dialog which has three settings that can be adjusted.

(1) Adjusts the distance between the lines of a paragraph.
(2) Adjusts the distance between the start of this paragraph and the one above it (separated by a hard return).
(3) Adjusts the distance between the last line of this paragraph and the one below it (separated by a hard return).

-Troy @ TLC

By |2016-11-17T14:06:58-08:00July 20th, 2006|Tutorial|

Use Line Spacing to Increase Legibility

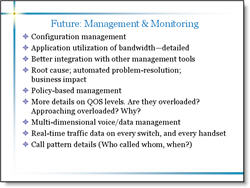
Here is a sample from a recent project (logos, names and telling content have been removed to protect the design challenged). Here is the original slide:

Here is the revised slide:

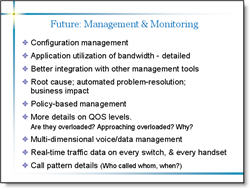
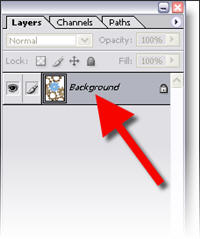
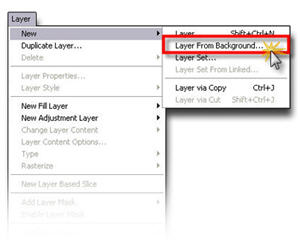
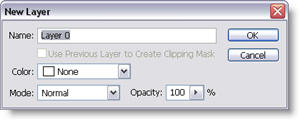
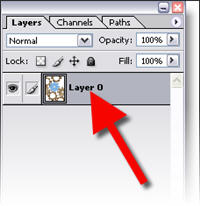
I was somewhat limited in what could be done. Things like the template could not be altered, content could not be edited, etc. But here are some details of what was adjusted:

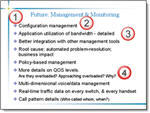
(1) I adjusted the template so the content text box was separated a bit more from the header text.
(2) I changed the font to a more legible Arial, which does not have the serifs (small ‘hooks’ on the end of the letters)
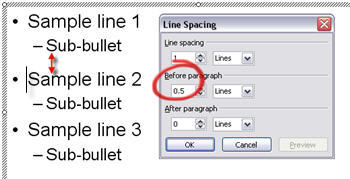
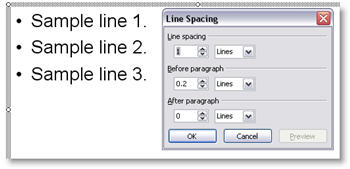
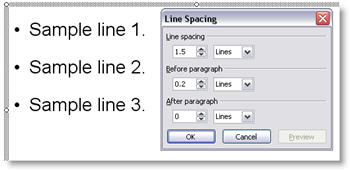
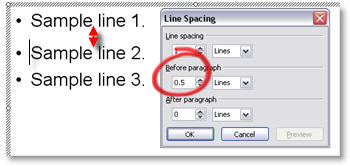
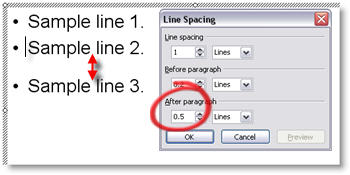
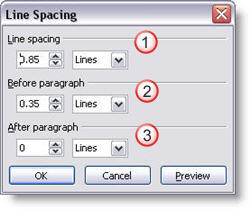
(3) I adjusted the overall line spacing from 0 to .35, this gives a bit of room between each bullet and allows the brain to “clump” the content into sections – which makes it more legible.
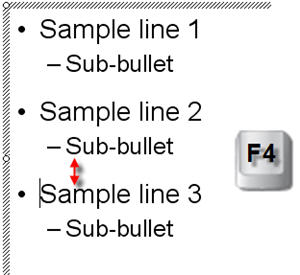
(4) Used a soft return (SHIFT RETURN) and made sub-content on its own line and reduced its font size. Did the same with the sub-content at the end of the last bullet.

There is a lot of small things that can be done to text heavy slides to make them more legible. The problem is that this usually involves modifying the content on a slide-by-slide basis, which can be time consuming. But the results are an audience the is able to understand your message clearer!

Troy @ TLC

By |2016-11-17T14:06:38-08:00July 18th, 2006|Portfolio, Tutorial|

Background vs. Layer in Photoshop

You are trying to remove the background from an image in Photoshop but when you hit the delete key it fills the selection with a solid color. This is an easy oversight, and even easier to correct. Most likely your image is set to a single merged/flattened layer. In Photoshop:
○ Open the layers palette by going to WINDOWS >> LAYER
○ Look at your image layer. It will either say BACKGROUND, LAYER 0 or another name. We are only concerned if it says “background.”

○ Either double-click the layer or go to LAYER >> NEW >> LAYER FROM BACKGROUND

○ Optionally name the layer in the New Layer dialog, click OKAY

○ Now in the layers palette the “background” has been replaced with “Layer 0” or the name you set. Make a selection, hit delete and the transparency checker board will be all that remains.

Troy @ TLC

By |2016-11-17T14:06:00-08:00July 14th, 2006|Tutorial|

Online Movie Tutorial : Remove Image Background in PhotoShop

In this screen capture tutorial I go through the process of exporting an image from a presentation, opening it in PhotoShop, removing the background, properly saving it with transparency and then inserting back into the presentation.

This is a 4 minute narrated online movie – because seeing a real demonstration saves hours of frustration! To view click here.

– Troy @ TLC

By |2016-11-17T14:05:43-08:00July 12th, 2006|Tutorial|

Make Your Images RGB in Photoshop

When creating or editing an image in PhotoShop – be sure it is set to RGB. I recently encountered a situation with a clients files that was perplexing (aka: extremely frustrating). They were scanning photos at a print resolution (300 dpi and very large) and also as CMYK images. I figured out their problem, corrected the images in the current presentation and gave them a scanning tutorial so future efforts will work better.

For any images you will be using in a PowerPoint presentation, make sure your images being edited in Photoshop, or any image editor, are set to RGB. In Photoshop:

○ Check the top information bar of your image to see what color mode it is currently set to. Common mode are RGB, CMYK and INDEX

○ To change your image to RGB go to IMAGE >> MODE >> RGB

Done.
You now know your image is compatible with PowerPoint and one potential conflict/problem has been eliminated!

Troy @ TLC

By |2016-11-17T14:05:22-08:00July 10th, 2006|Tutorial|

3D Spheres from AutoShapes

I create a lot of graphic elements for presentations and since the inception of PPT XP I have been able to do many directly in PowerPoint with some creative use of AutoShapes and transparency settings. PPT MVP Shawn Toh has posted a sample presentation with some really great 3D spheres at Indezine.

Here is one of the spheres created entirely with autoshapes:
One of the 3D Spheres in the Presentation
Here are the autshapes used to create the above 3D spere:
Autoshapes used to create the 3D Sphere

Here is the description and download link on Indezine, click here.

Troy @ TLC

By |2016-11-17T14:05:00-08:00July 8th, 2006|Resource/Misc, Tutorial|

PPT Keyboard Shortcuts

There are lots of great ways to work faster in PowerPoint (and all Office applications for that matter). Most everyone knows the basic keyboard shortcuts; copy, paste, duplicate slide, etc. But how about moving through action panes (F6) or move one word (Ctrl + Right Arrow).

Here is a reference this page on Microsoft for the complete listing of keyboard shortcuts, click here.

Troy @ TLC

By |2016-11-17T14:04:41-08:00July 6th, 2006|Resource/Misc, Tutorial|
Go to Top