Tutorial

Check For, and Turn on, Extended Desktop

If you want to use PowerPoint’s Presenter View, or display the presentation through a projector while having slide design view or slide sorter view on your monitor, the computer must support Extended Desktop.

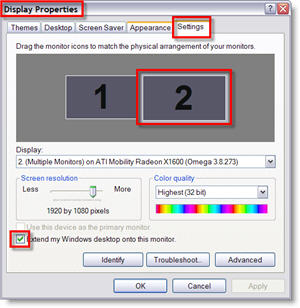
To see if your computer supports extended desktop go to: START >> CONTROL PANEL >> DISPLAYS >> SETTINGS tab. If you have two monitor icons, you should be good to go.

Click on monitor 2 and then activate the “extend my windows desktop onto this monitor.”

– Troy @ TLC

By |2016-11-17T14:24:43-08:00October 1st, 2006|Tutorial|

Animated Frame Entrance

Using native PowerPoint elements and animations, add a dynamic entrance to photos.

1. Insert a photo, or other graphic, to a slide.

2. Add a Line Color (aka stroke) to the photo. Use a color that coordinates with the image or background and is thick enough to be visible (sample here is 2 1/4pt.).

3. Now add a rectangle autoshape. Size it to be slightly larger than the photo and set the Fill to none. Add the same Line Color and weight as applied to the photo.

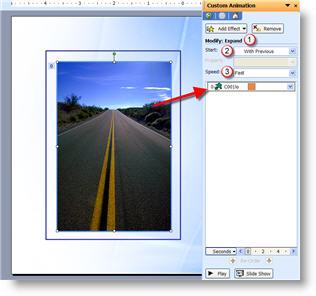
4. Animate the photo: EXPAND, FAST, WITH PREVIOUS

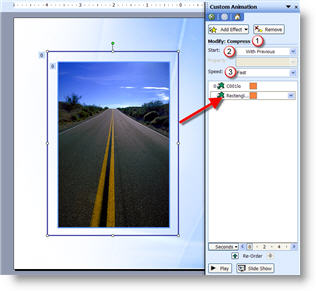
5. Animate the frame: COMPRESS, FAST, WITH PREVIOUS

Done! I have also uploaded a sample presentation of this animated slide. Click here to download.

Troy @ TLC

By |2016-11-17T14:23:58-08:00September 27th, 2006|Tutorial|

Make the “Hidden” Marker Disappear

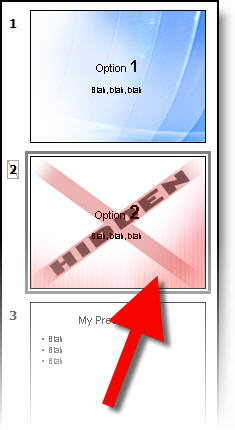
So you designed a presentation using a ‘hidden’ graphic to identify the hidden slides during review. Then during the show you manually enter the slide number to show the hidden slide. Now the audience sees the slide AND the full slide ‘hidden’ graphic – oops.

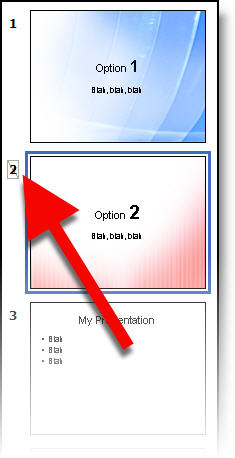
In this case all can work out with a little custom animation. Here is our example slide:

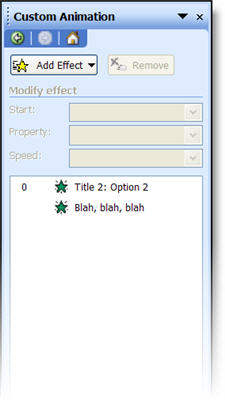
The animation for this slide has both lines of text with animated entrances:

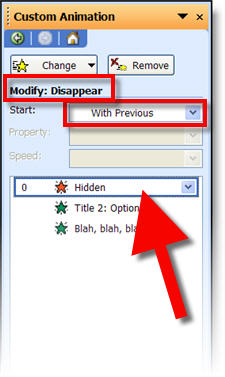
The solution is first to apply an Exit animation to the hidden image. I use EXIT >> DISAPPEAR >> WITH PREVIOUS.
The second step is to make this the first animation in the sequence.

Now you have added a custom graphic that makes it easy to identify which slides are hidden – in slide sorter and printouts. The slide can also be used during a presentation, because the hidden graphic is never shown in slide show mode!

– Troy @ TLC

By |2016-11-17T14:22:27-08:00September 19th, 2006|Tutorial|

Show A Hidden Slide During A Presentation

A hidden slide does not show up during a slide show – unless the slide is manually brought up.

If slide 3 contains optional information that you have hidden, it can be show by typing “3” + “ENTER.” This brings up the hidden slide #3 for your presentation.

– Troy @ TLC

By |2016-11-17T14:21:15-08:00September 15th, 2006|Tutorial|

Make a Hidden Slide Seen

The ‘hidden slide’ feature is great. It can be used to design a master presentation that contains a couple of versions of key slides – just hide the ones that do not apply to that audience. Or you want to edit a slide, but keep the original for that ‘just in case’ scenario.

No matter what the use, the one constant is that it is difficult to identify which slides are hidden. You have to look for the small hash mark here:

Not only is small, put the is no way to identify hidden slides on a printout. This poses a large problem when supplying printouts to clients for review. What I have done is create a semi-transparent, slide-sized “hidden” graphic in PhotoShop that is inserted on hidden slides. Easy to see in the slide sorter and very obvious in printouts.

– Troy @ TLC

By |2016-11-17T14:20:53-08:00September 13th, 2006|Tutorial|

What is the File Name of that Image?

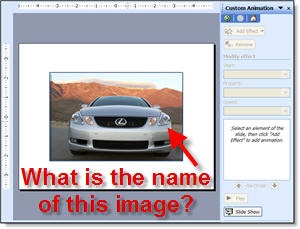
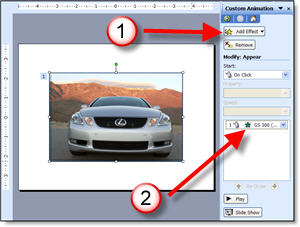
You carefully label all of the layers and saved out images from Photoshop with descriptive names. But once imported into PowerPoint you lose all reference to what image it is… Take this example:

You have a dozen very similiar images in the presentation, but you need to verify what model this one is. Is it a 300, 350, 430… You know the file name says exactly what it is, but where is the file name to be found?

If you have an animation applied, open the CUSTOM ANIMATION PANE, click on the image and reference the animation, it contains the file name! If you do not have an animation applied – temporarily apply one so you can read the info. Here I quickly applied the first animation in my list, APPEAR. Now I can read the file name, verify what model vehicle it is, delete the animation and move on.

Note: Hovering over the animation will let the pop-up info appear, which is helpful for reading long file names that become cut off in the animation bar.

– Troy @ TLC

By |2016-11-17T14:19:35-08:00September 5th, 2006|Tutorial|

Use PowerPoint Presenter View

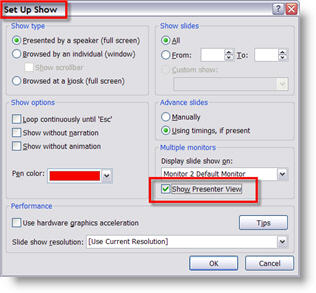
After activating Extended Desktop (Oct. 1 post) and setting up PowerPoint to display the presentation on the secondary monitor (Oct. 3 post), you have the option of displaying the Presenter View on your local monitor.

In PowerPoint go to: SLIDE SHOW >> SET UP SHOW. In the Multiple Monitors section check “Show Presenter View.”

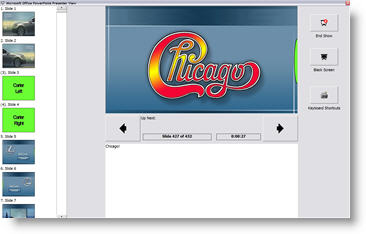
When you go into show mode your computer will display this view:

– Troy @ TLC

By |2016-11-17T14:19:16-08:00September 5th, 2006|Tutorial|

Pro’s and Con’s of Webcast Formats

I have been doing a lot of webcast projects lately. Most involve syncing a PowerPoint presentation with video of the presenter. One client’s IT department needed more information to determine which format fit their needs best so I provided this quick run down on the pro’s and con’s of the formats we were discussing:

Flash Legacy (.swf)
Pro: This format is virtually guaranteed to work on all computers, through firewall settings and has an install rating of over 98% of all computers worldwide.
Con: It is not optimized for live video, so it produces larger files and does not stream as well as an .flv

Flash Video/Flash 8 (.flv)
Pro: This format is optimized specifically for video. It produces good size files and streams extremely well (even if file is larger than a .swf it streams much smoother and faster).
Con: Still requires many computers to do the free upgrade, which is permitted through most corporate firewall systems (although it can be problematic in a tightly controlled corporate IT setting).

Windows Media Video (.wmv)
Pro: Optimized to playback on Windows PCs and now works on all Macs that have the Flip4Mac QuickTime add-in (included in a free auto update, so installed on majority of Mac systems). Can be embedded in webpage or forced to launch player application on computer.
Con: Larger file sizes than .flv (similar to .swf), fewer pre-load options (eg: a status bar before playing).

All of this is very simplified information, but it provides a quick overview of some common formats. Stay tuned for a very detailed set of posts on Streaming Media formats I have been working on.

– Troy @ TLC

By |2016-11-17T14:15:05-08:00September 1st, 2006|Resource/Misc, Tutorial|

Find the RECOLOR button

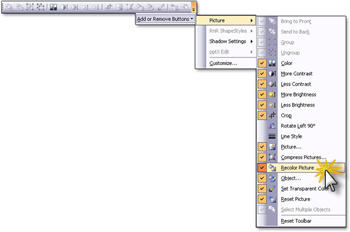
I like to setup PowerPoint so I can get edit accomplished in the fewest clicks. If you find a need to use the RECOLOR function (see Saturday’s post), you can add the RECOLOR button to your PICTURE toolbar.

Click the far right edge of the picture toolbar, choose ADD OR REMOVE BUTTONS >> PICTURE >> RECOLOR PICTURE. Now select the Excel table (that does not have data with it), click the recolor button, adjust colors, done.

– Troy @ TLC

By |2016-11-17T14:14:47-08:00August 30th, 2006|Tutorial|
Go to Top