Tutorial

Add Custom Bullets to a Presentation

Now that we have developed our custom picture bullet in PhotoShop, we can insert them into a PowerPoint presentation. The process is fairly simple (Note: I am using PowerPoint 2003 for this tutorial).

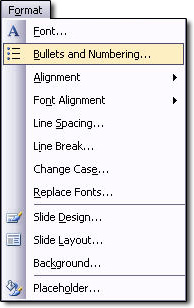
(1) Select the bulleted text. Go to FORMAT >> BULLETS AND NUMBERING.
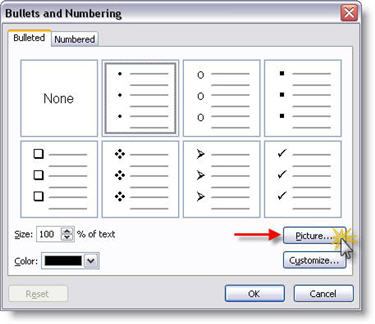
(2) From the BULLETS AND NUMBERING dialog click PICTURE.
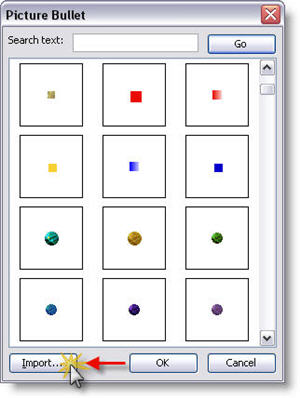
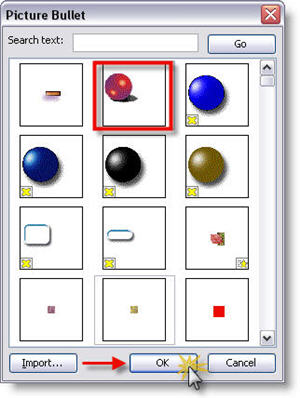
(3) From the PICTURE BULLET dialog click IMPORT.
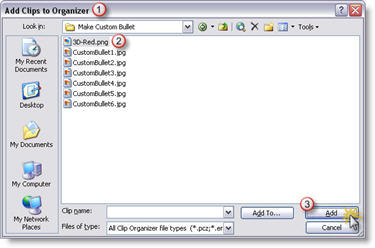
(4) Note the next dialog box is the ADD CLIPS TO ORGANIZOR dialog (import later in this series). From here find the .png image created and click ADD.
(5) Find the newly added picture bullet in the PICTURE BULLET dialog and click OK.
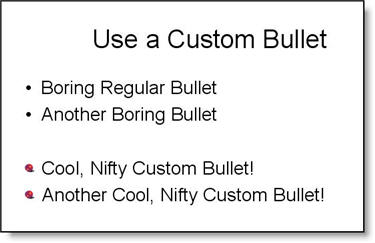
(6) Your selected bulleted text now has a COOL and NIFTY custom bullet!
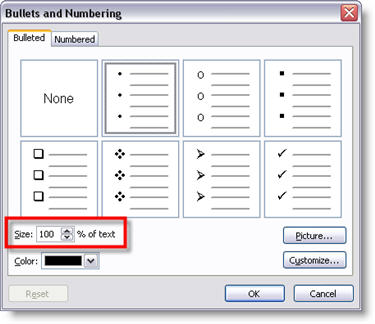
(7) If the bullet is to large or small, select the bulleted text, go to FORMAT >> BULLETS AND NUMBERING, and use the SIZE % OF TEXT to adjust.
– Troy @ TLC
By |2016-09-16T11:51:43-07:00May 4th, 2006|Tutorial|

Create a Custom PowerPoint Bullet

This is the first in at least a 4 part mini-series. Custom picture bullets were introduced with PowerPoint XP and they make a great addition to any presentation! I use custom picture bullets in many ways, always with the idea of how can they coordinate with the overall presentation. My custom bullets have ranged from simple color coordinated stylized shapes, to miniatures of the company logo, to small object icons that relate to the subject.

The first step is developing the artwork for the custom bullet. Note: I am using PhotoShop CS for this tutorial, but the process can be applied to virtually any image editing application.

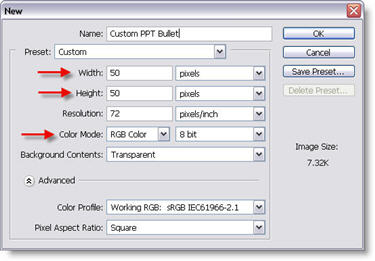
(1) Create a new document. Note the file size is very small and we ALWAYS use RGB for PowerPoint images.
New PhotoShop File

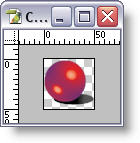
(2) Create your bullet artwork, sized to stay within the 50x50px area. I am creating a simple 3D sphere with a drop shadow.
Artwork for custom bullet

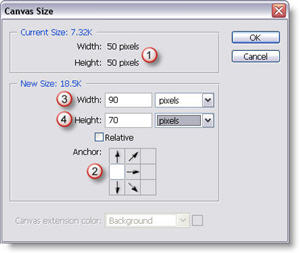
(3) Go to IMAGE >> CANVAS SIZE. Here we are going to increase the canvas size so the final image will have our bullet artwork horizontally on the far left and centered vertically.
Adjust Canvas Size
1. This is our original file size
2. Use this setting to force the new canvas area to keep the artwork on the far left, but allow it to be vertically centered.
3. Increase the width to 90px, this will provide a space between our bullet and the PowerPoint text.
4. Increase the height to 70px, this will vertically center our bullet on the PowerPoint text.

(4) The final step is to save the image as a .png with transparency (see “The Power of Ping” tutorial here for details).

– Troy @ TLC

By |2016-09-16T11:50:53-07:00May 2nd, 2006|Tutorial|

Adding Sounds To Interactive Elements

It is the fine details that make a project perfect. On a current project with lots of interactivity, includes mouse over / roll over sounds. Of course what is a good mouse over sound is somewhat subjective. To make communication easy I quickly created this mini-application that allowed the client to preview a selection of sounds, with the selected being added to the presentation. Click here to open, or download (500k).

Troy @ TLC

By |2016-09-16T11:47:21-07:00April 24th, 2006|Tutorial|

Circle and Triangle Shadow Boxes

The Shadow Box concept is not constrained to rectangles. I use variations of Shadow Boxes in every conceivable way, always with the goal of adding depth and visual dynamics to the slides. Here are two samples I created that use a circle and triangle.

Circle Shadow Box Applied
Here I duplicated the circle, removed the outline/stroke and went into the Fill Effects exactly the same as described in the previous post. But here I am using a color for the center and I manually distorted the circle to give it the cast shadow effect.

Pyramid Shadow Box
Here I duplicated the Pyramid, removed the outline/stroke and went into the fill effects. The difference is that I set the Shading Styles to be Horizontal so the gradient went from the top of the image to nothing at the bottom. I then really distorted the autoshape (extending it far beyond the boundary of the viewable slide) and positioned to create the drop shadow effect.

Troy @ TLC

By |2016-09-16T11:45:17-07:00April 22nd, 2006|Tutorial|

Create Shadow Boxes

A simple shadow element can add depth and eliminate some of the flat look and feel of a slide. In the last post I added a simple shadow box to a list box and a chart, here is how to create the shadow box – using PowerPoint autoshapes.

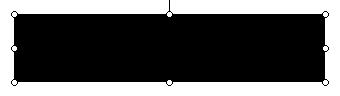
First create a rectangle. Set the fill to black and no outline/stroke.
PowerPoint rectangle autoshape

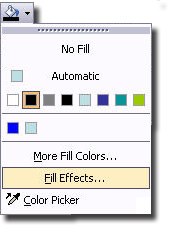
With the rectangle selected go to the Fill Effects.
Fill Effects

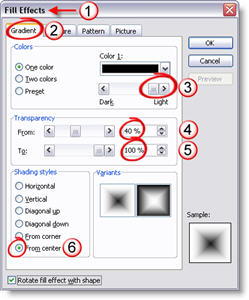
(1) In the Fill Effects window
(2) Go to the Gradient tab
(3) Move the slider all the way to the right/lighter
(4) Adjust the From opacity to 40%
(5) The To opacity should be at 100% (set when we moved the slider in #3)
(6) In the Shading Styles select From Center
Fill Effects Settings

Your rectangle will now look like this:
Smooth Gradient Filled Rectangle

The best thing about this rectangle is that it is a native PowerPoint autoshape. It can be adjusted as large or small as needed without any distortion or loss of quality. In addition you can go back into the Fill Effects and change the color and the inner opacity to best suite your slide!

Troy @ TLC

By |2016-09-16T11:44:50-07:00April 20th, 2006|Tutorial|

Visual Appeal to “Standard” Elements

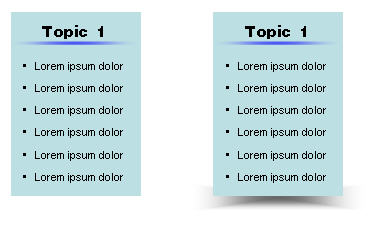
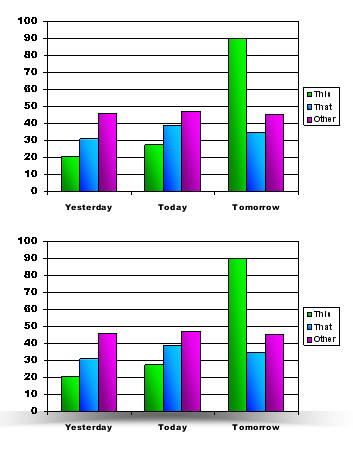
If you look at these two examples, there is only one difference between the “before and after” elements; the addition of a shadow box to add depth.

The wonderful thing about both of these is the shadow box element was created using native PowerPoint autoshapes. So in just a few clicks elements in your presentation can get a little extra pizzaz!

(Up next, how to create shadow boxes)

Troy @ TLC

By |2016-09-16T11:44:18-07:00April 18th, 2006|Portfolio, Tutorial|

What is an .M4A?

.MP3 and .Wav are audio file formats that PowerPoint recognizes. Another very common format is .M4A (audi-only version of an .MP4), and you have heard of even if you do not think so.

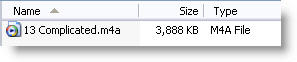
.M4A is the format of Apple iTunes music files. It is for the most part a higher quality file than an .mp3 and a smaller files size. Here is what an “M4A” looks like:
.M4A is an audio-only version of an .MP4

Unfortunately PowerPoint does not support the .M4A format, so if you download a song from iTunes it will need to be converted to another format (.mp3 or .wav).

-Troy @ TLC

By |2016-09-16T11:39:30-07:00April 6th, 2006|Tutorial|

What’s an “Ogg”?

.MP3 and .Wav are audio file formats. Another is .ogg, which is much common but with many .mp3 players supporting it you are likely to encounter one when developing a presentation at some point.

Vorbis is the group behind the .ogg format and it is for the most part a higher quality file than an .mp3. The Ogg Vorbis is a fully open, non-proprietary, patent-and-royalty-free, general-purpose compressed audio format for mid to high quality audio and music. Here is what an “ogg” looks like:

Unfortunately PowerPoint does not support the .ogg format, so if someone sends one to you for a presentation you will need to convert it to another format (.mp3 or .wav) in an audio editing application.

-Troy @ TLC

By |2016-09-16T11:38:38-07:00April 4th, 2006|Tutorial|

Making a Small .Wav

So, for maximum useability it great to embed multimedia into the presentation. PowerPoint allows the .wav audio format to embedded – great! But the .wav format makes the largest file size – bummer! The good news is, with a basic audio editing application you can dramatically reduce the size of your .wav files.

Here is my sample audio file; a huge 22MB!
Original .wav is 22MB!

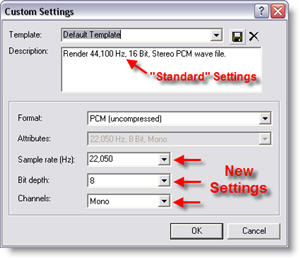
I opened the file in Sound Forge Studio, went to Save As, choose .wav as the format and then clicked on the ‘Customize’ button to further modify the settings. As you can see I:
– Reduced the SAMPLE RATE to 22,050 (from 44,100)
– Reduced the BIT DEPTH to 8 (from 16)
– Changed the CHANNELS to mono (from stereo)
Custom Settings for Presentation .Wav files

Needless to say, this is a lower quality audio track than the original. But most presentations are viewed with computer speakers, have no stereo recording attributes and act as an enhancement to the presentation – no one will notice 🙂

Here is the same audio file saved with the above settings – a mere 2MB!
Using optimized settings it is now 2MB

For comparison, here is what the same file looks like saved as a lower quality .MP3 (64k, 16 bit, stereo), but higher quality than our optimized .wav the .MP3 is only 1MB:
As a lower quality .MP3 it is only 1MB

You will need to find the balance between the benefits of larger – embedded audio and smaller linked audio to know which is better for your presentation. Best of luck!

-Troy @ TLC

By |2016-09-16T11:37:08-07:00April 2nd, 2006|Tutorial|

.Wav – The Exception To The Rule

As we know, multimedia files are linked to the PowerPoint presentation. The exception is the .wav audio file. This file can be embedded in the presentation!
Positive: It is a part of the presentation, so there are no links to worry about.
Negative: .wav is one of the largest audio file sizes, so the presentation gets much larger.

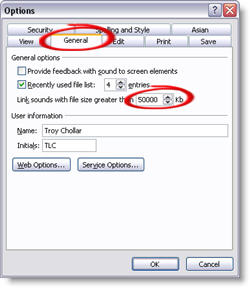
By default PowerPoint will embed a .wav file if it is under 100k – which is a very short audio file (1-5 seconds). You can increase the size PowerPoint will embed up to 50 MB. Go to: TOOLS >> OPTIONS >> GENERAL tab >> change the 100k to 50000k.

Update so .wav files up to 50MB can be embedded

Troy @ TLC

By |2016-09-16T11:36:40-07:00March 31st, 2006|Tutorial|
Go to Top