April is All About Other Software
Welcome to April! I have structured this month to focus on “other apps and software” because PowerPoint is not a silo, it is one tool in our toolbox.
Troy @ TLC

PowerPoint Presentation Translator Add-in
Microsoft has a secret garage where lots of amazing things are thought up, and few escape into the public realm. One recent Microsoft Garage app is the PRESENTATION TRANSLATOR. The add-in is really multiple parts; powered by the “Microsoft Translator Live Feature”, part PowerPoint add-in, part mobile app, and part 3-things-in-1, this add-in has a lot to offer a lot of different people.
At its core, the Presentation Translator is an add-in from Microsoft that is designed to help presenters communicate with audience members who speak a different language, or may be deaf/hard of hearing. It does slide translation as automatic narration, live subtitling, and interactive live translation using mobile devices. While not perfect, it is impressive, and fun to use.
To install you need to download direct from the Microsoft Garage webpage here (no Office Store install option yet).
Live subtitling, one of the key features, allows the presenter to speak in 1 of 10 spoken languages while the add-in creates real-time, live subtitles translated into one of more than 60 text translation languages. The customized speech recognition feature uses the slide content to learn your language, helping ensure proper translation.
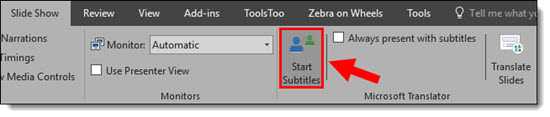
To start the live subtitles, go to the Slide Show tab and select Start Subtitles.
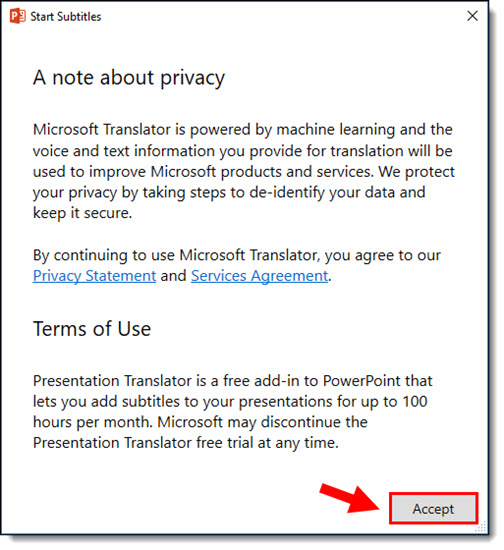
Click Accept to agree to the terms of use.
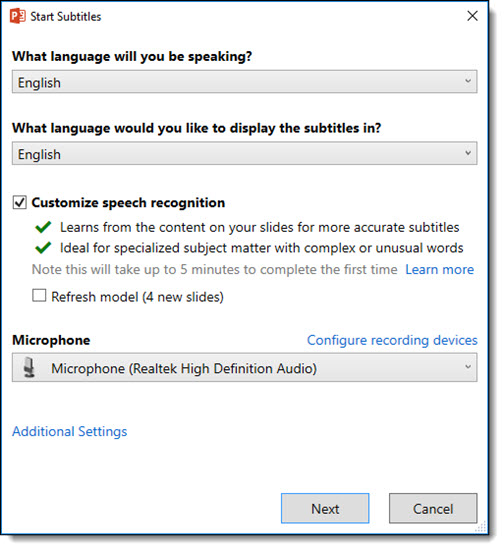
Walk through the overview by clicking Next until you reach the settings options. Select the speaking language and the subtitle display language. Check Customize speech recognition if you would like to use this feature, and select your microphone device.
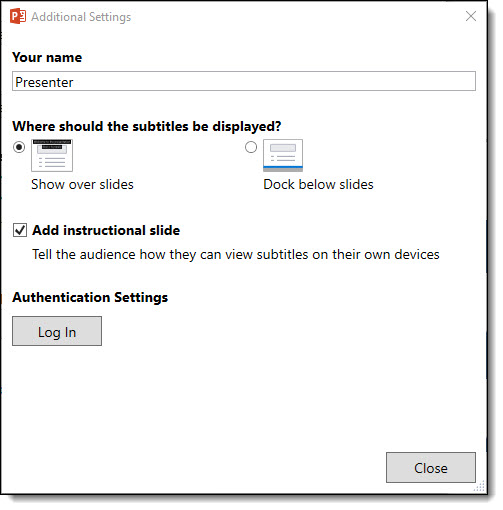
You can also enter a presenter name, select subtitle locations, log in for authentication settings, and turn on or off the optional instructional slide by clicking Additional settings. When finished with all settings, click Next. Once loaded, your presentation will begin and subtitles will appear in the location you selected.
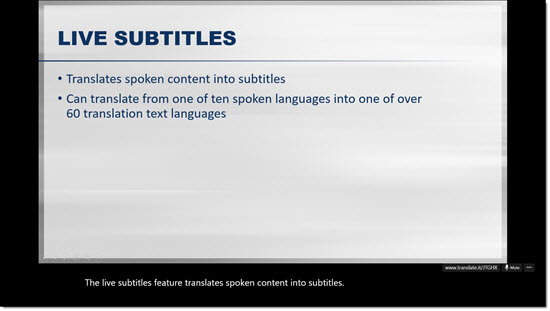
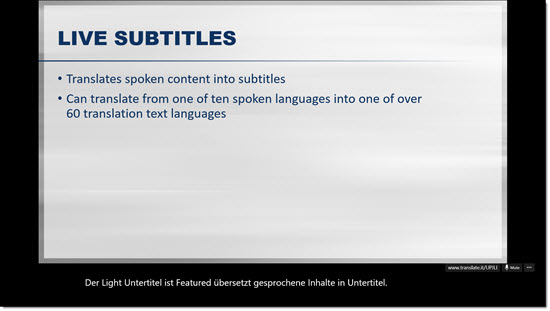
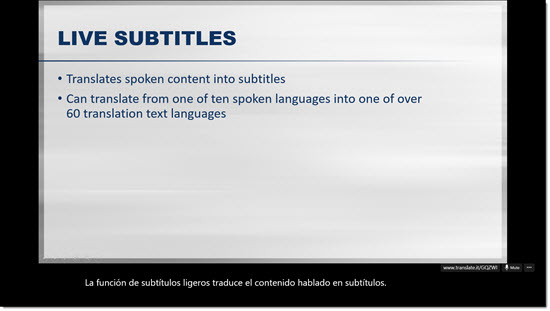
Here is one of our sample slides with the sentence “The Live Subtitles feature translates spoken content into subtitles” translated into English, French, German, and Spanish subtitles.

—
Personal Translation: Through the add-in and corresponding mobile app, the audience members can also use a custom code to access personal translations, allowing them to follow along and communicate in their own language. The add-in also translates audience questions during an unmuted Q&A. If the audience members don’t speak one of the ten spoken languages, they can use one of the 60+ text based languages. In turn, those who are deaf or hard of hearing can more easily follow along with the presentation.
To use this feature, you will need to download the Microsoft Translator app on your mobile device and follow instructions provided during the presentation.
—
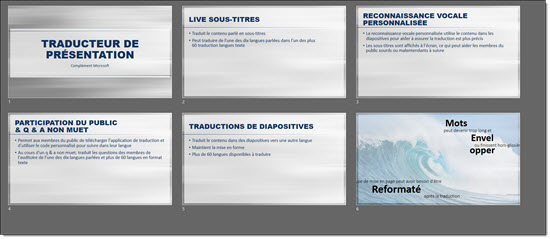
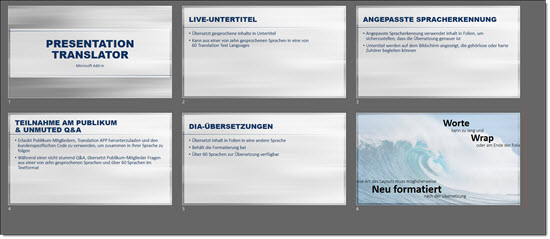
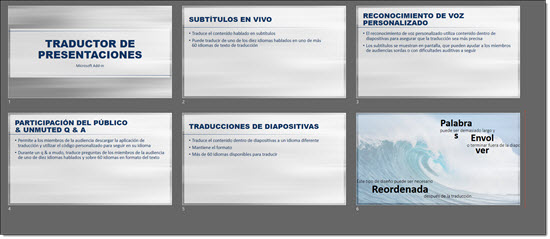
Presentation Content Translation: the add-in also offers a tool to translate an entire presentation, while still maintaining formatting. See our original example here, in English.

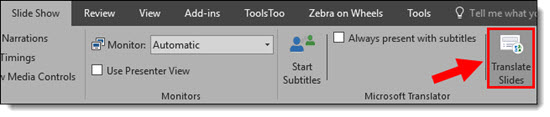
To translate the content, go to the Slide Show tab and select Translate Slides
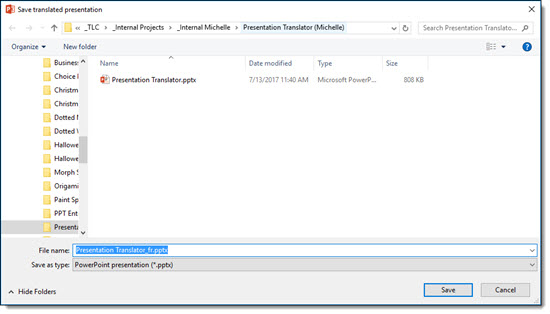
Select the current, slide language and the new language to translate to and click Translate Slides

Locate the folder you would like to save the translated version in, rename if desired, and click Save. Note the by default, an abbreviation of the new language is added to the end of the filename.
A new file will open with all content translated while still maintaining the original formatting. Here is our example after being translated to French, German and Spanish.
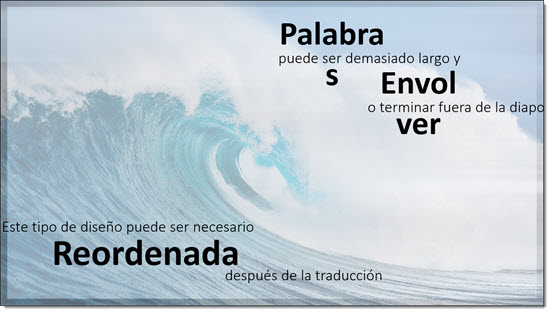
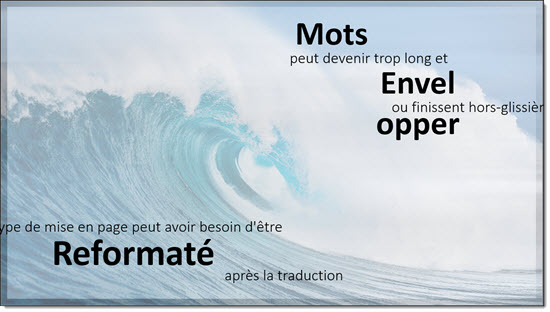
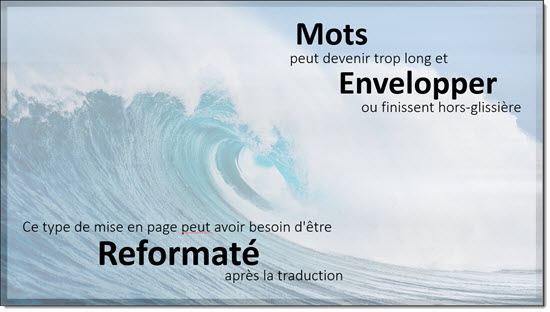
For some layouts, reformatting may be necessary to best display the translated content. For example, here is a slide that features large, stacked text of different sizes.
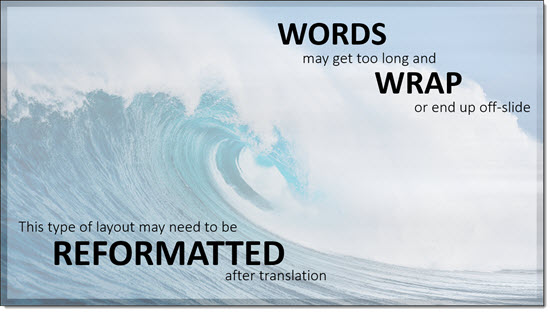
When translated into French, German or Spanish, the length of the words change and cause issues with the content fitting into the existing design. Notice that the word “wrap” may become two lines and some text ends up overlapping or off-slide.

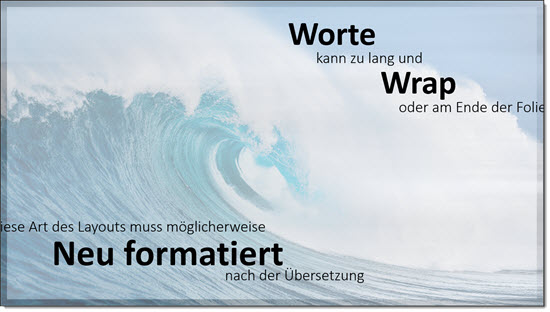
By resizing and moving text, most of these layouts can still function after translation. Here is our French slide before and then after fixing the formatting.
The slide content translation was the feature of most interest to me, and for a standard bullet list style presentation it does a good job. As the examples above show, for more stylized layouts, there is still a lot of layout revision needs. And, because I do not fluently speak or read any of the languages used, I cannot say how accurate the translated text really was. The world is becoming much smaller all the time, and the PowerPoint Translator add-in is making it happen sooner than later.
Troy @ TLC
Pro Word Cloud Generator Add-In
Word Clouds are images composed of words pertaining to a particular subject, in which the size of each word indicates its frequency and importance. They are a popular way to visualize a message and something we have integrated into many presentations.

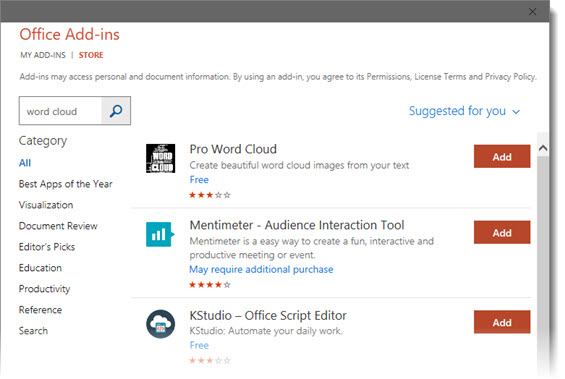
Pro Word Cloud is a Microsoft add-in that is free and can create world clouds with your custom text directly in PowerPoint. To install go to INSERT > STORE > search WORD CLOUD > and ADD the Pro Word Cloud add-in.
Installing the add-in gives direct access to a side pane to quickly and easily convert on-slide text to stylized word clouds directly from within PowerPoint itself. The action pane provides a nice selection of styling features, including; custom font, many preset color scheme options, word case and size.
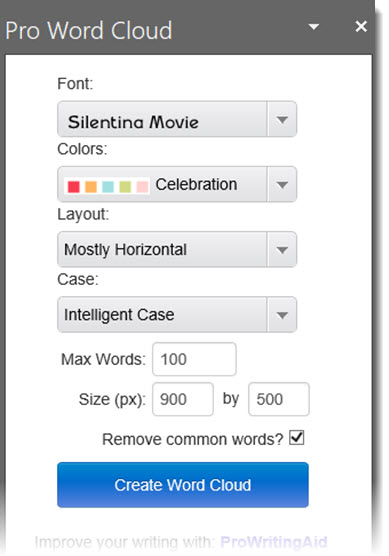
Creating a word cloud with Pro Word Cloud is not completely intuitive. First you need to add all of the words to a text box in PowerPoint. Then select all and copy, because the add-in uses the text copied to the clipboard, there is no text entry area in the app. In the Pro Word Cloud action pane, click CREATE WORD CLOUD. Now, right-click the small word cloud image and copy, then paste onto the slide.
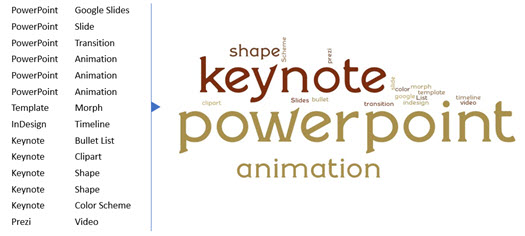
Here is my example, with text I copied on the left and the Word Cloud the add-in created on the right.
A few observations:
- Add-in does not use the PowerPoint template color scheme for the Word Cloud
- Available color options are limited to preset color schemes, with no custom color setup
- Use the size option to create a large enough word cloud image, I generally use 900x500px as the smallest size
- The Word Cloud is an inserted flat image, so no animation by word or editing options
- I recommend adding the word list to the presenter notes or to an off-slide text box to have available for any update needs
Troy @ TLC
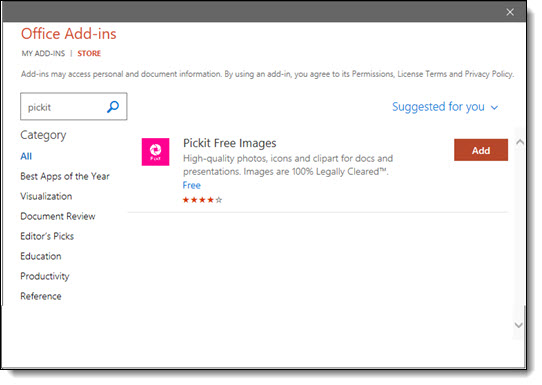
PickIt Image Add-In
Pickit is another image resource site, but it is uniquely focused on providing images for PowerPoint presentations. The home page boldly says “Legally Cleared images for people at work. Make your work stand out with unlimited access to royalty free photos and clipart in PowerPoint.”

To go with the PowerPoint (and Word) focus, Pickit has a Microsoft Store add-in that provides quick and convenient access to a large library of royalty-free and legally cleared™ images directly inside PowerPoint (and Word), meaning you can use them all without worrying about infringing on copyright laws.
To install the add-in go to INSERT > STORE > search for PICKIT > ADD.
Access the image library any time by clicking the PICKIT IMAGES button on PowerPoint HOME tab.
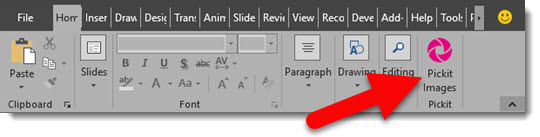
Open the Images action pane, search for any image, click INSERT, and the image is added to the current slide.

There is a free version that accesses the image library only from PowerPoint (no website access) and no HD resolution. The subscription is $1.99/month and makes all ad-free with unlimited app and web access, and access to HD resolution images.
Troy @ TLC
StockSnap – Free, and Royalty Free Images
StockSnap is a royalty free stock photography site that is worth bookmarking for presentation design.

All images on the website are FREE and do not require attribution, both great things for presentation designers to hear! Photographers choose to share their work with StockSnap and release them under Creative Commons, so they can be used for personal and commercial use. There is a variety of imagery, with categories from business to nature. 
Select an image and all the vital information regarding the photo is available; photographer, dimensions, size and relevant tags.
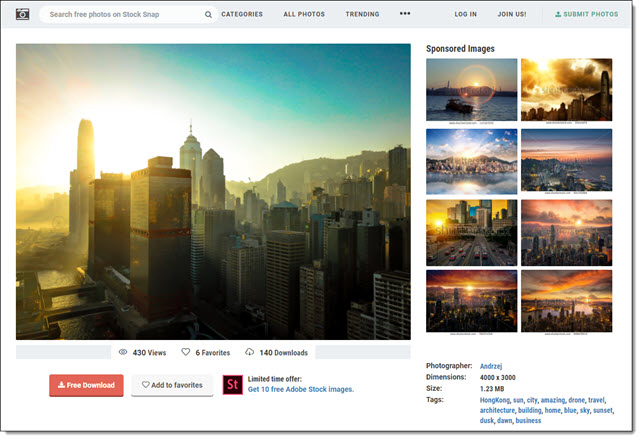
When searching images, the site will advertise some images with watermarks. These, and “sponsored images,” are from outside websites that are not included in the free StockSnap library. If your project needs a good, free, image resource, this is a perfect option to have available.
Troy @ TLC
PowerPointLabs Add-in for PowerPoint
We continue our March Blog Posts on PowerPoint Add-ins with PowerPointLabs. When we tested PowerPointLabs it was FREE, and full of features, many we have not seen in any other offering. I do recommend spending time going through the tutorial walk-through that is available after the add-in is installed.
PowerPointLabs is an entire ribbon, with a lot of good design, layout and styling features.

For this post I am just going through one of several styling options that stood out. The Picture Slides Lab tool automates making text stylized over an image (inserted image or background image). This feature is in line with the PowerPoint Designer feature, in terms of take text only content and make it visual for me. It provides a number of preset styling options:
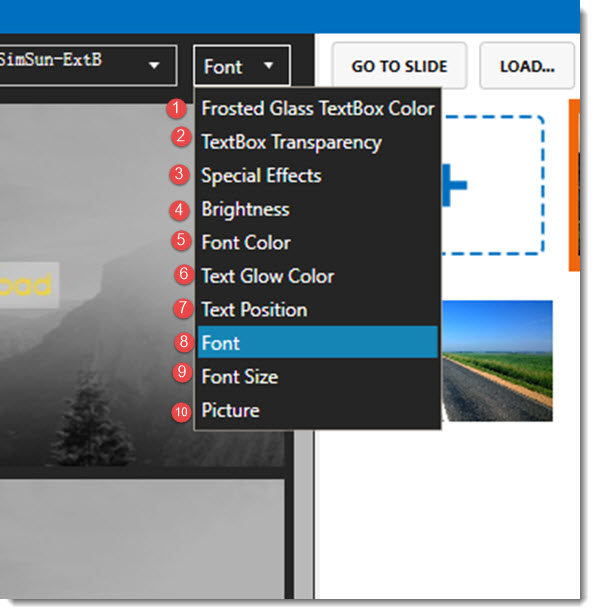
1) Frosted Glass TextBox Color (Option to add custom colors)
2) TextBox Transparency (Option to display multiple transparency options)
3) Special Effects (Options for how image is displayed)
4) Brightness (Options for image brightness by percentage)
5) Font Color (Options for custom font color)
6) Text Glow Color (Option to add custom glow color)
7) Text Position (Option to position your text in various positions on your slide)
8) Font (Option to choose a custom font. It doesn’t appear to load all fonts from your system.)
9) Font Size (Option to choose various preset font sizes)
10) Picture (This option allows you to add effects to your images)
Beyond the preset options, and a feature that always makes things better from my perspective, is the ability to use each preset as a starting point then customizing it.
Here is an example of the Picture Slides Lab in use:
1
Add a Blank Slide (to an existing presentation or new presentation)
2
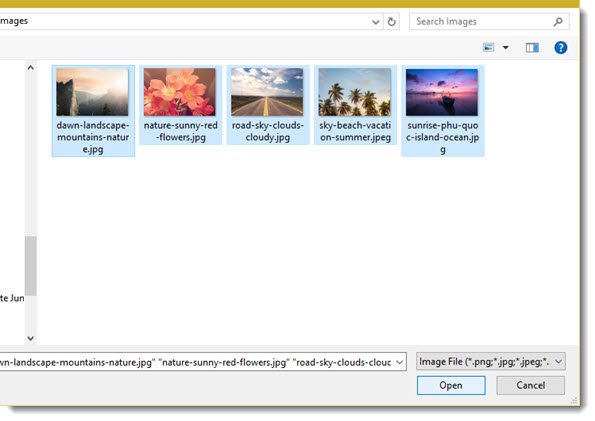
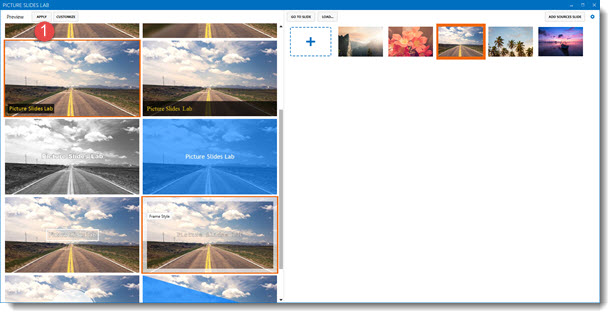
Go to the PowerPointLabs tab and select Picture Slide Lab, then select Images to import.
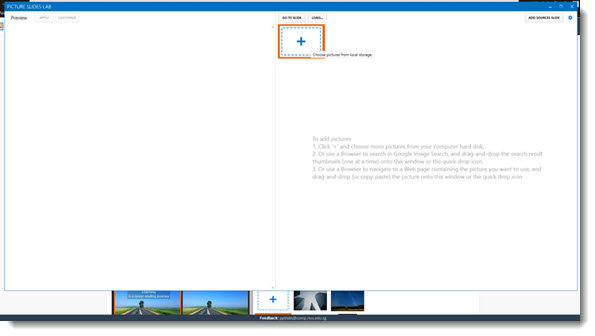
We added 5 visual images to the presentation.
3
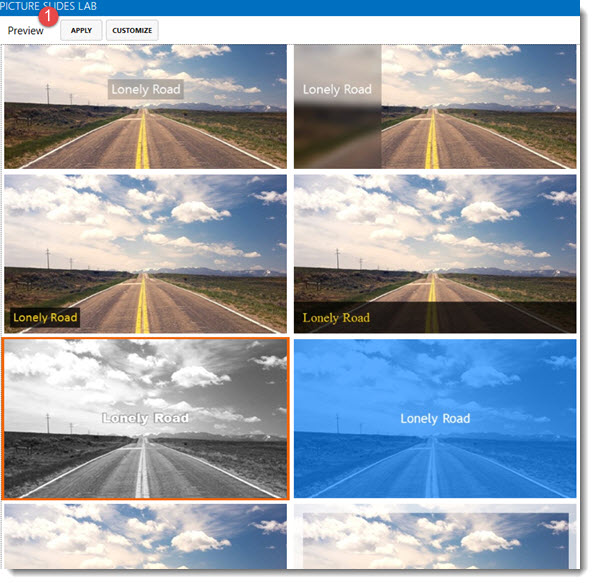
Select one of the imported images and select one of the preset styling options, then Apply.
4
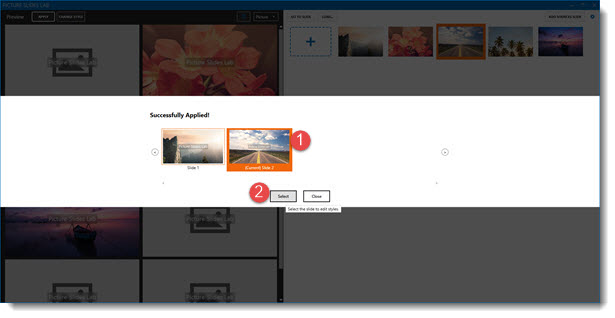
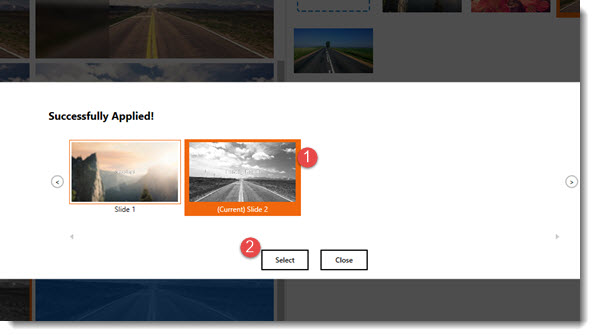
There is a dialog with thumbnail to confirm the selected image and styling (okay, this step feels a bit redundant and not needed). Highlight the image (1) to add to the presentation and click (2) Select.
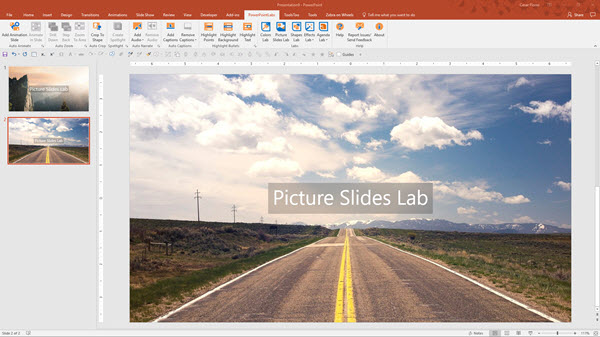
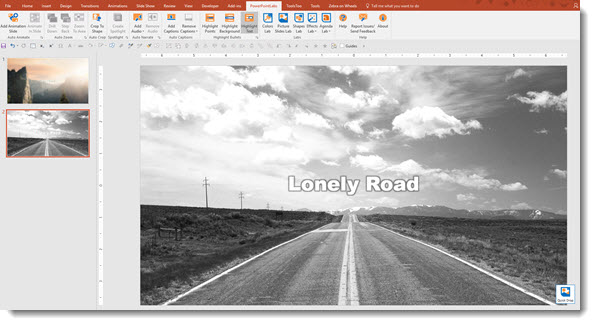
Everything is added to the presentation. And it is not a flat image, the text, image styling and graphic accents are all native PowerPoint content, so it can be modified in PowerPoint after inserted.
5
In addition to the content being editable in PowerPoint, another nice option to easily update the image and styling by going back to the PowerPointLabs tab, selecting Picture Slides Lab again and updating the image or styling options by clicking (1) Change Style.
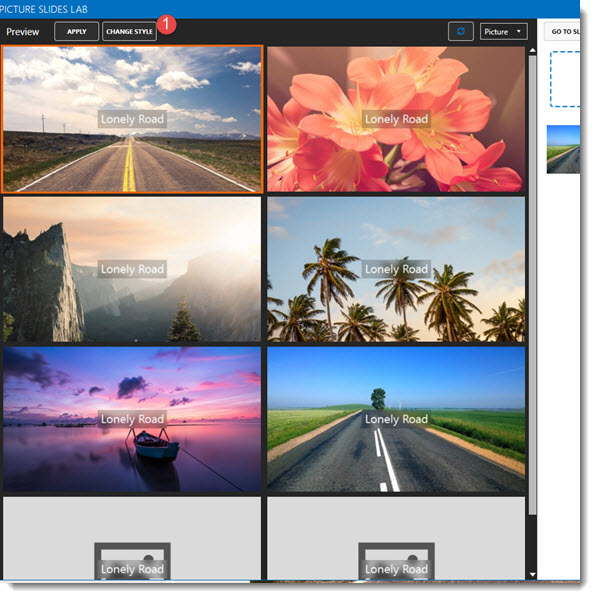
Once you’ve selected your new style, click (1) Apply.
(1) Select slide to be inserted in your project – (2) Click Select.
Here’s the new style applied to the slide.
The PowerPointLabs add-in is good for both the non-designer (professional preset designs for all) and designer (instant formatting for faster production). Have fun formatting some visual slide layouts on your next presentation!
– Troy @ TLC
The Presentation Podcast Episode #50 Released Today!
A new episode of The Presentation Podcast with Troy, Nolan, and Sandy is available today! Check out the latest episode, #50 – Live from the Microsoft MVP Summit!

We have two amazing things to share about this episode. First, this is the 50th Presentation Podcast episode! Second, we celebrate our 50th anniversary with a presentation and PowerPoint conversation at the Microsoft campus with over a dozen Microsoft PowerPoint MVPs!