The PowerPoint® Blog

I work with PowerPoint on a daily basis and I am very honored to be a Microsoft PowerPoint MVP. We have a talented team of presentation designers at TLC Creative Services and ThePowerPointBlog is our area to highlight PowerPoint tips, tricks, examples and tutorials. Enjoy! Troy Chollar

Applying Line and Paragraph Spacing

Quick Shortcut to Apply Line and Paragraph Spacing

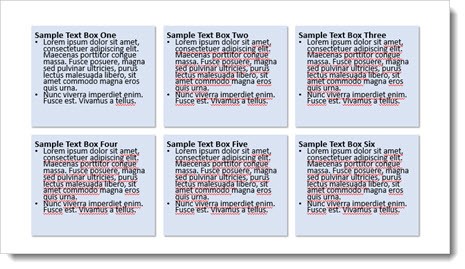
The F4 key reapplies the last action. It’s a great timesaver for those repetitive actions – an especially helpful task in customizing the line and paragraph spacing in a text box where not every paragraph gets the same spacing. Here is my sample slide with several text boxes and several paragraph spacing opportunities to improve the legibility.
line spacing f4_image01

If the formatting goal is to add some additional paragraph space between the bullets on each text box, the process unfortunately involves selecting the bulleted text in one text box, opening the paragraph spacing dialog, adjusting, closing dialog and then repeating the process in the next text box.

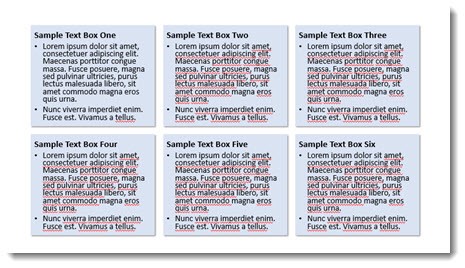
As a shortcut, adjust the Line and Paragraph spacing, then select the next text box and position cursor on the next bullet line. Use F4 to repeat the step automatically! F4 applies the last action made, so in this case you can go from the above sample slide to the one below in less than 30 seconds vs. several minutes selecting text boxes and opening/adjusting the Line and Paragraph dialog 6 times.
line spacing f4_image02

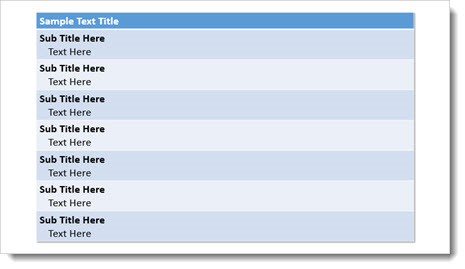
The F4 repeat works on virtually any command while editing slides. Another great use is formatting text in Tables – in this sample F4 was used to quickly add the text indenting for each 2nd line.
line spacing f4_image04

Also, Ctrl Y is another key command that does the same thing. So F4 or CTRL+Y repeat the last command. Test it out and see how it can save you time.

-Troy @ TLC

By |2016-08-10T08:24:12-07:00April 13th, 2016|Tutorial|

Crop to Shape in PowerPoint

Images within PowerPoint can be formatted to have many different effects.  In addition, a formatted image can also be cropped to any shape without affecting any existing formatting using the Crop to Shape tool.

1. Begin with an image that has been formatted within PPT.

Crop to shape-Photo_1

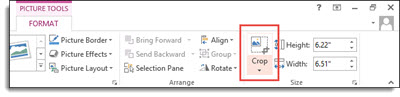
2. Select the image, and then click the drop down arrow below the Crop button under the Picture Tools Format tab.

Crop to shape-Photo_2

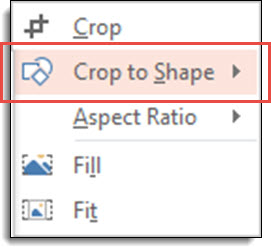
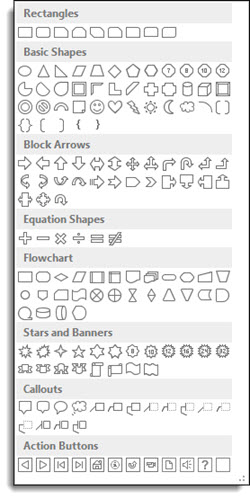
3. Hover over Crop to Shape to show the many different shapes available to crop the image to.

Crop to shape-Photo_3

4. Select the shape you wish to crop the image to.

Crop to shape-Photo_4

5. The image is now cropped to the new shape and all original formatting is still in place.  Here are some examples of the image cropped to different shapes:

Crop to shape-Photo_5Crop to shape-Photo_6

Crop to shape-Photo_7Crop to shape-Photo_8


-Troy @ TLC

By |2016-08-10T08:24:56-07:00April 11th, 2016|Tutorial|

PowerPoint Guides: Master vs. Slide

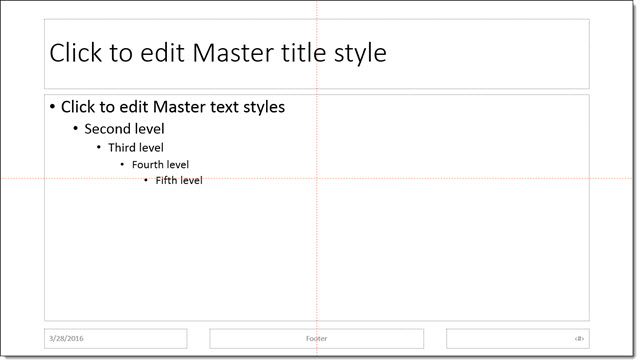
In PowerPoint, guides help with formatting, positioning and slide-to-slide consistency.  The PowerPoint guides have evolved over the past few versions. Here is a quick overview of the three different types of guides:

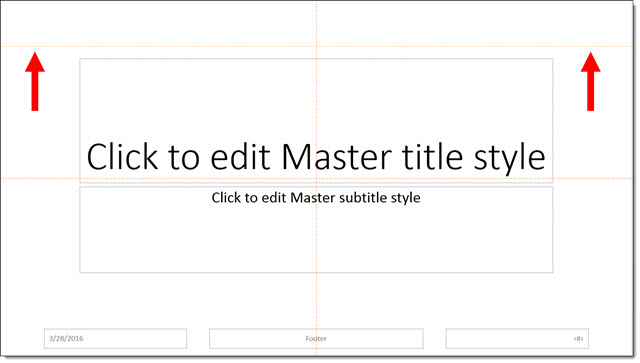
Master Slide Guides (Orange by default): Editable only on the master slide and display on all layouts and slides using that master slide.

PPT Guides_1

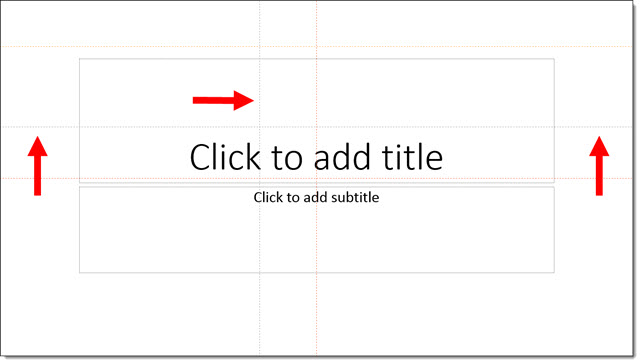
Master Layout Guides (Yellow by default): Apply to individual master layouts only and are only editable on that particular master layout. Here an additional guide is added to the TITLE layout, so only TITLE layout slides will see this new guide.

PPT Guides_2

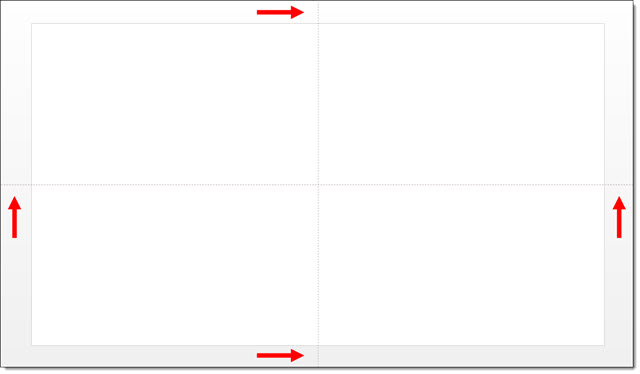
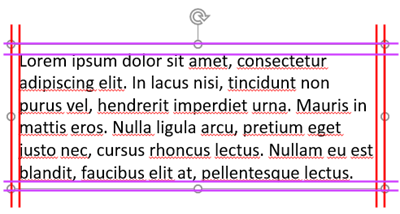
Slide Guides (Gray by default): These are guides added and editable on slides (in edit view, not master view or slide show). In this example, 2 new guides have been added to the slide.

PPT Guides_3

Existing guides can be adjusted by clicking and dragging them .  The easiest way to remove a guide is to drag it off the slide.

PPT Guides_4

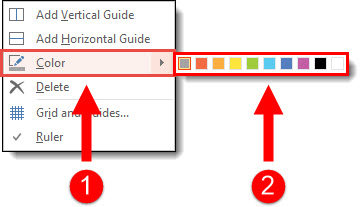
In addition, you can change the color of guides. To change the color of a guide:

  1. Right click the guide you want to change the color of (be sure it is in an area off the slide or on an empty area of the slide)
  2. Hover over Color
  3. Select a color option

PPT Guides_5

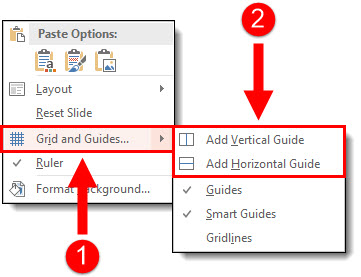
To add PowerPoint guides to a slide or layout:

  1. Right click off slide or on an empty area of the slide
  2. Go to Grid and Guides
  3. Choose Add Vertical or Add Horizontal

PPT Guides_6

– Troy @ TLC

By |2016-08-10T08:25:22-07:00April 8th, 2016|Tutorial|

PowerPoint Text Box Cell Padding (Margins)

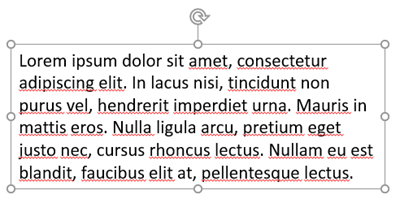
One great feature of PowerPoint is knowing that every text box is basically a mini Word document which means adjusting the cell padding can be done quickly and easily.

Cell padding-1

By default, all text is inset a small amount in each text box. Here is an example from the Microsoft PowerPoint 2016 default template. There is .1″ all the way around.

Cell padding-2

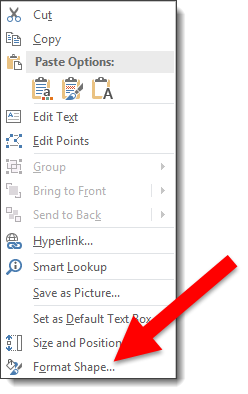
The cell padding, or inset, is easily customized. Select a text box, right-click and select Format Shape.

Cell padding-3

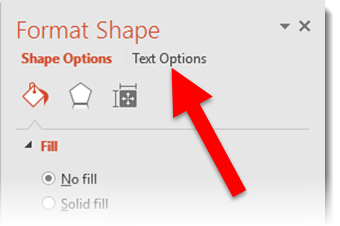
In the Formatting text pane, click the Text Options.

Cell padding-4

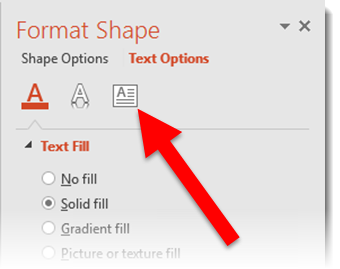
Click the text box icon.

Cell padding-5

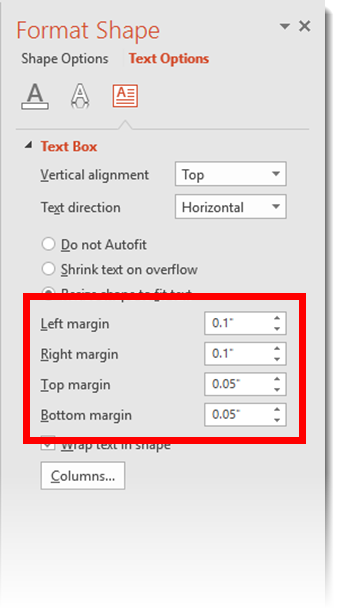
Adjust the Left/Right/Top/Bottom margins exactly as needed.

Cell padding-6

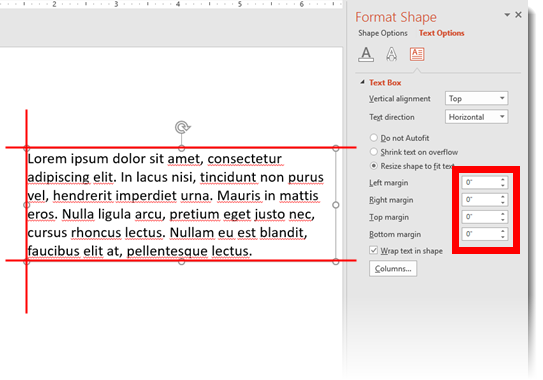
Here is the same text box with a 0″ margin all the way around so the text is right next to the placeholder now.

Cell padding-7

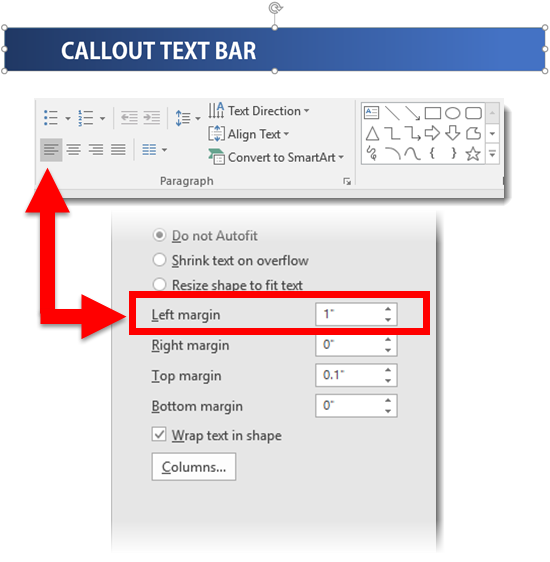
And here is a callout bar with the text set to start 1″ in from the left edge.

Cell padding-8

Just some formatting ideas for your next presentation. Otherwise, you are stuck wondering why the text in a shape is not in the position it should be.


– Troy@TLC


By |2016-08-10T08:25:42-07:00April 6th, 2016|Tutorial|

2-Up PDF Printout of PowerPoint Slides

Printing slides is a common need. But the Microsoft presets are not optimal. For example, let’s look at “2-up” printouts directly from PowerPoint and then we’ll look at my preferred option which is using Adobe Acrobat to create the 2-up PDF printout.

Using Microsoft’s PowerPoint preset:

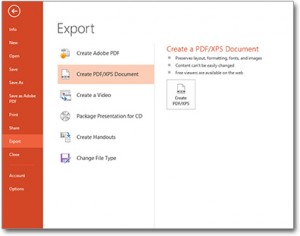
1. Go to File > Export > Create PDF/XPS Document

2-up PDF printout Export_Image1

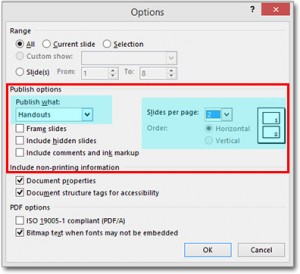
2. In the PUBLISH OPTIONS section, change the drop down menu to HANDOUTS. Slides per page = 2. Keep HORIZONTAL setting. A print preview of the pages will be on the right.

2-up PDF printout PPT_Image2

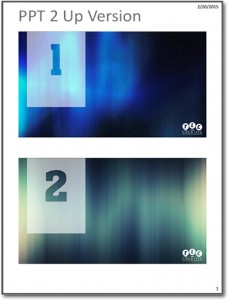
Select OK and your PDF will be created.

2-up PDF printout PPT_Image3


But, these can be larger images of each slide if we do not use the PowerPoint preset.


To create 2-up printout using Adobe Acrobat (Note: This is a multi-step process, but the result is great):

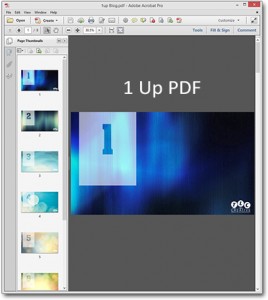
1. Go to File > Export > Create PDF/XPS Document. This time don’t worry about the options, just create PDF with 1 slide per page (the default print setup).

2upBlog_1upPDF_Image4

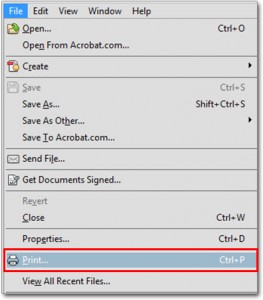
2. Now we are going to print the PDF again. From the PDF of the slides, Go to File >Print

2-up PDF printout PDF_Image5

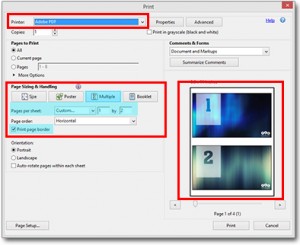
3. Select ADOBE PDF as your printer.

4. In the Page Sizing and Handling select MULTIPLE.

5. In Pages Per Sheet select Custom.

6. Set to 1 by 2, the small print preview should look like the below example.

7. PRINT.

2upBlog_PrintPDFoptions_Image6

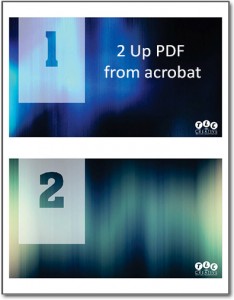
As you can see, side-by-side, the Adobe Acrobat 2-up PDF printout on the left has larger slide images than the PowerPoint 2-up printout, the Adobe Acrobat 2-up takes up the page significantly more than PowerPoint does.

2upBlog_2upPDF_Image72upBlog_2upPPT_Image3

Just a simple option to provide better printouts. It also works for 3-4-6-8-up printouts!

-Troy @ TLC

By |2016-08-10T08:27:31-07:00April 4th, 2016|Tutorial|

Where is PowerPoint’s Ruler?

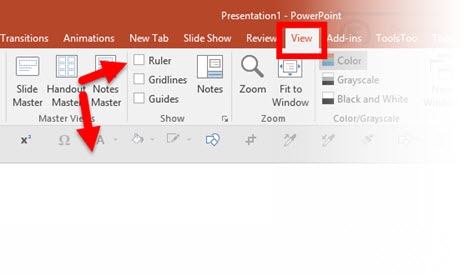
This is a very common question that we’ve encountered on many occasions.  By default, the Ruler is not visible when PowerPoint is launched.

Ruler image_02v2

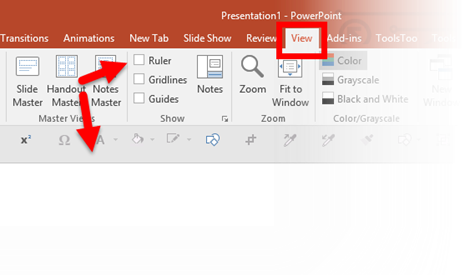
To see the Rulers, go to the View tab, Show section and turn on Ruler.

img2

That’s it! Now the rulers will be visible automatically when PowerPoint is used.


-Troy @ TLC


By |2016-08-10T08:28:41-07:00April 1st, 2016|Tutorial|

NEW Podcast on Presentation Design!!

Yes! It’s true! You can now hear me and other Presentation Design professionals on a new Podcast entitled The Presentation Podcast! New episodes will be available 2 times a month and we’ll cover different topics each week!

new podcast logo_forPPTBlog

I am constantly listening to Podcasts, so I am extremely excited about the opportunity to put together a new Podcast specific to the presentation industry. The hosts are Nolan HaimsSandra Johnson and Myself. We will have discussions all about presentation design, best practices, running a design studio, tips & tricks and lots more so be sure to tune in!

Add The Presentation Podcast to your iTunes Podcasts and join us for the fun!

-Troy @ TLC
By |2016-08-10T08:29:12-07:00March 30th, 2016|Resource/Misc|

Can a Video Morph in PowerPoint?

Can a video morph in PowerPoint? The answer is yes (but not completely).

The great thing is – a video placeholder works with Morph. Here is my two slide sample, the video on the second slide has been resized to full screen.

video morph-1

In the demo video below, the sample video growing to full slide size with a Morph transition works perfectly. However, due to a limitation of how PowerPoint plays videos, a video cannot play across slides. In this sample, the visual works nicely with the 2nd slide set with a shorter slide transition duration (morph) and a Play-with-Previous to have the video start playing instantly after the morph finishes. But a video with audio or content that would look awkward with a  pause will not work as well (visually).

[KGVID]https://thepowerpointblog.com/wp-content/uploads/2016/03/unnamed-file-6.mp4[/KGVID]

-Troy @ TLC
By |2019-10-31T22:13:58-07:00March 28th, 2016|PowerPoint|

HD, 2k,4k, 8k Resolution Guide

Living in the digital era isn’t always easy. It is difficult to keep up with aspect ratio and resolution for PowerPoint Presentations. Here is a quick reference beyond this modern marvel of technology:

Resolution-6


Why is it called 2K-4K-8K?

An easy way to know what to call a resolution is to look only at the horizontal pixel count. 2K, 4K, 8K, etc. all refer to the horizontal resolution – approximately that number.

Note: For this post, all resolutions referenced are for 16×9 aspect ratio displays (with the exception of 2K).

HD (1920×1080)

HD, or High Definition, is used for two resolutions 1280×720 or 1920×1080.  These are commonly referred to as 720p or 1080p (see this post that explains “P” and “I”). I am going to refer to 1080p as HD.

Resolution-1

2K

HD, or High Definition, almost 2K, but not quite. 2K resolution is 2048×1080. It is a long story why computer displays did not just go with 2K, we’ll save that for another post. But needless to say, true 2K resolution is not used a lot in an HD world.

Resolution-2

4K

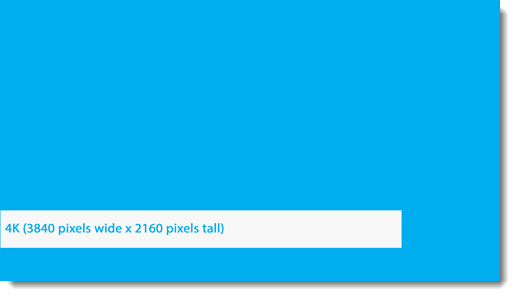
Like HD, 4K is actually 2 different resolutions depending on the context. The resolution we use for PowerPoint resolution and 4K monitors is called UHDTV 4K @ 3840 x 2160 pixels. The film industry will use 4096 x 2160 pixels, but this is not a 16×9 aspect ratio so it is not a part of this discussion and something you will most likely never use.

Resolution-3

8K

Yes, I am skipping 6K (noted below), because 8K is the next industry standard, also called UHDTV 8K @ 7680 x 4320 pixels. This is a lot of pixels and yes we design presentations for beyond 8K projection!

Resolution-4


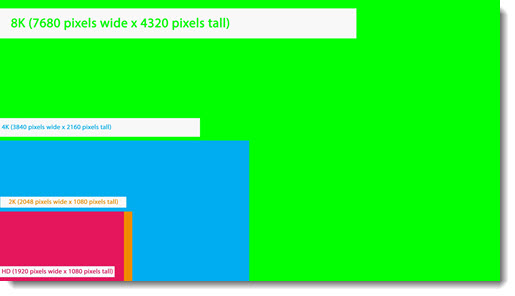
6K, 10K, 12K and beyond are all resolutions, but they are not industry standards. Here is a quick list of resolutions, that includes them for reference.

HD = 1920×1080

2K = 2048×1080

4K = 3840×2160

5K = 5120×2880

6K = 6144×3160

8K = 7680×4320

10K = 10328×7760

Yes, PowerPoint can handle any of these resolutions. It is not so much a question of can PowerPoint handle a high resolution as it is can the computer and monitor/projector handle the high resolution. In addition, many stage events we develop presentations for use an array of side-by-side projectors to create a custom resolution. Usually, it is an array of HD, 1920×1080, projectors, so (and I am simplifying the details) a 4 projector wide setup will create an 8K wide by HD height image. TLC then creates a custom PowerPoint for the 7680 x 1080 pixel resolution, which we generically refer to as “Ultrawide Presentations.”

Industry Standard Resolutions in 1 Chart

Resolution-5


-Troy @ TLC


By |2016-08-10T08:31:00-07:00March 25th, 2016|Resource/Misc, Tutorial|
Go to Top