The PowerPoint® Blog

I work with PowerPoint on a daily basis and I am very honored to be a Microsoft PowerPoint MVP. We have a talented team of presentation designers at TLC Creative Services and ThePowerPointBlog is our area to highlight PowerPoint tips, tricks, examples and tutorials. Enjoy! Troy Chollar

PPT Overlays To Graphics (2)

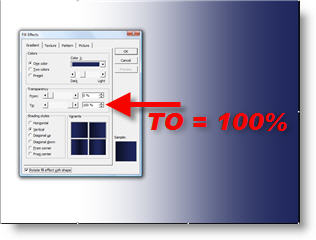
Because the globe is a circle, the solution to making it tie in with the template color scheme was to use a semi-transparent autoshape. I added a circle, sized it to the globe, then gave it a subtle 2-color fill.

This altered the “blue” globe to a “green” globe – without affecting the animated .gif

– Troy @ TLC

By |2016-11-17T16:05:20-08:00June 10th, 2007|Tutorial|

PPT Overlays To Graphics (1)

This was a nice effect I worked on for a recent presentation. The goal was to use an animated globe to visually bring in a “global” element while discussing a corporations global sales.

The problem was the blue earth did not tie in with the template color scheme.

– Troy @ TLC

By |2016-11-17T16:04:59-08:00June 8th, 2007|Tutorial|

PPT 2003 now available in 2007!

The below memo is true – date and all. Recently working onsite at a major corporation this memo was part of the weekly company updates sent to all employees.

– Note the date: April 19, 2007 (Office 2007 launched just weeks prior and Office 2003 is now almost 4 years old)

– Note the announcement: “…for future enhancements by beginning the worldwide implementation of Microsoft Office 2003.”

– Hmmm, the Microsoft sales team may have some work to do!

– Troy @ TLC

By |2016-11-17T16:04:18-08:00June 6th, 2007|Personal|

Mosaic Images

This is a nifty online (and free) application. I recently used it for an awards show image where the first photo of the recipient was a mosaic and then the ‘real’ photo faded in to reveal who won the award. I did this sample of my daughter for the blog.

Here is a close-up that shows how the original image is converted to 1,000s of images that recreate the photo as a mosaic.

Give it a try at the “Image Mosaic Generator” here.

– Troy @ TLC

By |2016-11-17T16:03:57-08:00June 4th, 2007|Software/Add-Ins|

New Book – “Why Most PPT Presentations Suck”

I received an announcement about a new PowerPoint book recently that I felt was newsworthy. I have known the author, Rick Altman, and believe this will not only be informative but very fun read (much as the title implies).

The problem exists, not because PowerPoint is hard,” Altman says, “but because it is easy. Most people learn PowerPoint in one day and then rarely seek further training. They know enough to get into trouble but not enough to get out of it, or avoid it in the first place.”

More info can be found at the books website, betterppt.com

– Troy @ TLC

By |2016-11-17T16:03:31-08:00June 2nd, 2007|PowerPoint, Resource/Misc|

PPT Autoshape BG (6)

Here is the finalized background with the title area drop shadow.

Click here to download PowerPoint file.

For virtually all presentations I develop the custom background art and elements in Photoshop. But with creative use of the available tools in PowerPoint, some great effects can be achieved!

– Troy @ TLC

By |2016-11-17T16:03:09-08:00May 31st, 2007|Portfolio, Templates/Assets, Tutorial|

PPT Autoshape BG (4)

Using another gradient autoshape I created the title text area.

By having the more transparent area over the already darker right corner another sense of depth is created.

– Troy @ TLC

By |2016-11-17T16:02:47-08:00May 29th, 2007|Tutorial|

PPT Autoshape BG (5)

Depth creates shadows. So adding a drop shadow is an easy way to add depth to this background. Using a very thin gradient autoshape is all that was needed.

Here are the FILL EFFECTS settings to create the drop shadow (note I am using black, but not starting with a solid color, 40%, to create a “dark grey” that mixes with the other colors).

– Troy @ TLC

By |2016-11-17T16:02:23-08:00May 29th, 2007|Tutorial|

PPT Autoshape BG (3)

Next is an easy step, because I just use the previous gradient again. Here are the steps:
1. Select gradient
2. Duplicate
3. Go to DRAW >> ROTATE OR FLIP >> ROTATE RIGHT 90′
4. Position at bottom of slide
5. Stretch left/right to width of slide

With another layer a nice effect has been achieved leaving a lighter area in the top left, which creates a subtle visual motion with the darker streak (from the first autoshape)on the opposite axis:

– Troy @ TLC

By |2016-11-17T16:01:51-08:00May 27th, 2007|Tutorial|

PPT Autoshape BG (2)

To create visual depth I layered some semi-transparent gradients to create lighter and darker areas (that were not overly linear). The second autoshape is a gradient, that begins with the darker blue and goes to transparent.

Here is this element placed over the right side of the slide. Layered on top of the first full size autoshape the upper right now has a larger dark area than the rest of the slide.

– Troy @ TLC

By |2016-11-17T16:01:28-08:00May 25th, 2007|Tutorial|
Go to Top