Software/Add-Ins

Video downloads with Savevideo.me

Savevideo is a great online tool that can be used to download videos as mp4 files.  Although the site does not support Youtube videos, it does support a number of other popular sites, including Vimeo, Facebook, Twitter, Vine and Dailymotion (just to name a few).   There is an extensive list of supported sites in the drop down menu under Supported video-sites.

To download a video using this simple tool:

1

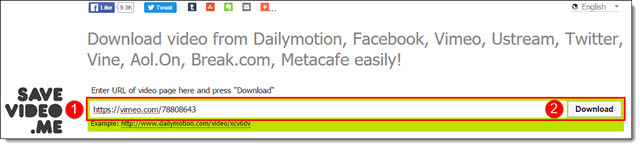
Copy and paste the url for the desired video into the field and click Download.


(NOTE: Be careful not to click any other download buttons on the site, as they are likely advertisements.)1_ Savevideo


2

The download bar will turn green to show the video is in process

2_ Savevideo

3

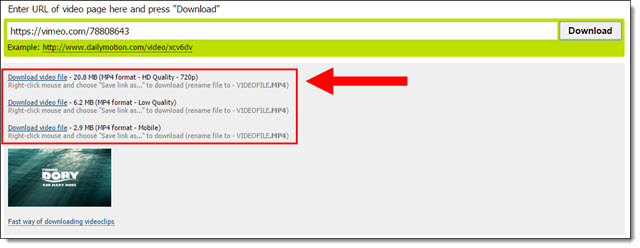
A list of available sizes will appear below the download bar.

3_ Savevideo

4

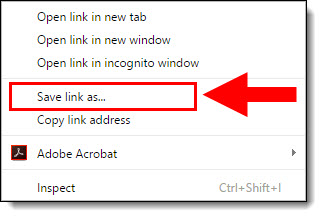
Right-click the link that says Download video file next to the desired version, and select Save link as… Choose the location for your video file, and click Save.

4_ Savevideo


Michelle @ TLC

By |2016-08-10T08:33:25-07:00March 14th, 2016|Software/Add-Ins|

Video Export Size (HD!)

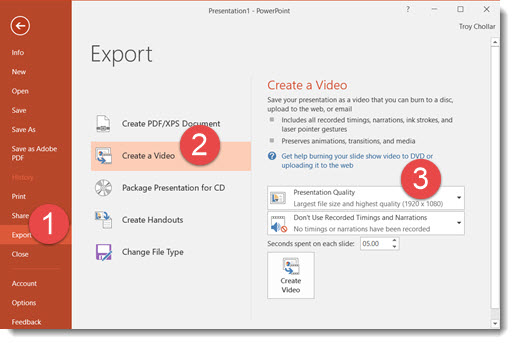
Another behind the scenes upgrade in PowerPoint 2016 is the video export size options. Now true, 1920×1080 HD video can be exported from PowerPoint.

Go to FILE > EXPORT > CREATE A VIDEO
Video Export Size 1

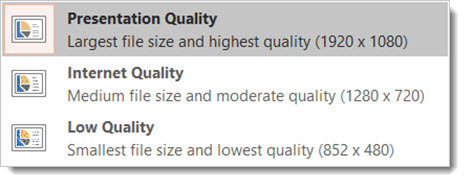
The export size options have been revised to 1920×1080, 1280×720 (the PPT 2013 highest res option), and 852×480.

Video Export Size 2


-Troy @ TLC

By |2016-08-10T08:39:43-07:00February 10th, 2016|PowerPoint, Software/Add-Ins|

New Auto Layout Designer

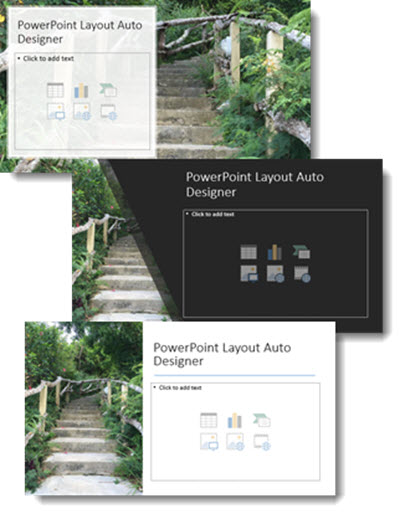
Another new feature of PowerPoint 2016, only available to subscription users, is DESIGNER, which is an automatic layout tool. Here is an example of how it works.

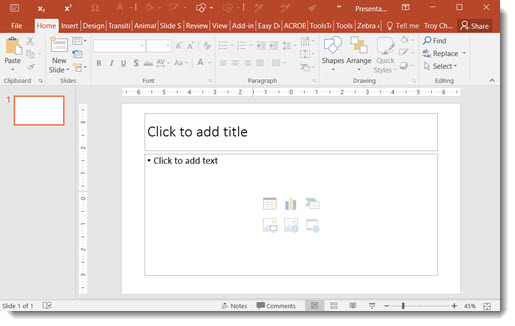
  1. Start with a blank slide – on a Microsoft supplied template (I am using the standard white background new presentation)
    Designer 1
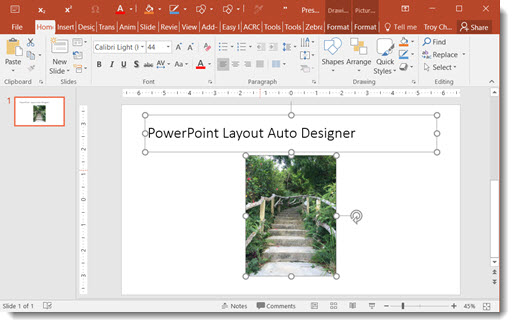
  2. I entered some text in the title placeholder and used the Insert Image option for the content placeholder
    Designer 2
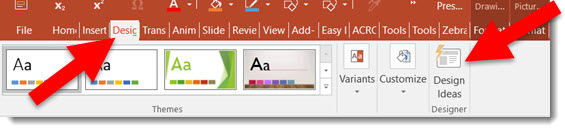
  3. Go to the DESIGN tab and click the new DESIGN IDEAS button
    Designer 3
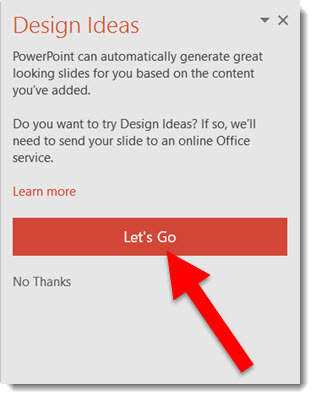
  4. The right action pane opens the DESIGN IDEAS interface, click LET’S GO
    Designer 4
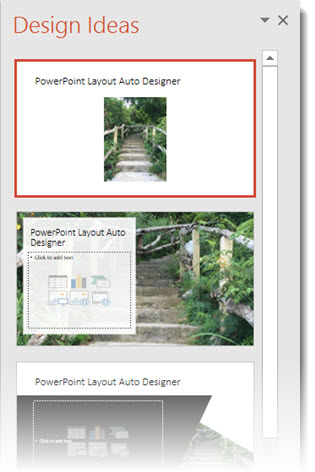
  5. The Design Ideas pane displays a number of layout options
    Designer 5
  6. Scroll through the options, select any to see and use, these layouts (and several others) were automatically created with a simple click
    Designer 6

Fantastic feature for both the designer and non-designer! But at this stage there are a few downsides to the new DESIGNER tool.

  • The biggest downside is if you do not have PowerPoint 2016, and a subscription version (eg. Office 365), Designer is not available in PowerPoint.
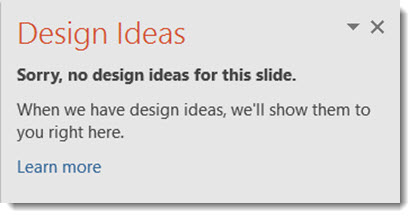
  • The biggest limitation is that it will only work with Microsoft supplied templates. Open the DESIGN tool on a custom template and get the message below.
  • If you do not use layout placeholders (eg. add your own text boxes and insert images not through a placeholder insert image icon), and you get the message below.

Designer 7

Overall, a great idea and smooth implementation. But because TLC virtually never uses a Microsoft template (or theme), this feature has very limited use for us – but I am hopeful Designer will continue to expand its capabilities.


-Troy @ TLC
By |2016-08-10T08:41:53-07:00February 5th, 2016|PowerPoint, Software/Add-Ins|

The PowerPoint QAT – A Designer’s Best Tool

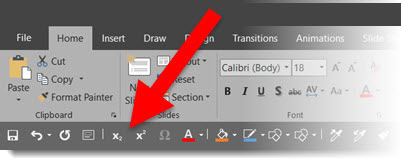
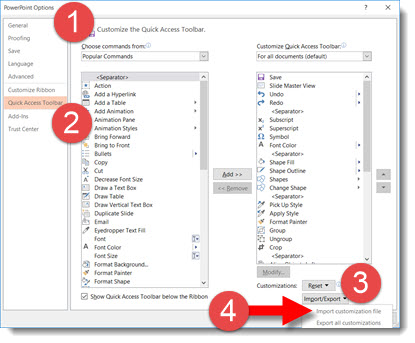
The Quick Access Toolbar (QAT) is one of the best options for making your design work faster, if setup properly. The PowerPoint QAT is basically a collection of the top used “buttons” always accessible without having to change tabs on the ribbon.

PowerPoint QAT 3

Setting up the QAT is fairly easy, but tedious. But Microsoft has made it very easy to leverage someone else’s effort. In this case, my effort, think of it as my gift to everyone that reads this post, and instantly setup your QAT with 37 buttons to speed up design.

Download the QAT file HERE (unzip and “PowerPoint Customizations.exportedUI”).

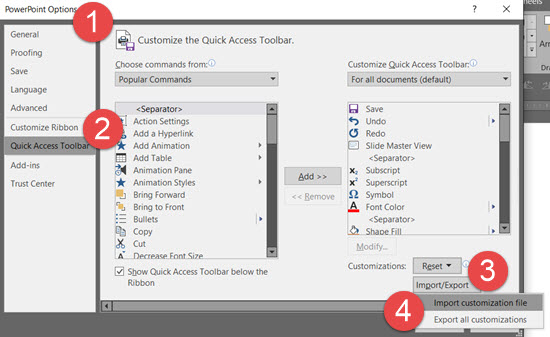
In PowerPoint, go to FILE > OPTIONS > QUICK ACCESS TOOLBAR > IMPORT/EXPORT > IMPORT > select the downloaded file > say YES to the dialog > done.

PowerPoint QAT 2

– Troy @ TLC
 

By |2016-08-10T08:54:31-07:00September 28th, 2015|PowerPoint, Resource/Misc, Software/Add-Ins|

Permanently Delete a File with Eraser

Here at TLC, our team works hand in hand with companies dealing with all sorts of information. One week, you may find us setting up show computers for a large event for a pharma company, and the next week, onsite running presentations for an executive of an auto corporation. Our computers are always operated by internal staff, but it is imperative to secure information.

Eraser 1

Dropping files into the Recycle Bin is not really deleting them – it is only the operating system removing the reference of the files from the system table. Every file is really there until another file is saved over it. Eraser permanently overwrites files with patterns of data that completely prevents file recovery. So, whether you want to securely erase financial records, passwords and/or security data, Eraser is a free, easy to use program that makes files gone for good. Eraser can be found here (go to the download link at top of page – do not use any of the adware download buttons!).

eraser logo

– Troy @ TLC

By |2016-08-10T09:01:02-07:00August 10th, 2015|Software/Add-Ins|

Awesome Screenshot.com – online screen capture app

[text]All of the designers at TLC use Snagit for screen shot needs; it is installed on every computer we have. Windows and Mac OS both have built in screen capture options that are cute and nice, but not robust. We recently found Awesome Screenshot.com which is a great online screen share, and edit app, something we can use when working on a guest computer.[/text]

Awesome screenshot 12

[text]Awesome Screenshot is free for 30 images and 1 project folder. The premium option (currently $8.99 promo, regularly $11.99 year) has unlimited image captures and project folders. The Chrome browser is the only one that supports the add-in, but the annotation and editing features can be used on any browser. The Chrome add-in makes Awesome Screenshot a more full featured option (eg. Use Chrome for this app).
[/text]

Awesome_1

[text]Possibly one of the coolest features of Awesome Screenshot is adding comments to screenshots (much of what we use SnagIt for) and sharing directly from the site. In addition, other users are able to comment on the screenshot image as well, so this can make collaborative feedback simpler than ever! Some other cool tools are highlighting or blurring text. But the editing tools are more limited than other apps with fewer less colors, shapes, etc. Still, the ability to organize the screenshots by project is unique and pretty awesome (pun intended)![/text]
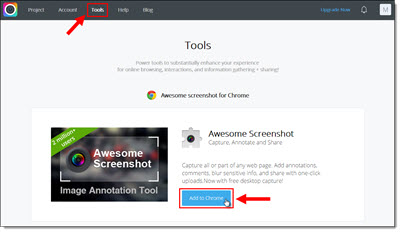
[text]Use Chrome and create an account. Under the Tools tab, select Add to Chrome, and follow the steps to install.[/text]

[text]After installed, Chrome has this app icon.[/text]

Awesome_2

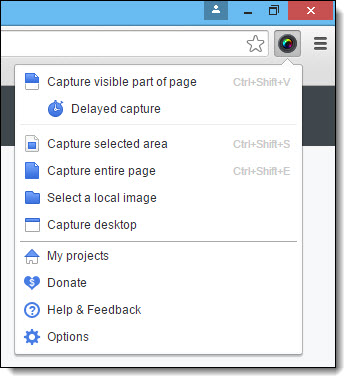
[text]Click the Awesome Screenshot icon to view capture options.[/text]

Awesome_3

  • Capture visible part of page: Captures only the visible area of the current browser page
  • Delayed capture: Captures only the visible area of the current browser page three (or five) seconds after clicking
  • Capture selected area: Allows you to select the area of the current browser page to capture using a marquee selector
  • Capture entire page: Captures the entire area of the current browser page (include non-visible areas that require scrolling to see)
  • Select a local image: Allows you to choose an image that is saved locally to your computer or drive[/list_item]
  • Capture desktop: Allows you to select from any open windows or computer screen(s) to capture
  • My projects: Takes you to the Projects library
  • Options: Allows you to update the settings, such as image format, shortcut, and delay time specifications

[text]In addition, you can drag and drop existing images into the open project folder of your choice or select “Add images” from the project folder page on the website.[/text]

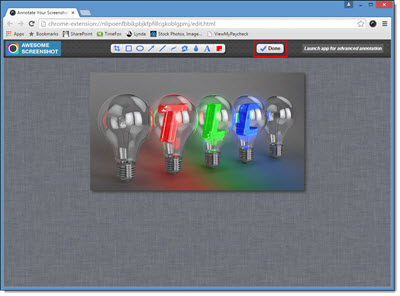
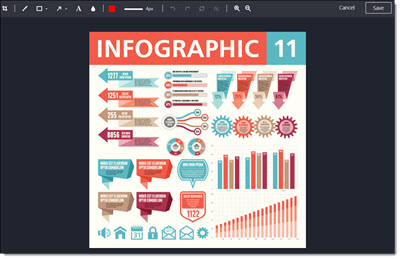
[text]Capture a screenshot (all or part of the screen) and it shows up in the simplified Annotation (or edit) screen. Save the image to a project folder to get to the full editing options.[/text]

Awesome_4

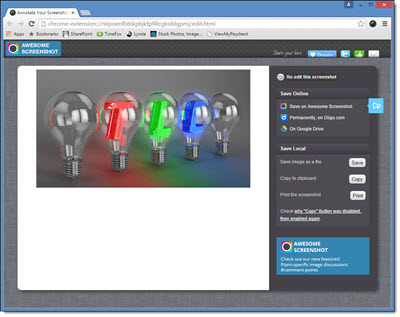
[text]There are several save options – save online for best collaboration.[/text]

Awesome_5

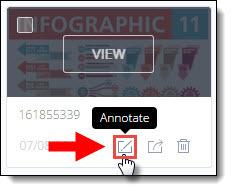
[text]To edit, click the Annotation icon while hovering over the image.[/text]

Awesome_8

[text]The top bar is the editing tools: Crop, draw, shapes (rectangle or oval), arrows/lines, text, blur, color, line weight, undo, redo, reset, delete shape, and zoom.[/text]

Awesome_9

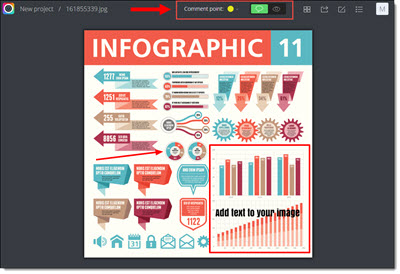
[text]Save edits and add comments. By default, it goes to the comments page. You can also select other images in the project folder, share the image, return to the Annotation page, or view the comments list.[/text]

Awesome_10

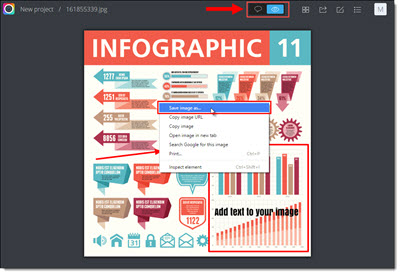
[text]Click the “eye” icon to exit the page, or right-click select Save image as to get a local version of the image on your computer – which can be added to a presentation.[/text]

Awesome_11

[text]Thanks to staff designer Michelle for this review.
– Troy @ TLC[/text]

By |2016-08-10T09:03:57-07:00July 17th, 2015|Software/Add-Ins|

Office 2016 for Mac – Available!

Office for Mac 2011, the current version, has been in existence for 4.5 years. That is a very long time between upgrades. But Microsoft has (finally) released Office 2016 for Mac – and it is a very good upgrade.

O2016

If you are an Office 365 subscriber, Office 2016 for Mac is part of the subscription and an easy upgrade. If you are a retail or corporate licensing client, you may have a few months until Microsoft has it available to you.

I have been fortunate to be running the beta version for the past few months and have found Office 2016 has good parity with Office 2013 for Windows (not perfect, but much, much better). The interface uses the Ribbon styling (although not all buttons and options are in the same place or available) and the functionality is near identical. The ability to move presentations between platforms has never been better (again, not perfect, but a huge step forward). This is a major undertaking by the Microsoft Mac Office team (completely coding a new version of Office) and I expect Office 365 subscribers to have a steady stream of refinements rolled out (which is great!).

– Troy @ TLC

By |2016-08-10T09:04:24-07:00July 14th, 2015|Software/Add-Ins|

Using Pic Resize to Optimize Images for PowerPoint

Pic Resize is a useful web-based app to optimize images for presentations, that is FREE. Images can be resized, cropped and have many editing options applied. This is a good, quick solution in the process of making images sized for a presentation and not jumbo multi-megabyte sized files from a digital camera or print project. TLC designer, Michelle, put together this overview of how Pic Resize is used and some of its options.

To get started, go to the Pic Resize webpage (here).

Click From Computer and then the Browse button. Locate a image on your computer and click Open.

Pic ReSize-1

Pic ReSize-2

Once you have selected the image, click the Continue (Resize, Crop & Special Effects) button.

Pic ReSize-3

On the top portion of the next page, you can crop or rotate your image, if needed. Continue on to the second section to resize your image. The website defaults to resizing the image to 50% of the original size. If you need a different size, click on the drop down menu and select another preset percentage or resolution. You can also select Custom Size… to enter in the dimensions of your choice.

Pic ReSize-4

To optimize this image for use within PowerPoint, I will resize this image to 800 pixels wide. By leaving the Height field empty, Pic Resize will automatically keep the image proportionate by determining the correct height value.  You can also select a custom percentage of the original image by selecting Percent from the drop down image next to the Width or Height fields. The new dimensions of the image can be found on the right next to Estimated Final, which will be highlighted in green.

Pic ReSize-5

In the next section, you can select one of many special effects to enhance the image, if desired. Some of these special effects include Oil Paint, Scorched, Grayscale, and Sharpen, which can be seen below.

Pic ReSize-6

Pic reSize-7


In the last step, you will select the format, quality (if JPEG) and maximum file size (optional) to save your image as. The original format of the image will be automatically populated but JPEG, GIF, PNG, and BMP are all supported. PNG images with alpha transparency are supported, so transparency will be maintained if resized. If resizing to a JPG as the format, you can also select the quality of the image being saved.

Pic ReSize-8

Once you have selected the format and quality, click the I’m Done, Resize My Picture! button. When successfully resized, you can select View Image to preview, Resume Edit to continue editing, Save to Disk to save onto your computer, or Save to Web to upload the image onto a social media website of your choice. For this instance, we would save the image to the desired location by clicking Save to Disk.

Pic ReSize-9

Once saved, you now have an optimized version of your image that can be easily used within PowerPoint. Below, you can see the new, optimized image, which was resized from 5184 x 3456 pixels down to 800 x 533 pixels.

– Michelle @ TLC

By |2016-08-10T09:23:22-07:00October 20th, 2014|Software/Add-Ins|

Using Pic Resize to Optimize Images for PowerPoint

Pic Resize is a very useful tool to resize and edit images that are larger than needed. This website offers a quick and easy-to-use method to optimize a large image so that it fits your needs.

To get started, make sure you have selected From Computer to choose an image on your computer to resize. Click Browse to locate the image on your computer, select the image desired and click Open.

Once you have selected the image, click the Continue (Resize, Crop & Special Effects) button.

On the top portion of the next page, you can crop or rotate your image, if needed. Continue on to the second section to resize your image. The website defaults to resizing the image to 50% of the original size. If you need a different size, click on the drop down menu and select another preset percentage or resolution. You can also select Custom Size… to enter in the dimensions of your choice.

To optimize this image for use within PowerPoint, I will resize this image to 800 pixels wide. By leaving the Height field empty, Pic Resize will automatically keep the image proportionate by determining the correct height value. You can also select a custom percentage of the original image by selecting Percent from the drop down image next to the Width or Height fields. The new dimensions of the image can be found on the right next to Estimated Final, which will be highlighted in green.

In the next section, you can select one of many special effects to enhance the image, if desired. Some of these special effects include Oil Paint, Scorched, Grayscale, and Sharpen, which can be seen below.

In the last step, you will select the format, quality (if JPEG) and maximum file size (optional) to save your image as. The original format of the image will be automatically populated but JPEG, GIF, PNG, and BMP are all supported. PNG images with alpha transparency are supported, so transparency will be maintained if resized. If resizing to a JPG as the format, you can also select the quality of the image being saved.

Once you have selected the format and quality, click the I’m Done, Resize My Picture! button. When successfully resized, you can select View Image to preview, Resume Edit to continue editing, Save to Disk to save onto your computer, or Save to Web to upload the image onto a social media website of your choice. For this instance, we would save the image to the desired location by clicking Save to Disk.

Once saved, you now have an optimized version of your image that can be easily used within PowerPoint. Below, you can see the new, optimized image, which was resized from 5184 x 3456 pixels down to 800 x 533 pixels.

– Troy @ TLC

By |2016-08-10T09:41:20-07:00May 21st, 2014|Software/Add-Ins, Tutorial|

Themed Lorum Ipsum Text! Pirate – Corporate – Coffee – and More!!

Lorum Ipsum, or Greeked Text, is placeholder text that has no meaning. Its purpose is to demonstrate how text will look in a layout, in a specific font, size and color. It is also, very helpful for PowerPoint templates and foundation presentations.

Traditional Lorum Ipsum text is a nonsensical latin (created by a 1st century Latin text by Cicero), and looks like this:

Lorem ipsum dolor sit amet, consectetur adipiscing elit. In lacus nisi, tincidunt non purus vel, hendrerit imperdiet urna. Mauris in mattis eros. Nulla ligula arcu, pretium eget justo nec, cursus rhoncus lectus. Nullam eu est blandit, faucibus elit at, pellentesque lectus. Maecenas a vulputate mauris. Donec quis dictum metus. Phasellus at nisi tempus mauris sollicitudin fermentum. Interdum et malesuada fames ac ante ipsum primis in faucibus.

For the above text I used the Lorem Ipsum text generator at lipsum.com (see this January 2007 post).

But that can be boring and TLC is a creative company. So we were very excited about discovering “Meet the Ipsums!” MeetTheIpsums.com is a text generator for dozens of themed Lorum Ipsum text, such as coffee ipsum, cat ipsum, Zombie Ipsum, Canada Ipsum and more!

Here is a personal favorite – Pirate ipsum:

Belaying pin chase coxswain list transom gally pillage broadside furl capstan. Hail-shot aft fore Davy Jones’ Locker careen killick mutiny weigh anchor bilge rat Nelsons folly. Chandler poop deck Blimey six pounders Buccaneer clap of thunder ye Barbary Coast keel Gold Road. Cable doubloon avast grapple interloper hang the jib boom heave down Sea Legs barkadeer.

Even better – not from a productivity vantage, but definitely better for fun and amusement – is that each Ipsum webpage is themed. Here is the interface for generating the above Pirate Ipsum text:

Themed Lorum Ipsum Text

Next time you have a project that needs themed Lorum Ipsum text, check out MeetTheIpsums.com!

– Troy @ TLC
By |2016-08-10T10:04:39-07:00December 2nd, 2013|Resource/Misc, Software/Add-Ins|
Go to Top