Save As PDF – From PPT 2007
I email a lot of PDF proofs of presentations for client review. They are smaller in file size and not editable. If you are using PPT07 creating a PDF is done through the SAVE AS dialog, not the PRINT dialog.
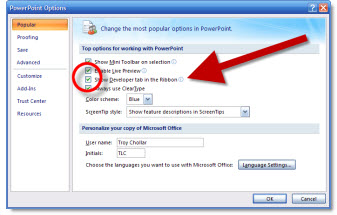
If you go to START >> SAVE AS and see this option: “Adobe PDF”
Then you have the full version of Adobe Acrobat with Distiller installed, or another Adobe PDF creation option installed.

But what you really want is this option: START >> SAVE AS >> PDF

This is Microsoft’s PDF print driver and it works incredibly fast, makes perfect PDFs of slides (including semi-transparent .png’s and autoshapes) and is my preferred method.
If you do not have this option don’t worry, it is not installed by default. Just head over to Microsoft’s website, go the Download Center, do a search for “Office PDF” and you will find these 2 links:

The PDF printer is free, and the XPS format is a Microsoft equivalent to PDF (not highly used yet), so you can choose to install it or the PDF only version.
– Troy @ TLC