Greetings From My Table
Just another show, array of computers and nice view of the action from the “front of house” tech table.

– Troy @ TLC
Add Slides to a Presentation and Keep Their Original Look
Adding slides from one presentation into another and hoping for a button that will automatically format the slides the way needed is just not a feature in PowerPoint. But, the almost magical “Destination vs. Source Formatting” button does exist. For this tutorial, we are going to add slides from the “Blue” presentation (Presentation #1) to the “Purple” presentation (Presentation #2) and keep the blue slides blue (ie. opposite of the last tutorial where the slides updated to the purple template).
Here is our “Blue” presentation (#1):
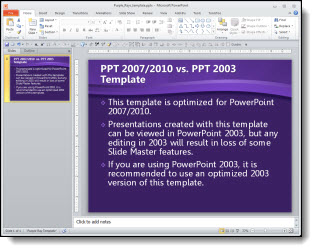
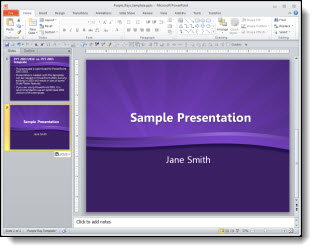
And here is our “Purple” presentation (#2):
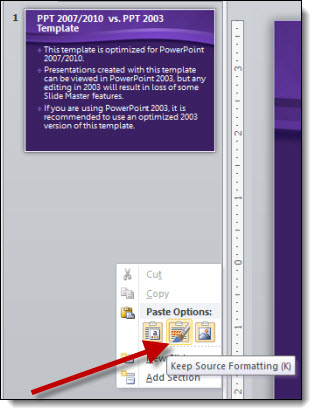
Select the slides from Presentation #1 and copy. Then paste them into Presentation #2. To paste in the new slides, right-click and in the pop-up menu in the “Paste Options” sections, select “KEEP SOURCE FORMATTING:”
With the KEEP SOURCE FORMATTING option the template for the new slides keeps the template that was used in Presentation #1. So the blue slides stay blue.
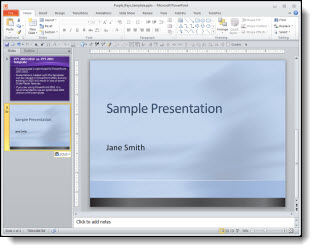
Behind the scenes what happens is a new Master Slide set is added to the presentation. So if you look in the slide layouts (HOME >> SLIDES section >> LAYOUTS) there are two master slide sets to choose from (Presentation #1 and Presentation #2).
NOTE: If you paste in more slides from the Blue presentation in a new location and select KEEP SOURCE FORMATTING another blue master slide set will be added (which is not optimal).
– Troy @ TLC
Add Slides to a Presentation That Fit In
Adding slides from one presentation into another and hoping for a button that will automatically format the slides the way needed is just not a feature in PowerPoint. But, the almost magical “Destination vs. Source Formatting” button does exist. For this tutorial, we are going to add slides from the “Blue” presentation (Presentation #1) to the “Purple” presentation (Presentation #2) and make all of the slides the same, so they are all purple.
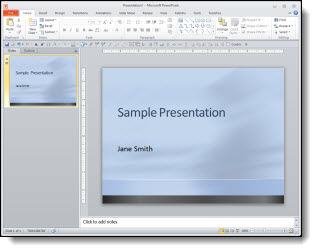
Here is our “blue” presentation (#1):
And here is our “purple” presentation (#2):
Select the slides from Presentation #1 and copy. The paste them into Presentation #2. To paste in the new slides, right-click and in the pop-up menu in the “Paste Options” sections select “Use Destination Theme:”
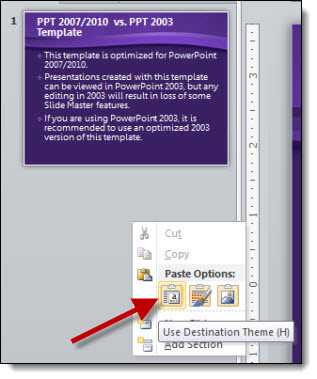
With the USE DESTINATION THEME option, the template for the new slides is assigned to the template used on the slide in front of the insert point. So now all of the blue slides are changed to the purple template.
*Note: There is no “magic” button and with this example the text boxes, background, colors used, etc. were all setup correctly using the template formatting (which also means it is a real template). When updating to the new (purple) template all of the master slide formatting carries over just fine. But there are lots of times when things are not based on template formatting and need to be manually updated (ie. no magic format button).
– Troy @ TLC
Adobe CS 6 is Coming – and FREE Upgrade Offer
Photoshop, Illustrator, and Acrobat are all common applications we use for presentation projects. Adobe has (finally) announced the time frame for CS6 to be released AND is offering the largest free upgrade they have ever done!
Release date for Adobe CS 6:
By May 31, 2012Free Upgrade:
Purchase Adobe CS 5.5 through May 6, 2012 and receive a one-time upgrade to Adobe CS 6 free.Details for the upgrade offer from the Adobe site are here.
– Troy @ TLC
Why Are The Shadows Not Animating?
Have you run into the issue of during the slide show an animated bullet list of text has the text shadow visible and then the full text animates on top of the shadow? It is a scenario that started with PPT 2007. The good news is, it is not a bug in the program and it is easy to “fix.”
Scenario:
You have shadow effects on your text and a great on-click animation.

But when you view as a slide show, the shadow of the text is not animating!

To Fix:
1. Select the text box.
2. Go to FORMAT >> SHAPE EFFECTS >> SHADOW and change the selection to NO SHADOW.

3. With the text box still selected, go to FORMAT >> TEXT EFFECTS >> SHADOW and choose the shadow style needed.
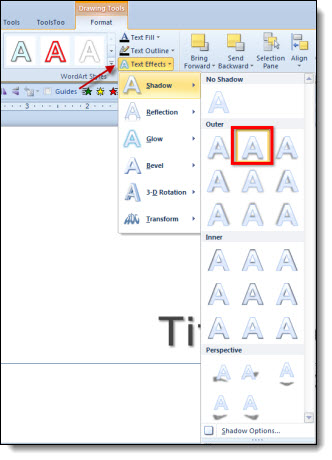
4. Now when you run as a slide show everything appears when animated!

Why:
PowerPoint has always had two types of shadows: Shape and Text shadows. In PPT 2003, there was really no visual difference between them (at the code level, the two shadow types were different). Starting with PPT 2007, the difference between the two shadows types made a difference in how things are displayed. The non-animating text shadow is the most common way this shows up.
– Troy @ TLC
VERY Creative and Impressive iPad Presentation
https://youtube.com/watch?v=qSA3Cvo4ff0
Thanks Tony R. for the link to this great presentation.
– Troy @ TLC
FREE – Adobe Lightroom 4 Live Online Course
I just found out about this (thanks Paul!) and thought others might be interested.

CreativeLIVE is offering an online workshop taught by Laura Shoe, a photographer and instructor from Seattle. Lightroom is Adobe’s incredible digital photography toolbox. The course description says it covers the fundamentals of Lightroom: how to import, organize and edit your photos and videos, create, copy and share and an overview what’s new Lightroom 4.

Get the full details here.
– Troy @ TLC