tutorial

PPT 2007 Charts (part 4)

More two-click adjustments are found when a chart is selected and going to teh LAYOUT tab.

Each of these choices have a drop down to instantly adjust the entire chart. As example, if I want to format the chart legend I SELECT the chart >> LAYOUT tab >> LABELS section >> click LEGEND >> CHOOSE from any of these formatting options:

It is just as easy to adjust the data labels, axes, gridlines and more!

– Troy @ TLC

By |2016-11-17T13:20:08-07:00March 17th, 2008|PowerPoint, Tutorial|

You Need to Find The Selection Pane!

So sometimes the greatest feature is only great if you know it exists. Recently I showed a very talented designer the Selection Pane in PPT 2007 and she could not believe she did not know of it. So you are in the know, here is what the Selection Pane is and how to open it.

1. Here is my sample slide. Note there are 6 elements (visible) on the slide

2. From the HOME tab, choose the SELECT all the way down on the right

3. In the SELECT drop down choose SELECTION PANE

4. The incredible SELECTION AND VISIBILITY pane will open (next to the animation pane)

This powerful tool will let you turn on or off layers (like photoshop) and let you select a buried element! On this sample note that there are (2) visible items, which are seen in the above sample. But there are also (3) not visible items on this slide.

– Troy @ TLC

By |2016-11-17T13:23:48-07:00February 27th, 2008|PowerPoint, Tutorial|

Make a “Fake” Website

One of the common requests is to show a website on a slide, or create a mock-up of a website. With this request I first open one of my favorite applications SnagIt.

Then open a blank broswer and use snagit to create a .jpg which can be inserted into the slide. Here is one I like, which I added a drop shadow to for some extra pizzazz.

Then I can capture the needed website or add images to mockup. Here is my slide, note there are 2 images; the browser image and then website image (which I positioned and cropped to fit inside the browser). I can also add the URL with a PPT text box, which makes this clear and easy to read:

– Troy @ TLC

By |2016-11-17T13:27:31-07:00February 13th, 2008|PowerPoint, Resource/Misc, Tutorial|

PPT 2007 Compresses Images By Default

Turns out PowerPoint may be trying to be more helpful than you want. I want to control when, and how many times, an image is compressed. The default setting for PPT 2007 is to compress images every time the file is saved. Here is my example slide, which has just one large image:

With the image selected (1) go to the FORMAT tab, then (2) click the COMPRESS PICTURES option

This brings up the basic dialog box, but we want to go into the OPTIONS

Finally, UNCHECK the automatically compress images option so you can control which images, if any need to be compressed by PowerPoint.

– Troy @ TLC

By |2016-11-17T13:33:34-07:00February 5th, 2008|PowerPoint, Tutorial|

Bevelled Edges (Yeah!)

Here again, is a great feature that eliminates time spent in Photoshop prepping images! A variety of bevel effects can be applied to any image – here are two:


A variety of bevel effects can instantly be applied with the presets:

I am going to cover the advanced settings in detail a bit later, but the bevel feature really lends itself to using the advanced settings, which is the menu opened when the “3D Options” is selected. It offers lots of customization options:

– Troy @ TLC

By |2016-11-17T13:47:55-07:00December 19th, 2007|Tutorial|

Download More

I often, as I am sure you do, have to download lots of files for a project (PowerPoint, Photoshop, images, PDFs, etc.). Unless all are on an FTP site I can access with an FTP application your browser limits you to 2 simultaneous downloads. Great if I was on a bandwidth limited dial-up modem, but I have a 15mb/s connection and want to download more.

The good news is this limitation can be overcome, but you have to do a bit of digging and adding values. I have all of my computers set to allow up to 10 simultaneous downloads. Here’s how:

1. Go to START >> RUN >> REGEDIT
2. Click on HKEY_CURRENT_USER
3. Click USER
4. Click SOFTWARE
5. Click MICROSOFT
6. Click WINDOWS
7. Click CURRENTVERSION
8. Click INTERNET SETTINGS

Now that you have burrowed deep into the OS, you need to add to new values (the ones that say let me download up to 10 files simultaneously).
9. Right-click anywhere in the right pane
10. Select NEW
11. Select DWORD VALUE

These next steps you will repeat twice, once for each needed value.
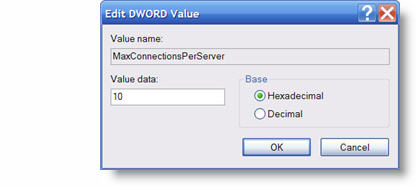
12. Double-click the newly created NEW VALUE #1 icon
13. In the Value Name area type “MaxConnectionsPerServer”
14. In the Value Date area type “10”
15. In the Base area click DECIMAL
16. Click okay

Do it again.
17. Repeat #12-16, but in the Value Name area type “MaxConnectionsPer1_OServer”

You are now free to download up to 10 files simultaneously (provided you have enough bandwidth with your internet connection)!

– Troy @ TLC

By |2016-11-17T16:31:34-07:00October 15th, 2007|Tutorial|

Make Your Desktop Presentation Worthy

This is one of the nifty features of Windows (XP) that no one seems to know about. Before a presentation, I use the “show/hide desktop icons” feature to hide every single item on my desktop. That way if I need to exit a presentation for any reason, the only thing projected is a my desktop wallpaper. After the presentation, I restore all in just one click.

1. Right-click desktop
2. Go to Arrange Icons By
3. Select Show Desktop Icons
4. Let the screen refresh (may take a few moments) and you are left with a completely clutter free view!

– Troy @ TLC

By |2016-11-17T16:31:04-07:00October 12th, 2007|Tutorial|

Rotate Pictures in Windows Explorer

If you have bunch of images to insert into a presentation, but some are rotated (ie. taken in vertical layout with a digital camera) they can easily be rotated BEFORE inserting into the presentation.

1. Open Windows Explorer
2. Set View to thumbnail or filmstrip
3. Select image(s) to rotate
4. Right-click and choose the rotation (clockwise or counter clockwise) needed

– Troy @ TLC

By |2016-11-17T16:29:23-07:00October 5th, 2007|Tutorial|

Organize and Enhance Movies in Presentation (2)

How does the person reviewing a printout of the slides know which movie is to be played, or even if it is a movie? When a movie is inserted on a slide it adds an image of the first frame of the movie. Sometimes this provides enough information to identify it. Other times it is something abstract or even black.

For all of my projects I take advantage of the fact that a movie will always play on top of all other content. I create a rectangle autoshape that is the same size as the movie image and place it ON TOP of the movie. I then add descriptive text.

Now anyone reviewing the slides in PowerPoint or from a printout knows exactly what is going to happen on this slide. Another benefit of this is that is does hide that first frame image of the movie that PowerPoint created – we’ve all seen the awkward image of the person with their mouth open – eyes closed – and out of focus, it’s a good thing to hide it!


Again, the movie is UNDER the autoshape, but during show mode it will “pop” to the front and hide the autoshape.

– Troy @ TLC

By |2016-11-17T16:22:56-07:00August 29th, 2007|Tutorial|

Where’s My .PCB File in Vista?

So your PowerPoint toolbars have exploded and you need to reset them with your backup .pcb file (file that contains your customized toolbar settings). But you have just upgraded to Vista and it is no where to be found!

Here is where you need to go:
C: >> Users >> (Your Name/Account) >> App Data (will need to be able to view hidden folders) >> Roaming >> Microsoft >> PowerPoint

– Troy @ TLC

By |2016-11-17T16:20:48-07:00August 13th, 2007|Software/Add-Ins|
Go to Top