Software/Add-Ins

Can a Mobile Device Project? Yes it can!

There is a lot of talk and excitement about using mobile devices, phone or tablet, to run presentations. And yes, I can confirm it is possible. But the question is – should you use a tablet or smartphone as the presentation “computer?” The answer – it depends on the meeting.

mobile-devices-1

Some presentations require a mobile device, such as a mobile app demo. But for a traditional presentation, if it is a large meeting with AV support, I recommend conforming to the desktop app and handing off a presentation file. This ensures you can focus on the presentation, not the technology setup and function. If it’s a small board room meeting and you feel confident in using newer technology, then mobile devices can be a good option. However, I recommend having a traditional computer, and the presentation on a memory drive – just in case.

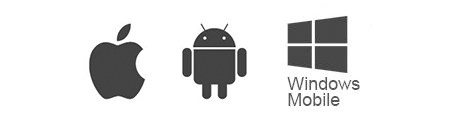
Let’s look at the different options currently available to work with when it comes to using mobile devices in presentations. This is a high-level reference and overview of the primary mobile devices that can be used for presentations.

Apple

  • iPhone, iPad Tablets and iPod Touch

Google

  • Android Phones and Android Tablets

Microsoft

  • Windows 8.1 / 10 Mobile and Surface Tablets

Wired and Wireless

mobile-devices-2

There are two types of connection options for getting a presentation from a device to the projector.  Both are options. In general, using a wired connection is going to be easiest option, as it has the least technology needs (do to the cables, connect – done).

Wired

The first option is wired connections. This is (obviously) physically connecting a cable to the mobile device. Each device type has a different connector, and then there are multiple options for the AV system you need to figure out (eg. Is the AV system using VGA, HDMI or other display connector?).

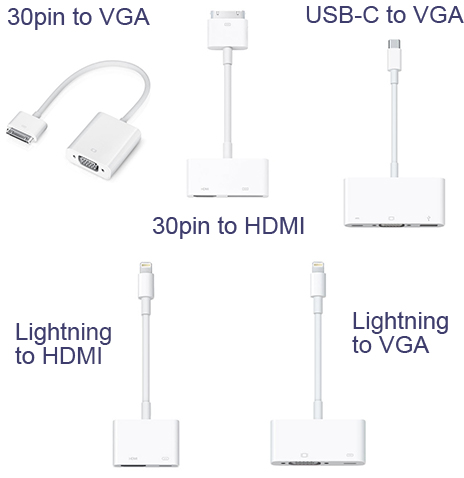
iPhone/iPad Connectors

  • 30 pin to VGA/HDMI
  • Lightning to VGA/HDMI
  • USB-C to VGA

mobile-devices-3

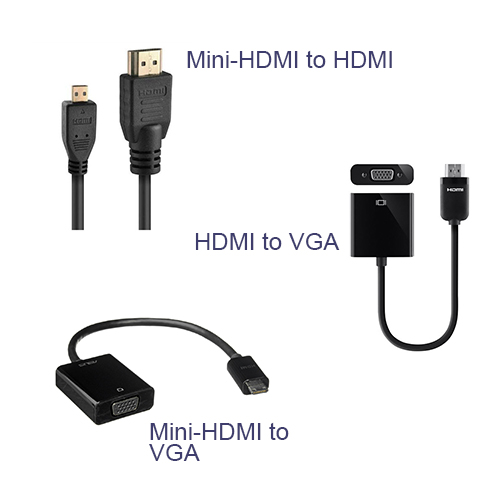
Android Phone / Tablet Connectors

  • Mini-HDMI to HDMI or VGA
  • HDMI to VGA/HDMI/DVI

mobile-devices-4

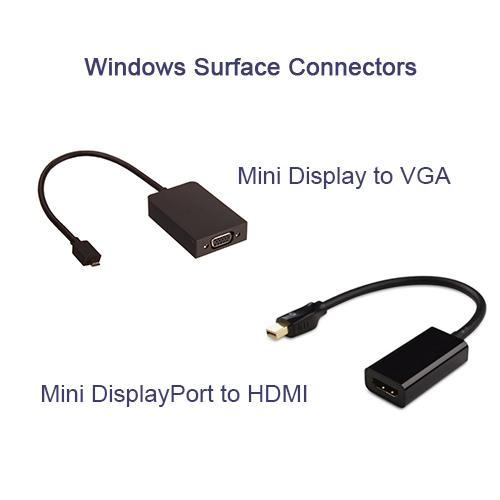
Windows 10 Phone / Tablet Connectors

  • Mini HDMI to HDMI/VGA
  • Mini DisplayPort (AKA Thunderbolt) to HDMI/VGA/DVI

mobile-devices-5

Wireless

The second option is connecting your mobile devices using a wireless system. Keep in mind, most wireless display connectors need WiFi. And the WiFi needs to be fast enough for the presentation to display content and animations smoothly, and it needs to have enough coverage to connect in the meeting meeting room (ie. Not your hotel room or the lobby, but the actual ballroom).  Miracast is a direct connection technology, so a WiFi network is not needed.

iOS Devices = Apple TV

mobile-devices-6

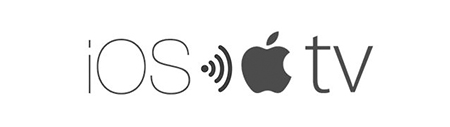
Apple devices are easily the most popular and abundant (myself included with an iPhone and iPad). Apple devices need to connect to Apple TV, so you need the physical Apple TV device and a WiFi network for both the IOS device and Apple TV connect to (then the Apple TV connects to the AV System/projector/monitor). AirPlay is the IOS app (built in to all Apple devices) that make the wireless display work.

My opinion on wireless presentations from IOS devices is that they work well, but have a lot of hardware and setup needs.

 Android Devices = Google Chromecast

mobile-devices-7

If you use an Android mobile device, the Google Chromecast device is needed. The original Chromecast device was basically a small USB drive with an HDMI connector and additional mini-USB port for power. The new Chromecast device is a bit larger, more in line with an Apple TV size (but still just a USB power). Another option is many SmartTVs are Chromecast-ready and Android devices can stream direct to it with no additional hardware. No matter what Chromecast connector is used, WiFi is needed.

Last, if you are using an Android device, a great app available in the Android Google Play App Store is AllCast, which enables Android devices to also connect to Apple TV, even more SmartTVs and the Amazon Fire TV.

My opinion on Chromecast is that it works, has smaller equipment, has easy setup – but I have been unable to connect it to some larger show AV systems…

Windows 10 Mobile = Miracast WiFi

mobile-devices-7

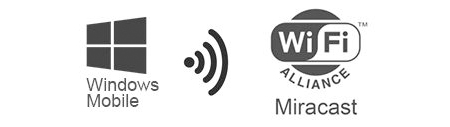
If you’re a Windows 10 Mobile device user, or Windows 10 desktop, the MiraCast wireless display software is built in. The interesting thing (and good thing), is MiraCast is not a Microsoft technology, but an industry wide wireless display platform that Microsoft has adopted and integrated into ALL Windows 10 devices (Note: It is also available on Windows 8.1 as a download in the Windows App Store). MiraCast is also available on Android devices as a separate app download, and it also works with IOS devices (but is not available through the Apple App store, so only works with “jail break” devices which I hope changes in the future).

My opinion of MiraCast is this works the best of all wireless display options covered. Because it is an open standard, the physical dongle is not limited to one company and I have had some work great and others not work at all. I recommend the Microsoft manufactured device as I have had flawless operation of it (and it is very small like the original Chromecast device). The other really great feature is that MiraCast does not need WiFi, it will connect to any device using a local connection (so it does use WiFi, but not internet enabled WiFi).

I hope the helps with an overview of many mobile device connection options and some of my (sometimes hard-earned) opinions on mobile devices for presentation use.


-Troy @ TLC

By |2016-08-10T08:10:43-07:00May 31st, 2016|PowerPoint, Resource/Misc, Software/Add-Ins|

Use a PDF for a Slide Show

A PDF of slides, or any document if in the correct aspect ratio, can be used for presentation slides. I am using Adobe Acrobat, but most PDF viewing apps have the same capability.

Here is my sample 16×9 presentation of 4 slides exported as a PDF, now open in Acrobat.

PDFView_4

I have selected the first page vs. the Organize/Grid view.

PDFView_1

Go to VIEW > FULL SCREEN MODE, or use the keyboard shortcut CTRL+L

PDFView_2

The Acrobat tool bars disappear and the slide displays full screen. Using the arrow keys or Page Up/Down keys, you can go through the pages just like a presentation.

PDFView_3

Notes:

  • No animation
  • No slide transitions
  • No video or audio (There are ways to add these, but not covered in this tutorial, and not part of PowerPoint’s PDF export)
  • Cannot be added to a master slide deck of all presenter slides (This is a separate file that just look like slides)
  • No presenter view (Duplicate display is recommended vs. extended desktop)

-Troy @ TLC

By |2016-08-10T08:12:27-07:00May 23rd, 2016|Software/Add-Ins, Tutorial|

Using Adobe Typekit Fonts

Adobe Typekit is a combination between an online tool that previews fonts and an installer that adds them to a computer. Adobe TypeKit is included with Adobe Creative Cloud subscriptions.

Adobe TypeKit -1


Can Presentation Apps Use Adobe Typekit Fonts?

Yes, if we are talking about desktop PowerPoint and Keynote. Once the Adobe Typekit font is selected and synced to the computer, the font is available in other applications. At TLC, we use PowerPoint for Windows and Mac and Apple Keynote – we can confirm Typekit fonts are available for all of them. Note: PowerPoint may need to be restarted for the font to become available in the font menu.

Adobe Typekit Windows Mac
PowerPoint YES YES
Keynote N/A YES


HOW TO FIND AND INSTALL ADOBE TYPEKIT FONTS

Adobe Typekit is a hybrid app that is web-based, and can also be viewed through the Adobe Creative Cloud app and most Adobe applications (PhotoShop, Illustrator, InDesign, etc.). For our example, we are looking at Typekit through a web browser, which has the most options. Select the font to use in your presentation by going through the font library, select by clicking +USE FONTS (there are a lot of ways to view and search for fonts, and there are thousands of fonts).

adobe typekit menu


This is where things get a bit confusing. There are two options for using the font: (1) Web Sync, which will make the font available for web use (ie. a website), or (2) Creative Cloud Sync, which will make the font available for use in Desktop apps on a computer. We are installing fonts to a computer for use in PowerPoint.

adobe typekit

After selecting fonts and use, click SYNC SELECTED FONTS and they will  be installed on the computer.

adobe typekit sync

The Creative Cloud Desktop application will open and prompt you to add fonts from Typekit. Below that is a list of all Adobe Typekit fonts currently available.

adobe typekit -1

PowerPoint and Adobe Typekit

All Adobe Typekit fonts can be used by PowerPoint on both Windows and Mac, but there are some considerations:

  • PowerPoint needs to be started AFTER fonts are installed, or the new fonts will note show up in the font list.
  • Typekit fonts are considered “custom fonts” and will need to be installed on any computer that is going to show the presentation.
  • Only a computer that has Adobe Creative Cloud installed and has an active user account logged in to an Adobe CC account is going to be able to sync and install Typekit fonts.
  • PowerPoint will not warn you that fonts are missing, nor will it tell you where the fonts are from (So an end user needs to look at the font list for missing fonts and know they are Typekit fonts that they can install. TIP: Add a hidden slide or off-slide note about custom fonts and where to find them to help other users).
  • Typekit fonts installed on a computer are not actual files that can be accessed and copied to other computers.

2

Keynote and Adobe Typekit

All Adobe Typekit fonts can be used by Keynote, but there are some considerations: Keynote dynamically recognizes newly installed fonts, so there’s no need to restart it after fonts are installed (great!).

  • Adobe Typekit fonts are considered “custom fonts” and will need to be installed on any computer that is going to show the presentation.
  • Only a computer that has Adobe Creative Cloud installed and has an active user account logged in to an Adobe CC account is going to be able to sync and install Adobe Typekit fonts.
  • Adobe Typekit fonts installed on a computer are not actual files that can be accessed and copied to other computers.

2


-Troy @ TLC


By |2016-08-10T08:17:25-07:00May 4th, 2016|Resource/Misc, Software/Add-Ins, Tutorial|

Video downloads with Savevideo.me

Savevideo is a great online tool that can be used to download videos as mp4 files.  Although the site does not support Youtube videos, it does support a number of other popular sites, including Vimeo, Facebook, Twitter, Vine and Dailymotion (just to name a few).   There is an extensive list of supported sites in the drop down menu under Supported video-sites.

To download a video using this simple tool:

1

Copy and paste the url for the desired video into the field and click Download.


(NOTE: Be careful not to click any other download buttons on the site, as they are likely advertisements.)1_ Savevideo


2

The download bar will turn green to show the video is in process

2_ Savevideo

3

A list of available sizes will appear below the download bar.

3_ Savevideo

4

Right-click the link that says Download video file next to the desired version, and select Save link as… Choose the location for your video file, and click Save.

4_ Savevideo


Michelle @ TLC

By |2016-08-10T08:33:25-07:00March 14th, 2016|Software/Add-Ins|

Video Export Size (HD!)

Another behind the scenes upgrade in PowerPoint 2016 is the video export size options. Now true, 1920×1080 HD video can be exported from PowerPoint.

Go to FILE > EXPORT > CREATE A VIDEO
Video Export Size 1

The export size options have been revised to 1920×1080, 1280×720 (the PPT 2013 highest res option), and 852×480.

Video Export Size 2


-Troy @ TLC

By |2016-08-10T08:39:43-07:00February 10th, 2016|PowerPoint, Software/Add-Ins|

New Auto Layout Designer

Another new feature of PowerPoint 2016, only available to subscription users, is DESIGNER, which is an automatic layout tool. Here is an example of how it works.

  1. Start with a blank slide – on a Microsoft supplied template (I am using the standard white background new presentation)
    Designer 1
  2. I entered some text in the title placeholder and used the Insert Image option for the content placeholder
    Designer 2
  3. Go to the DESIGN tab and click the new DESIGN IDEAS button
    Designer 3
  4. The right action pane opens the DESIGN IDEAS interface, click LET’S GO
    Designer 4
  5. The Design Ideas pane displays a number of layout options
    Designer 5
  6. Scroll through the options, select any to see and use, these layouts (and several others) were automatically created with a simple click
    Designer 6

Fantastic feature for both the designer and non-designer! But at this stage there are a few downsides to the new DESIGNER tool.

  • The biggest downside is if you do not have PowerPoint 2016, and a subscription version (eg. Office 365), Designer is not available in PowerPoint.
  • The biggest limitation is that it will only work with Microsoft supplied templates. Open the DESIGN tool on a custom template and get the message below.
  • If you do not use layout placeholders (eg. add your own text boxes and insert images not through a placeholder insert image icon), and you get the message below.

Designer 7

Overall, a great idea and smooth implementation. But because TLC virtually never uses a Microsoft template (or theme), this feature has very limited use for us – but I am hopeful Designer will continue to expand its capabilities.


-Troy @ TLC

By |2016-08-10T08:41:53-07:00February 5th, 2016|PowerPoint, Software/Add-Ins|

The PowerPoint QAT – A Designer’s Best Tool

The Quick Access Toolbar (QAT) is one of the best options for making your design work faster, if setup properly. The PowerPoint QAT is basically a collection of the top used “buttons” always accessible without having to change tabs on the ribbon.

PowerPoint QAT 3

Setting up the QAT is fairly easy, but tedious. But Microsoft has made it very easy to leverage someone else’s effort. In this case, my effort, think of it as my gift to everyone that reads this post, and instantly setup your QAT with 37 buttons to speed up design.

Download the QAT file HERE (unzip and “PowerPoint Customizations.exportedUI”).

In PowerPoint, go to FILE > OPTIONS > QUICK ACCESS TOOLBAR > IMPORT/EXPORT > IMPORT > select the downloaded file > say YES to the dialog > done.

PowerPoint QAT 2

– Troy @ TLC


By |2016-08-10T08:54:31-07:00September 28th, 2015|PowerPoint, Resource/Misc, Software/Add-Ins|

Permanently Delete a File with Eraser

Here at TLC, our team works hand in hand with companies dealing with all sorts of information. One week, you may find us setting up show computers for a large event for a pharma company, and the next week, onsite running presentations for an executive of an auto corporation. Our computers are always operated by internal staff, but it is imperative to secure information.

Eraser 1

Dropping files into the Recycle Bin is not really deleting them – it is only the operating system removing the reference of the files from the system table. Every file is really there until another file is saved over it. Eraser permanently overwrites files with patterns of data that completely prevents file recovery. So, whether you want to securely erase financial records, passwords and/or security data, Eraser is a free, easy to use program that makes files gone for good. Eraser can be found here (go to the download link at top of page – do not use any of the adware download buttons!).

eraser logo

– Troy @ TLC

By |2016-08-10T09:01:02-07:00August 10th, 2015|Software/Add-Ins|

Awesome Screenshot.com – online screen capture app

[text]All of the designers at TLC use Snagit for screen shot needs; it is installed on every computer we have. Windows and Mac OS both have built in screen capture options that are cute and nice, but not robust. We recently found Awesome Screenshot.com which is a great online screen share, and edit app, something we can use when working on a guest computer.[/text]

Awesome screenshot 12

[text]Awesome Screenshot is free for 30 images and 1 project folder. The premium option (currently $8.99 promo, regularly $11.99 year) has unlimited image captures and project folders. The Chrome browser is the only one that supports the add-in, but the annotation and editing features can be used on any browser. The Chrome add-in makes Awesome Screenshot a more full featured option (eg. Use Chrome for this app).
[/text]

Awesome_1

[text]Possibly one of the coolest features of Awesome Screenshot is adding comments to screenshots (much of what we use SnagIt for) and sharing directly from the site. In addition, other users are able to comment on the screenshot image as well, so this can make collaborative feedback simpler than ever! Some other cool tools are highlighting or blurring text. But the editing tools are more limited than other apps with fewer less colors, shapes, etc. Still, the ability to organize the screenshots by project is unique and pretty awesome (pun intended)![/text]
[text]Use Chrome and create an account. Under the Tools tab, select Add to Chrome, and follow the steps to install.[/text]

[text]After installed, Chrome has this app icon.[/text]

Awesome_2

[text]Click the Awesome Screenshot icon to view capture options.[/text]

Awesome_3

  • Capture visible part of page: Captures only the visible area of the current browser page
  • Delayed capture: Captures only the visible area of the current browser page three (or five) seconds after clicking
  • Capture selected area: Allows you to select the area of the current browser page to capture using a marquee selector
  • Capture entire page: Captures the entire area of the current browser page (include non-visible areas that require scrolling to see)
  • Select a local image: Allows you to choose an image that is saved locally to your computer or drive[/list_item]
  • Capture desktop: Allows you to select from any open windows or computer screen(s) to capture
  • My projects: Takes you to the Projects library
  • Options: Allows you to update the settings, such as image format, shortcut, and delay time specifications

[text]In addition, you can drag and drop existing images into the open project folder of your choice or select “Add images” from the project folder page on the website.[/text]

[text]Capture a screenshot (all or part of the screen) and it shows up in the simplified Annotation (or edit) screen. Save the image to a project folder to get to the full editing options.[/text]

Awesome_4

[text]There are several save options – save online for best collaboration.[/text]

Awesome_5

[text]To edit, click the Annotation icon while hovering over the image.[/text]

Awesome_8

[text]The top bar is the editing tools: Crop, draw, shapes (rectangle or oval), arrows/lines, text, blur, color, line weight, undo, redo, reset, delete shape, and zoom.[/text]

Awesome_9

[text]Save edits and add comments. By default, it goes to the comments page. You can also select other images in the project folder, share the image, return to the Annotation page, or view the comments list.[/text]

Awesome_10

[text]Click the “eye” icon to exit the page, or right-click select Save image as to get a local version of the image on your computer – which can be added to a presentation.[/text]

Awesome_11

[text]Thanks to staff designer Michelle for this review.
– Troy @ TLC[/text]

By |2016-08-10T09:03:57-07:00July 17th, 2015|Software/Add-Ins|

Office 2016 for Mac – Available!

Office for Mac 2011, the current version, has been in existence for 4.5 years. That is a very long time between upgrades. But Microsoft has (finally) released Office 2016 for Mac – and it is a very good upgrade.

O2016

If you are an Office 365 subscriber, Office 2016 for Mac is part of the subscription and an easy upgrade. If you are a retail or corporate licensing client, you may have a few months until Microsoft has it available to you.

I have been fortunate to be running the beta version for the past few months and have found Office 2016 has good parity with Office 2013 for Windows (not perfect, but much, much better). The interface uses the Ribbon styling (although not all buttons and options are in the same place or available) and the functionality is near identical. The ability to move presentations between platforms has never been better (again, not perfect, but a huge step forward). This is a major undertaking by the Microsoft Mac Office team (completely coding a new version of Office) and I expect Office 365 subscribers to have a steady stream of refinements rolled out (which is great!).

– Troy @ TLC

By |2016-08-10T09:04:24-07:00July 14th, 2015|Software/Add-Ins|
Go to Top