Tutorial

Fonts You Can and Can’t Use in PowerPoint

With the millions of designs available, fonts have the ability to make text display anywhere from serious to fun.

Fonts_1

Fonts are separate files that must be installed on each device the custom font is needed. There are Microsoft Fonts, Adobe Creative Cloud Typekit, Google Web Fonts, custom fonts from Font Foundries and websites everywhere – but what is a presentation to use? When selecting fonts, you are selecting physical files.

For example, in PowerPoint, all fonts shown in the font drop down menu are actually individual files installed on that computer (TIP: If there is not an “O” or “TT” icon next to a font, it is not installed on that computer and is not going to display as designed). So first, let’s overview the common types of fonts that can installed.

font-type-3


OpenType

font_types-1

In the history of digital fonts, OpenType is the newest format, with applications adopting its use around the 2,000’s. The extension for OpenType fonts is .OTF and in PowerPoint’s drop down font list, OTF fonts are identified by a large “O” icon. One advantage of OpenType fonts over others is the font file format provides more typographic design options which means more symbols/glyphs/language support/display options. The greater display options (OpenType does not have one display method, but the ability to use legacy display standards and new display standards) mean it is the font file format of choice for newer devices and OS’s – think mobile everything.

Fun Fact: OpenType is a registered trademark of Microsoft, and was developed because Microsoft was unable to license Mac’s “GX Typography” system. Microsoft and Adobe partnered to develop OpenType. Get the full history of OpenType development at this wiki page.


TrueType

font_types-2

TrueType is still the most common font file type. The extension for TrueType is .TTF and in the PowerPoint font drop down, TrueType fonts are identified with a “TT” icon. True Type is older (than OpenType), a bit less robust when it comes to designing and displaying fonts, but it is the dominant font format used – partially because it is less expensive to license.

Fun Fact: Apple was the first to use TrueType in its 1991 OS with 4 fonts (Times Roman, Helvetica, Courier, Pi), which is originally licensed to Microsoft for free. Full history of TrueType development at this Wiki page.


PostScript

The last font file format for this discussion is our oldest digital font format, which is the most complex. PostScript fonts are actually 2 files. One is for the onscreen display and the other is used for printing where it literally outlines every letter and symbol sent to the printer. The extension is .PS, and PowerPoint does not support PostScript fonts – so we do not see them in the font drop down menu, even if they are installed on the computer. What makes PostScript fonts important for today’s presentations is PostScript fonts were the first font technology to use mathematical computation to dynamically redraw fonts with vector Bezier curve to allow fonts to be any size. PostScript fonts were also the first to contain multiple character sets (ie. multiple languages).

Fun Fact 1: I remember working with PostScript fonts as the only solution for high quality graphic design and typographic work – and spending huge amounts to buy a custom font for projects.

Fun Fact 2: Printers used to be “PostScript-Ready,” meaning the printer actually had PostScript processing built into it.

Fun Fact 3: Adobe developed Type 1 and Type 3 fonts, which are PostScript file types, back in 1984! There was an earlier Type 0 before those, and development with Type 3-4-5-up to 42 (which was introduced in 2010). Full history of PostScript development at this Wiki page.


-Troy @ TLC

By |2016-08-10T08:18:10-07:00May 2nd, 2016|Resource/Misc, Tutorial|

What is the Template Color Scheme Name?

Every template has a Custom Color Scheme. And every color scheme has a custom name. For example: Here is a custom PowerPoint template I am working on, and I named the template color scheme “The Future Is Now” which is the theme name of the event where it will be used.

Template Color Scheme -1

And when I look at the color schemes available on my computer, this theme is listed – because it was created on this computer:

Template Color Scheme -5

But on any other computer, with the template open, if I look at the color schemes, The Future Is Now is not listed:

Template Color Scheme -2


To find the Custom Color Scheme name, do this:

  • Go to VIEW > SLIDE MASTER > BACKGROUND > mouse over (do not click) COLORS
  • Template Color Scheme -3
  • The pop up dialog shows the current template color scheme name
  • Template Color Scheme -4

Now you can edit the existing color scheme and know what name to give it.

-Troy @ TLC


By |2016-08-10T08:18:29-07:00April 29th, 2016|Tutorial|

Snap to Grid and Nudge

Why do shapes sometimes jump further than you want when moving them with the arrow key? What is the PowerPoint Grid? How are they connected?

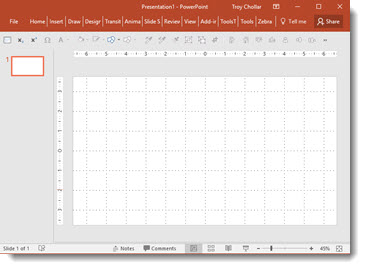
Let’s start with the PowerPoint Grid. Using a PowerPoint Grid can be a great tool for slide layout and design. To turn it on/off go to VIEW > SHOW > GRIDLINES check box. Once it’s checked, you’ll see a dotted line grid like this:

PowerPoint Grid-1

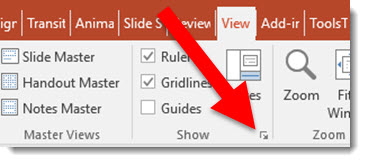
There are some options, such as the grid spacing, and another way to turn on/off. Open the GRID AND GUIDES dialog by going to VIEW > SHOW > click the Options box:

Nudge-3

The GRID AND GUIDES dialog has several options for guides, snapping, and grids:

Nudge-4

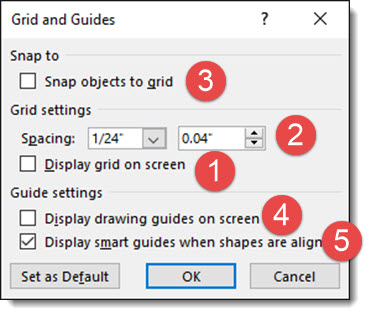
1- DISPLAY GRID ON SCREEN is the same as the above VIEW > SHOW > GRIDLINES. Both turn on/off the gridlines.

2- The spacing, or size of the grid, can be changed here. (Note: The grid spacing is used for the document, so you cannot have a different PowerPoint Grid mixed into a single presentation file.)

3- SNAP OBJECTS TO GRID is what enables objects (shapes, photos, lines, etc.) to “jump” to a location when you are moving them. They are “jumping” to the next gridline. (Note 1: The grid does not need to be visible/on for this to be active. Note 2: I personally do not like objects jumping to locations, so Snap to Grid is turned off on my design computer.)

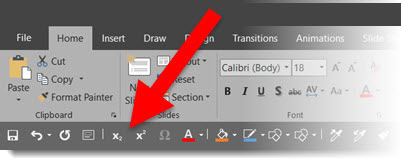
4- DISPLAY DRAWING GUIDES ON SCREEN can also be accessed a few ways, including as a button on my custom QAT (Note: I use guides in my design process much more than grids).

5- DISPLAY SMART GUIDES WHEN SHAPES ARE ALIGNED is a love-it or hate-it feature (I am in between and turn this on/off as the design needs). It is like SNAP TO GRID, but instead objects snap into alignment with other objects.

 
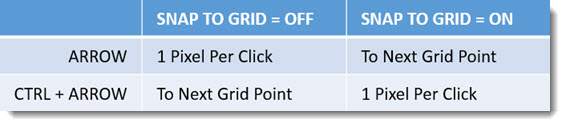
Back to our original question, why do objects “jump” further than you want when moving with a mouse? The answer is NUDGING, or moving an object with the arrow key, is directly connected to SNAP OBJECTS TO GRID. If my goal is to move the blue box to the right and touch the next grid line, the number of arrow nudges is going to depend on whether the Snap to Grid is on or off.
.
.
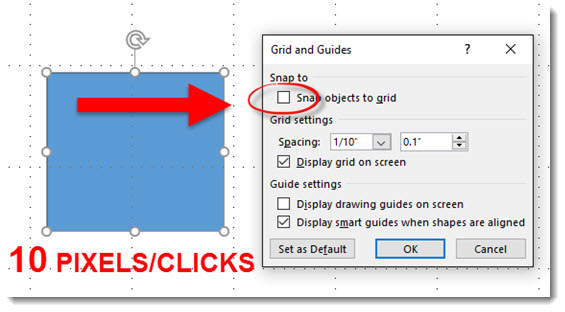
Example 1 – Snap to Grid = OFF
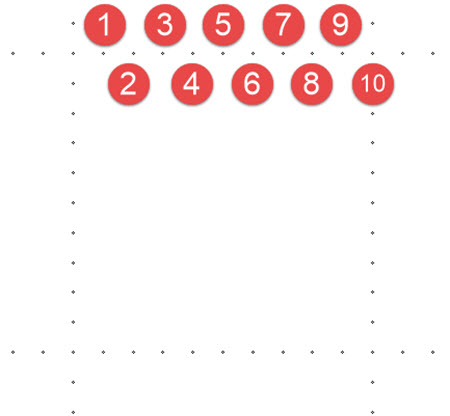
– With Snap to Grid turned off, I have complete control moving an object, each arrow nudge is 1 pixel. In this example, I would need to arrow/nudge 10 times to move the blue box to touch the next grid line (the blue box is 10 pixels away from the grid line).
Nudge-5
.
 
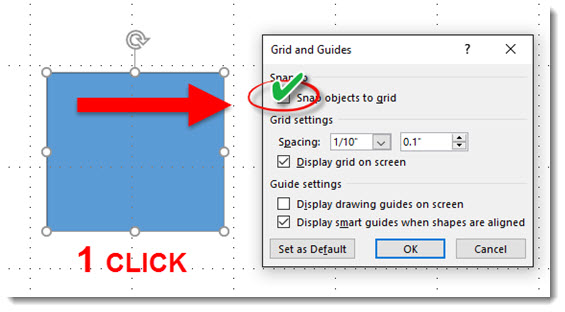
Example 2 – Snap to Grid = ON
– With Snap to Grid turned on, I have less control moving an object, each arrow nudge jumps to the next grid point. In this example, the next grid point is the next grid line, so 1 arrow/nudge jumps the blue box to touch the next grid line, which may be good or bad (or frustrating).
Nudge-6
 .
 
Here is a close up of the grid points. With this 1/10″ grid, there are 10 points in any direction, and an object will nudge at the most 10 clicks to move across the grid (but the grid in this example is actually 300 pixels wide/tall).
Nudge-7
 
 .
 
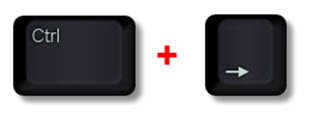
TIP: There is a great hidden feature to override SNAP TO GRID, actually temporarily switch its ON/OFF so nudging does the opposite, use CONTROL key + Arrow key (in any direction)
Nudge-8
 .

Summary (thanks MS Blair for sending out this simplified grid! [which I modified]):

Nudge-9

-Troy @ TLC


By |2016-08-10T08:19:44-07:00April 27th, 2016|Tutorial|

Crop to Aspect Ratio & Shape in PowerPoint

When PowerPoint added image crop capabilities, the need to rely on Photoshop (or other external image editing programs) was amazingly reduced. The Image Crop tool has some great advanced options that are not well known, or used nearly enough. So, here is a demo of two great tools hidden in PowerPoint’s Image Crop tool.

Here is our sample slide and original image, a tall rectangle:

IMAGE CROP Page_1

If the goal is to use a perfect square image, it is only 3 clicks away:

  1. Select the image
  2. Go to FORMAT > CROP > ASPECT RATIO
  3. Select 1:1 and the image is cropped to a perfect square (1:1 aspect ratio) – without the image being distorted
  4. The bonus click would be moving the image within the crop to adjust what is visible

IMAGE CROP Page_6

  • 3 clicks and our test slide image now looks like this:

IMAGE CROP Page_2

The same can be used for the common 4×3 and 16×9 aspect ratios and several other options!

Another great, but not well known, option of the Image Crop tool is changing the shape of any image. All of the shapes dialog, used to add a PowerPoint shape (rectangle, circle, trapezoid, etc.) are available to images too.

  1. Select the image
  2. Go to FORMAT > CROP > CROP TO SHAPE
  3. Select any available PowerPoint shape

image crop 10

  • 3 clicks and the image can be an oval or trapezoid:

IMAGE CROP Page_4

IMAGE CROP Page_5

-Troy @ TLC

By |2016-08-10T08:23:47-07:00April 15th, 2016|Tutorial|

Applying Line and Paragraph Spacing

Quick Shortcut to Apply Line and Paragraph Spacing

The F4 key reapplies the last action. It’s a great timesaver for those repetitive actions – an especially helpful task in customizing the line and paragraph spacing in a text box where not every paragraph gets the same spacing. Here is my sample slide with several text boxes and several paragraph spacing opportunities to improve the legibility.

line spacing f4_image01

If the formatting goal is to add some additional paragraph space between the bullets on each text box, the process unfortunately involves selecting the bulleted text in one text box, opening the paragraph spacing dialog, adjusting, closing dialog and then repeating the process in the next text box.

As a shortcut, adjust the Line and Paragraph spacing, then select the next text box and position cursor on the next bullet line. Use F4 to repeat the step automatically! F4 applies the last action made, so in this case you can go from the above sample slide to the one below in less than 30 seconds vs. several minutes selecting text boxes and opening/adjusting the Line and Paragraph dialog 6 times.

line spacing f4_image02

The F4 repeat works on virtually any command while editing slides. Another great use is formatting text in Tables – in this sample F4 was used to quickly add the text indenting for each 2nd line.

line spacing f4_image04

Also, Ctrl Y is another key command that does the same thing. So F4 or CTRL+Y repeat the last command. Test it out and see how it can save you time.

-Troy @ TLC

By |2016-08-10T08:24:12-07:00April 13th, 2016|Tutorial|

Crop to Shape in PowerPoint

Images within PowerPoint can be formatted to have many different effects.  In addition, a formatted image can also be cropped to any shape without affecting any existing formatting using the Crop to Shape tool.

1. Begin with an image that has been formatted within PPT.

Crop to shape-Photo_1

2. Select the image, and then click the drop down arrow below the Crop button under the Picture Tools Format tab.

Crop to shape-Photo_2

3. Hover over Crop to Shape to show the many different shapes available to crop the image to.

Crop to shape-Photo_3

4. Select the shape you wish to crop the image to.

Crop to shape-Photo_4

5. The image is now cropped to the new shape and all original formatting is still in place.  Here are some examples of the image cropped to different shapes:

Crop to shape-Photo_5Crop to shape-Photo_6

Crop to shape-Photo_7Crop to shape-Photo_8


-Troy @ TLC

By |2016-08-10T08:24:56-07:00April 11th, 2016|Tutorial|

PowerPoint Guides: Master vs. Slide

In PowerPoint, guides help with formatting, positioning and slide-to-slide consistency.  The PowerPoint guides have evolved over the past few versions. Here is a quick overview of the three different types of guides:

Master Slide Guides (Orange by default): Editable only on the master slide and display on all layouts and slides using that master slide.

PPT Guides_1

Master Layout Guides (Yellow by default): Apply to individual master layouts only and are only editable on that particular master layout. Here an additional guide is added to the TITLE layout, so only TITLE layout slides will see this new guide.

PPT Guides_2

Slide Guides (Gray by default): These are guides added and editable on slides (in edit view, not master view or slide show). In this example, 2 new guides have been added to the slide.

PPT Guides_3

Existing guides can be adjusted by clicking and dragging them .  The easiest way to remove a guide is to drag it off the slide.

PPT Guides_4

In addition, you can change the color of guides. To change the color of a guide:

  1. Right click the guide you want to change the color of (be sure it is in an area off the slide or on an empty area of the slide)
  2. Hover over Color
  3. Select a color option

PPT Guides_5

To add PowerPoint guides to a slide or layout:

  1. Right click off slide or on an empty area of the slide
  2. Go to Grid and Guides
  3. Choose Add Vertical or Add Horizontal

PPT Guides_6

– Troy @ TLC

By |2016-08-10T08:25:22-07:00April 8th, 2016|Tutorial|

PowerPoint Text Box Cell Padding (Margins)

One great feature of PowerPoint is knowing that every text box is basically a mini Word document which means adjusting the cell padding can be done quickly and easily.

Cell padding-1

By default, all text is inset a small amount in each text box. Here is an example from the Microsoft PowerPoint 2016 default template. There is .1″ all the way around.

Cell padding-2

The cell padding, or inset, is easily customized. Select a text box, right-click and select Format Shape.

Cell padding-3

In the Formatting text pane, click the Text Options.

Cell padding-4

Click the text box icon.

Cell padding-5

Adjust the Left/Right/Top/Bottom margins exactly as needed.

Cell padding-6

Here is the same text box with a 0″ margin all the way around so the text is right next to the placeholder now.

Cell padding-7

And here is a callout bar with the text set to start 1″ in from the left edge.

Cell padding-8

Just some formatting ideas for your next presentation. Otherwise, you are stuck wondering why the text in a shape is not in the position it should be.


– Troy@TLC


By |2016-08-10T08:25:42-07:00April 6th, 2016|Tutorial|

2-Up PDF Printout of PowerPoint Slides

Printing slides is a common need. But the Microsoft presets are not optimal. For example, let’s look at “2-up” printouts directly from PowerPoint and then we’ll look at my preferred option which is using Adobe Acrobat to create the 2-up PDF printout.

Using Microsoft’s PowerPoint preset:

1. Go to File > Export > Create PDF/XPS Document

2-up PDF printout Export_Image1

2. In the PUBLISH OPTIONS section, change the drop down menu to HANDOUTS. Slides per page = 2. Keep HORIZONTAL setting. A print preview of the pages will be on the right.

2-up PDF printout PPT_Image2

Select OK and your PDF will be created.

2-up PDF printout PPT_Image3


But, these can be larger images of each slide if we do not use the PowerPoint preset.


To create 2-up printout using Adobe Acrobat (Note: This is a multi-step process, but the result is great):

1. Go to File > Export > Create PDF/XPS Document. This time don’t worry about the options, just create PDF with 1 slide per page (the default print setup).

2upBlog_1upPDF_Image4

2. Now we are going to print the PDF again. From the PDF of the slides, Go to File >Print

2-up PDF printout PDF_Image5

3. Select ADOBE PDF as your printer.

4. In the Page Sizing and Handling select MULTIPLE.

5. In Pages Per Sheet select Custom.

6. Set to 1 by 2, the small print preview should look like the below example.

7. PRINT.

2upBlog_PrintPDFoptions_Image6

As you can see, side-by-side, the Adobe Acrobat 2-up PDF printout on the left has larger slide images than the PowerPoint 2-up printout, the Adobe Acrobat 2-up takes up the page significantly more than PowerPoint does.

2upBlog_2upPDF_Image72upBlog_2upPPT_Image3

Just a simple option to provide better printouts. It also works for 3-4-6-8-up printouts!

-Troy @ TLC

By |2016-08-10T08:27:31-07:00April 4th, 2016|Tutorial|

Where is PowerPoint’s Ruler?

This is a very common question that we’ve encountered on many occasions.  By default, the Ruler is not visible when PowerPoint is launched.

Ruler image_02v2

To see the Rulers, go to the View tab, Show section and turn on Ruler.

img2

That’s it! Now the rulers will be visible automatically when PowerPoint is used.


-Troy @ TLC


By |2016-08-10T08:28:41-07:00April 1st, 2016|Tutorial|
Go to Top