
Video downloads with Savevideo.me
Savevideo is a great online tool that can be used to download videos as mp4 files. Although the site does not support Youtube videos, it does support a number of other popular sites, including Vimeo, Facebook, Twitter, Vine and Dailymotion (just to name a few). There is an extensive list of supported sites in the drop down menu under Supported video-sites.
To download a video using this simple tool:
1
Copy and paste the url for the desired video into the field and click Download.
(NOTE: Be careful not to click any other download buttons on the site, as they are likely advertisements.)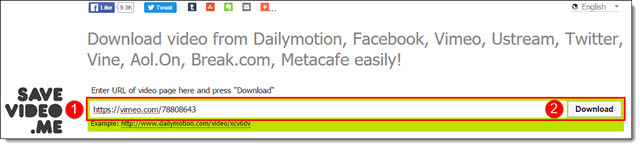
2
The download bar will turn green to show the video is in process

3
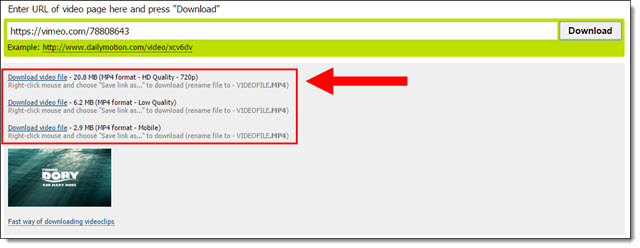
A list of available sizes will appear below the download bar.
4
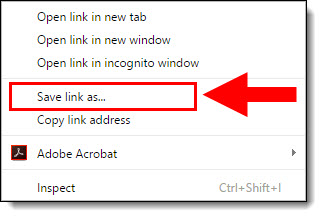
Right-click the link that says Download video file next to the desired version, and select Save link as… Choose the location for your video file, and click Save.
Michelle @ TLC
2 Second Rule for Auto Transition after Video
Using auto advance for transition is easy, but calculating when a video will end in order to add in the correct auto advance timing is tedious.

However, it turns out that we do not need to actually figure out how long a video is because PowerPoint cannot use the auto transition feature to override a video that is playing and advance, even if we want to (the solution is to trim the video to the shorter duration or manually advance the slide).
TLC’s best practice is the 2 second auto advance
Slide has video, presenter wants presentation to automatically go to next slide when video is done – easy.
On video slide, set to auto advance after 2 seconds. This assumes the video is the only animation and it is going to start playing automatically.
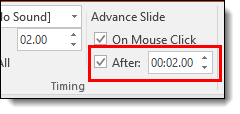
PowerPoint will go to the video slide, then the video will start playing and trigger to auto advance to next slide after 2 seconds, but it cannot do so until the video is done playing, so it waits for the video to finish. When the video play animation is done, the slide automatically advances to the next slide! We use this feature to help us easily setup what could be a complex request.
See the video example below:
– Amber @ TLC
Introduction to AudioBlocks
AudioBlocks.com is a great resource that TLC Creative Services uses often we’re looking for sound to put in a presentation. Audioblocks is a sister company/service to Videoblocks which we reviewed in the previous post.

AudioBlocks is a subscription service (i.e. Annual fee) and you get unlimited downloads. The entire audio library is royalty-free so you can legally download and use sounds in both commercial and personal projects, without having to pay any additional fees. The library has over 100,000 sound effects, loops and music and adds new clips continuously.
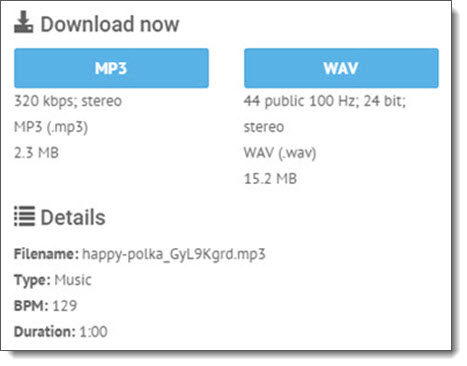
Clips are available in MP3 and WAV file formats.
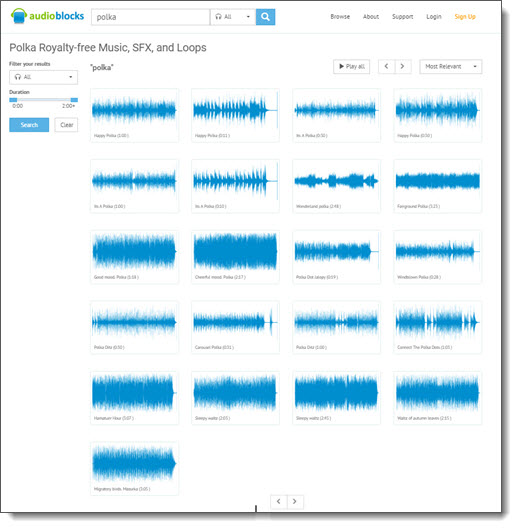
A really good option is that the Search feature can be filtered by keyword or style. Searches can be filtered by music, SFX or loops. My favorite search option is by duration to further focus the results. Additional search filters are by Music category, genre, mood, and even instruments. Daetona did a sample search for polka music and found 21 results (that’s a lot of Polka!). The duration of clips ranged from 00:11 seconds to 03:23, and if I needed just a short clip, the duration filter would even further focus the results.
TLC Creative has been using AudioBlocks’ online subscription since it launched a few years ago. We were even a customer of their CD-ROM collections before that. The lowest price I have found for an annual subscription is currently $99/year. A less valuable monthly subscription is also available for $79.
-Troy @ TLC
Introduction to VideoBlocks
Presentations often feature videos. But where can designers get quality videos? VideoBlocks.com is a subscription-based site with unlimited downloads from a library of professional stock video footage. TLC Creative Services has used VideoBlocks for several years, going back to purchasing DVDs from their pre-online business.

VideoBlocks has an in-depth library with over 115,000 studio-quality videos, motion backgrounds and after effects clips. Additional videos are added every month. VideoBlocks members have two download options – videos included in the subscription (great value) or videos from an a la carte Global Marketplace where professional videos are uploaded and sold individually (average $49 per video).
In addition to variety (more on that in a moment), quality and value, one thing that distinguishes VideoBlocks from their competitors is their royalty free permissions on all videos (at least those in the subscription library). Videos are pretty much permitted to be used for any project, with any level of distribution and they include global usage rights. Other VideoBlocks customers include big companies like ABC, MTV, and even National Geographic, so we are in good company!
For variety, my sample search for puppies gave me over 27K results! That broke down to 65 videos in the free Unlimited Library and 27,000 in the a la carte Marketplace. Sixty-five puppy videos is a good result AND I found the perfect one for my presentation.
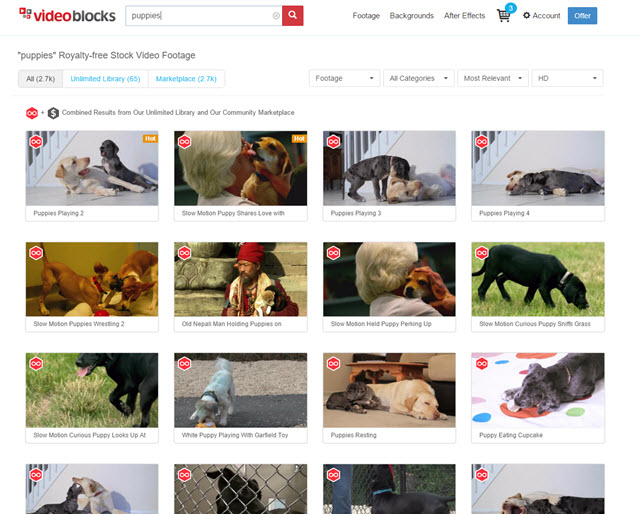
The search can be filtered only to show videos included in the subscription library or to include those available in the Global Marketplace. It can also be filtered by category or resolution (more on this in a moment). In addition, VideoBlocks has 15 preset categories that range from Business and Professions to Holidays and Celebrations. All in all, the TLC Creative Design Team has little trouble using the search options to find a video clip suitable for their presentations.
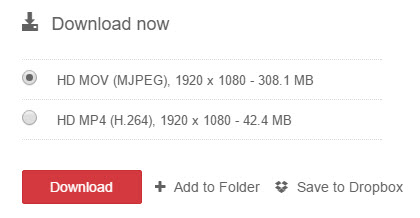
MP4 and MOV file formats are available for all video clips. Resolution sizes vary from SD 480p to full HD 1080p but almost all videos are 1080p. You can also look under the “Red Camera” category for a good selection of 4K resolution videos.
After a quick search on the site, I found that a one-year subscription is currently $149. The subscription price is a huge value and something TLC Creative has renewed annually for several years so we always have a video resource for our projects. They also have specials a few times per year that drop the price to $99. And you will be locked in at that special rate for renewals. I asked and received a referral link that will get anyone a $50 discount. Click here to bring the current price down to $99 a year!
-Troy @ TLC
Interlaced vs Progressive with Powerpoint
When it comes to exporting video in PowerPoint, or any other program, there are many factors that play a role in the final quality.
One of those factors is the concept of interlaced or progressive.
All PowerPoint videos export as progressive, but why?
In order to understand the answer, we first need to know what progressive vs. interlaced really means.
Here is the simple explanation:
- Interlaced is sending half the picture in 1 frame and the other half in the next frame. When done fast enough, the human eye sees a full picture.
- Progressive is sending the entire picture on every frame.
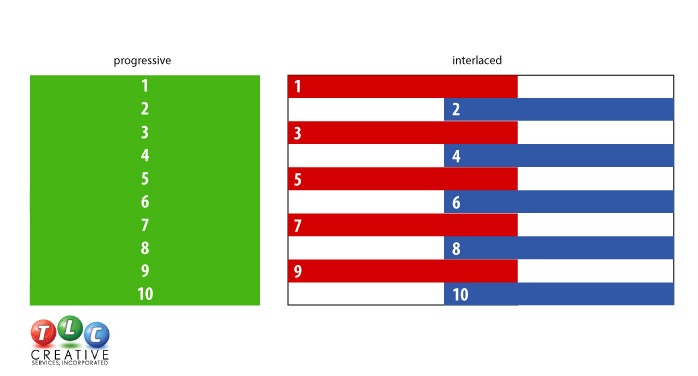
Interlaced video was made popular with television and over the air TV transmission (in the dark ages, before Cable TV). Interlaced video sends half the data and bandwidth, so it made TV signal transmission easier. For video editors, it made digital editing and processing faster because you were working with half the amount of data.
With current technologies of HD and beyond, computer monitors, television monitors and projectors, the idea of interlaced (or 1/2 quality) video is virtually a thing of the past. So 720p and 1080p stand for “progress video” at that resolution. 720i & 1080i means the video is interlaced at that resolution. If there is not an “i” or “p” after the resolution it is assumed to be progressive “p.”
Because progressive video has more data than interlaced video (entire picture in each frame vs. half the picture in each frame), it appears sharper and richer in color.
Progressive

This technique, however, is not ideal for broadcasting, due to the amount of data that needs to be transmitted. This brings us to Interlaced video. For the most part, interlaced video is used by TV broadcasters. It outputs from two adjacent frames one after the other, blending odd and even lines to form each image.
Interlaced

Quite a difference, right? To answer the original question “Is all PowerPoint video progressive?” – the answer is yes. PowerPoint’s video export only has profiles for progressive video, with 3 different resolution options. There is no practical need for interlaced video on any computer playback. If you are sourcing a video for a presentation and one of the options is progressive or interlaced, choose progressive.
-Troy @ TLC
Recolor Content with Powerpoint Tools
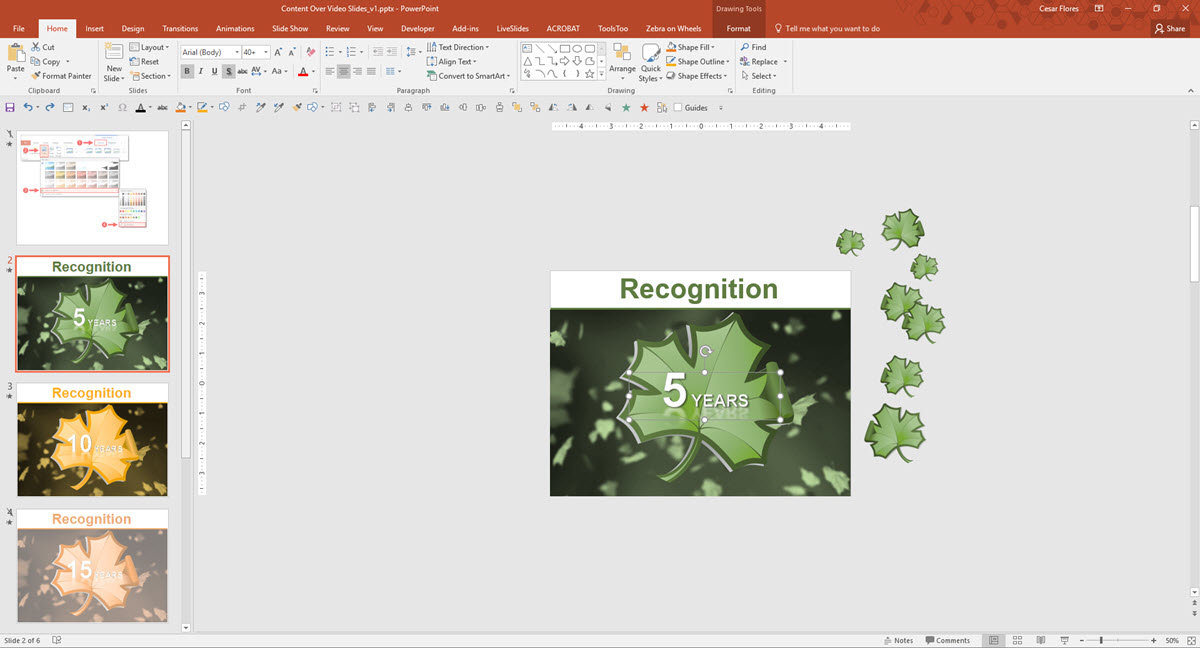
In PowerPoint, you can place content on top of a video background to create a dynamic and dimensional design.
Find a great example we created here:
[KGVID]https://thepowerpointblog.com/wp-content/uploads/2016/03/unnamed-file-7.mp4[/KGVID]
Here’s how to create a similar effect to your video
1
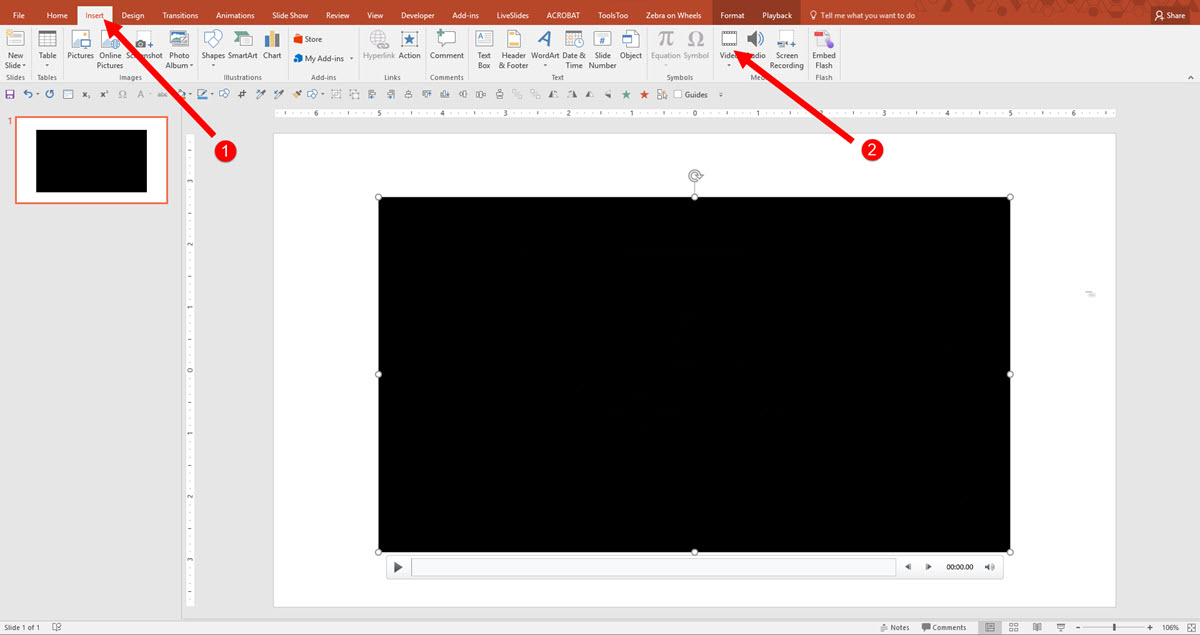
Insert (1) Video onto your Canvas , click (2) Video and select your Video.
2
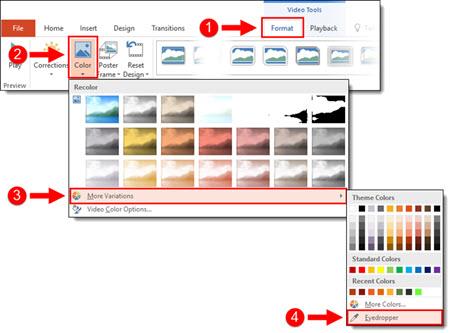
To recolor your video, click on (1) Format Tab, select (2) Color tool in the drop down, you get Recolor options.You can add custom colors by Selecting the (3) More Variations or using the (4) Eyedropper tool.
3
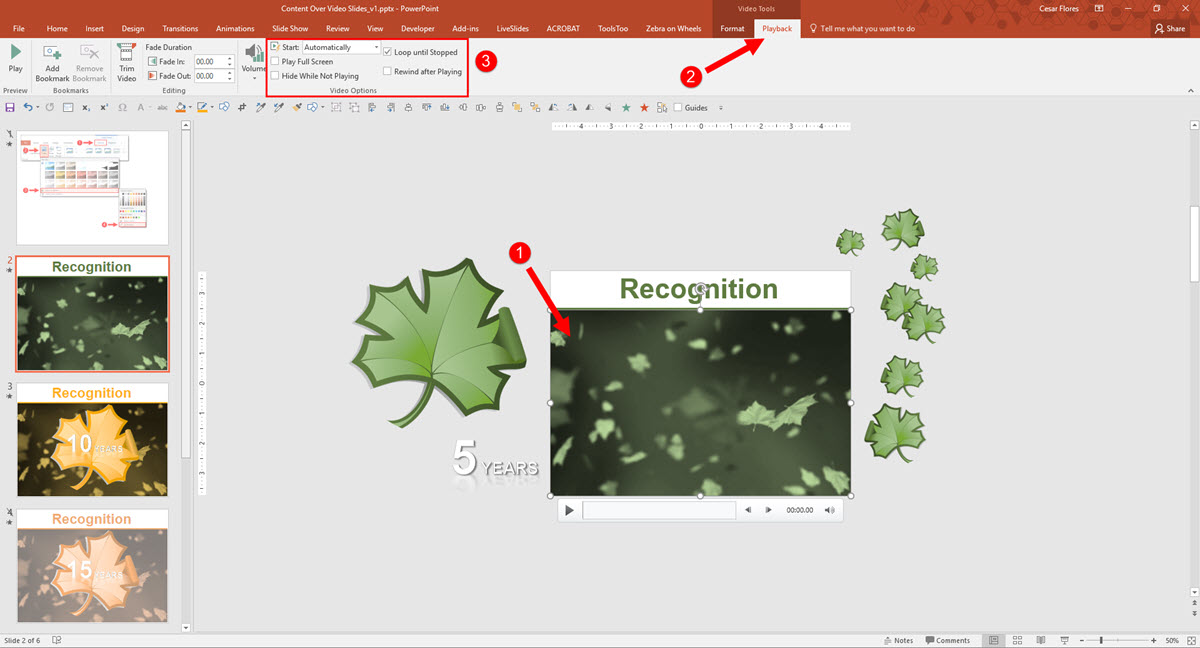
Once you are satisfied with the styling of the video, select your (1) video on the Canvas, select (2) Playback, set the video to (3) Start Automatically and Loop until Stopped.
4
Next, add stylized text and graphics directly on top of the video and animate as desired. The end result is a slide with content that animates directly on top of the video background.
-Michelle @ TLC
It’s Leap Year 2016
Finally, Leap Year explained (thanks to Sara and some more great Morph animation use!).
Happy Leap Year, February 29th!
-Sara @ TLC