Monthly Archives: January 2025

Slide Design with Image Fill Text – A Look Back to February 2015

I was a bit worried when this year-long “Look Back” series was proposed; was it going to take too much time, would there be enough previous posts, are previous posts still relevant to PowerPoint design today… Well, now I’m excited about his series as we end January! As example, this typography-themed post is from a decade ago! Though originally posted in February 2015, the slide design feature in PowerPoint is exactly the same. Therefore, the flair and creativity it can bring to slides absolutely works for presentations created today!

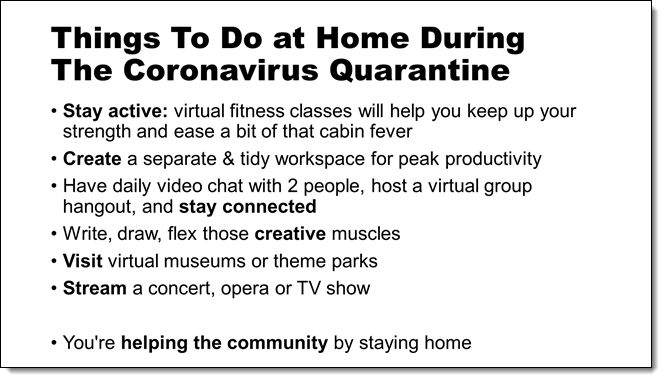
In this post, we are adding a visual styling to text AND keeping it editable. All text can have a color fill, gradient fill, texture fill or PHOTO/IMAGE fill. Here is my sample text slide, on a black background to help the text styling options display.

Image Fill Text 1

1. Select the text to fill (*Tip: It does not have to be all of the text in a text box, select just the text you want – this can be a great solution for adding accent focus on specific text).

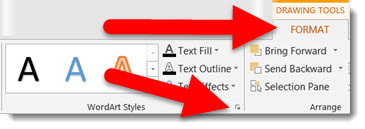
2. Go to FORMAT >> WORDART STYLES section >> FORMAT TEXT EFFECTS to open the FORMAT SHAPE pane to the text formatting tab.

Image Fill Text6

3. Select PICTURE OR TEXTURE FILL.

Image Fill Text 8

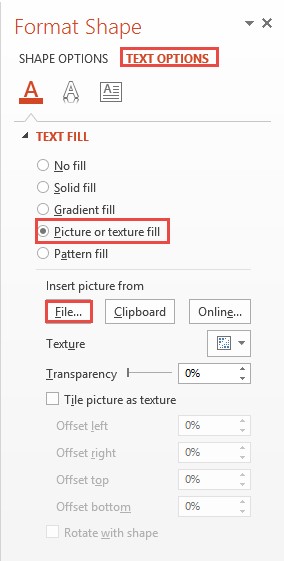
4. This defaults to filling text with the first texture in the Microsoft library.

Image Fill Text 2

4. Click FILE.

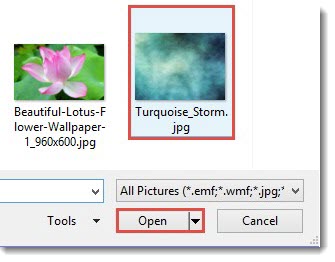
5. Select an image to use as the fill – I am using an abstract image.

Image Fill Text 12

And here is the stylized text, which is editable (change the font, size, text, etc.) and can have any PowerPoint styling options applied (drop shadow, bevel, glow, etc.).

Image Fill Text 3

– Troy @ TLC

This is from our Look Back series, rediscovering previous blog posts with relevant PowerPoint tips, tricks and examples. The original post from February 18th, 2015 can be viewed here.

By |2025-01-10T09:59:18-08:00January 31st, 2025|Tutorial|

Adobe Express – Part 2

Presentations are very visual, and sometimes PowerPoint’s internal tools are not up to the job of creating all design elements for a professional presentation slide design. I am continuing our Adobe Express series looking at how it can help presentation design with techniques such as removing the background from a photo, designing stylized text or creating videos. These can be done within PowerPoint, but its internal tools are often not able to provide polished and professional results. Adobe Express adds a next level quality to these image needs.

Adobe Express is a free, online platform which provides a new option that is a straightforward, user-friendly approach to photo and video editing. It has an amazing Remove Background feature for images that is incredibly easy to use, and an immediate fit for presentation design needs.

Many times at TLC Creative, we use photos that need to be masked and the background elements removed. We sometimes will use the Remove Background tool within PowerPoint – sometimes… Our general go-to process is pulling the image into Photoshop and either manually clip and mask with a pen tool (still a great design skill!) or utilize Photoshop’s Generative AI to isolate the subject and remove the background. The image is then cropped to the visible pixels, exported as a PNG, then imported into PowerPoint.

The background removal tool in Adobe Express uses the same AI-powered technology to automatically detect and separate the subject from the background in an image. It has fewer adjustments and tools over Photoshop, but the results are fast and quite literally amazing. Plus, it is web-based, so there is no software to install. This is ideal for masking profile pictures or product shots without the need for advanced editing skills.

In this example, you can see the original, and how PowerPoint’s remove background vs. Adobe Express’s remove background perform. Of special note is the curly, feathered hair. PowerPoint’s remove background tool is just not up to the task, even with lots of fine tuning on the removed parts. The Adobe Express image, completed in 1-click is presentation ready. The only downside is the extra steps and work outside of PowerPoint.

Now let’s take a look at the Adobe Express interface and how to use the Remove Background feature. There are two ways to do this:

Option 1: Modify an Existing Photo on Your Computer

  1. From the web-based app home page.
  2. Under More ways to start section, click the Remove background
  3. In the new screen click the BROWSE button or drag and drop an image.
  4. That’s it – done! Here is the original image:
  5. And Adobe Express’s background removed:
  6. Two notes:
    1. This option does not allow you to select from stock photos or the cloud.
    2. The image must be a JPEG, JPG or PNG, and under 40MB in size.
  7. DOWNLOAD as a .PNG with transparent background,
  8. Or before downloading, use the options to add a colored or patterned background,
  9. Last, Adobe Express does have an online image editor with more advanced features, click the OPEN IN EDITOR

Option 2: Modify a Photo from Adobe Stock

Before demonstrating this option, it is important to know that Adobe has Adobe Stock. Adobe Stock is a paid service with literally millions of royalty free photos, illustrations, videos and music assets (TLC Creative has selected Adobe Stock as the resource for our design team). But for this blog post, the key bit of information is that Adobe Express, which is free to use, provides access to what they list as “over 1 million royalty-free photos”!!

TIP: this is a great, free, photo resource for presentation design!

  1. From the Adobe Express home page, in the upper right corner, click the big blue plus buttons.
  2. This opens the GET STARTED screen, which in other areas of the app is labelled as starting an “image from scratch.”
  3. For slides, click the LANDSCAPE aspect ratio button.
    1. TIP: Adobe Express has dozens of options. From the basic square, landscape and portrait modes to the pre-set sizes of all major social media, video and print media needs.
  4. Choose the Media option on the left column tool bar.

    1. There is an UPLOAD FROM DEVICE button, which is the same process as Option 1, just a longer way of getting there.
    2. The GENERATE IMAGE is Adobe’s AI that creates images from text prompts (the same engine is available on Adobe Stock, and it creates some really great images – but it is free here!).
    3. Below that is where you can search the Adobe Stock images available through Adobe Express. Use the SEARCH bar or the categories.
  5. Find a desired photo, click on it and Express will automatically add onto the editing canvas.
  6. Click the Remove background button and it’s gone. In the example below, we purposely have chosen a subject with a busy background to show the capabilities. Notice the thin strands of hair that remain.
  7. Change the canvas background to none. This will ensure a transparent background when exporting.
  8. Click Download and choose the PNG option. One thing to note, because we chose a template size of 1920px x 1080px (16:9), the new image will export at that size. Not the size of the edited photo. Adobe Express does have a crop tool, however it will only crop the photo on its layer. It does not crop the entire canvas size.
  9. Insert the new image into a PowerPoint file or set as background so the image fills page.

The new offering from Adobe, Adobe Express, is separate from Adobe Creative Cloud subscriptions, so it can be a standalone set of design tools or used in conjunction with an Adobe CC subscription. These are just a few of the photo editing and design tools that work for presentation design where images are needed. Explore the Adobe Express offering here.

Mike @ TLC Creative

By |2025-01-07T08:27:26-08:00January 29th, 2025|Software/Add-Ins|

Adobe Express – Part 1

What is Adobe Express? Formerly known as Adobe Spark, is a user-friendly tool that lets you create professional-looking social media posts, flyers, videos, and more in just a few clicks. Whether you’re running a small business, managing your personal brand, or just love pretty visuals, Adobe Express might just become your new best friend.

At its core, Adobe Express is a simplified web-based design tool. Think of it as Adobe Photoshop’s cooler, less intimidating cousin. You don’t need advanced skills to create polished content; Adobe Express provides an extensive library of templates, fonts, colors, and even royalty-free stock photos to make your designs look like they were created by a pro.

It’s perfect for creating Instagram posts, YouTube thumbnails, or even business cards—basically, if it needs to look good and you need it done fast, this is the tool. It also can be helpful to presentation designers, which is the focus of the next 2 posts.

HOW MUCH DOES ADOBE EXPRESS COST

Here’s the good news, Adobe Express offers a free plan! It includes access to many templates, fonts, and basic design tools.

The more advanced features require a paid premium plan, ~$100 annually. It is also collaboration focused and offers “team” plans, that are lower pricing, ~$50-80 annually per team member. But the most exciting offering is if you already subscribe to Adobe Creative Cloud, chances are you already have access to the premium version as part of your CC subscription!

WHAT ARE THE PREMIUM TOOLS

The free version is great, but the premium tools really make Adobe Express shine:

  • Remove Backgrounds: A click is all it takes to remove the background from an image. No need to fiddle with a million settings.
  • Resizing Magic: Want to turn an Instagram post into a Pinterest pin? The premium version resizes your design for different platforms in seconds.
  • Exclusive Templates & Fonts: More options mean less time spent tweaking designs.
  • Brand Kit: Save your logos, colors, and fonts to keep your branding consistent across all designs.
  • Access to Adobe Stock: Get premium stock images and graphics baked right into the platform.

DO I NEED TO INSTALL ANYTHING

Nope! Adobe Express is web-based, so you can use it directly from your browser without installing anything. Adobe Express is available for Windows, Mac, iPad, and smartphones (both iOS and Android). It’s basically wherever you need it to be.

The mobile version is especially handy if you’re managing social media on the go. It syncs with your Adobe account, so you can start a design on your computer and finish it on your phone or vice versa.


WHAT POWERS ADOBE EXPRESS FEATURES

Adobe Express is powered by Adobe’s AI technology, including Firefly. Just Adobe Photoshop, Firefly in Adobe Express can generate images from text prompts. This AI generated tool can assist with automatically removing the background or automatically resizing the layout for every social channel.

WHAT POWERS ADOBE EXPRESS FEATURES

Adobe Express is perfect for anyone who wants to create beautiful content without spending hours learning complicated software. As a team of professional presentation designers, we can see Adobe Express being part of a presentation design workflow.

Now that we have an overview and introduction to Adobe’s newest offering, Adobe Express, in the next few posts we are going to focus on using it to create presentation ready images.

By |2025-01-09T07:47:29-08:00January 27th, 2025|Software/Add-Ins|

Real-Time Presenter Notes Edits Through Teams – A Look Back to September 2022

Microsoft Teams has a huge selection of tools to make life easier – including real-time collaboration! This tool is just as useful as it was when Troy first talked about it in September of 2022, and the guide he wrote is still handy today!

As a follow up to an earlier blog post (Edit Presenter Notes Live While Presenting!), I have been leveraging Microsoft Teams real-time collaboration (which I find an amazing tool!) for updating presenter notes for quite a while. The process is very easy, assuming you are running Office 365 and have a Microsoft Teams account. The presentation file is uploaded to Microsoft Teams. I open the PowerPoint file using the OPEN > OPEN IN APP, so desktop PowerPoint is used (vs. Teams or PowerPoint for Web). The SAME presentation is opened on the show computer (the computer running the slide show) and on my production computer. The only limitation is the internet connection speed (which is a constant concern while working in a hotel ballroom!). My goal is to NOT touch the show computer, I like it to just present – never lose focus on the slide show, never escape out of slide show.

I make edits on my production/design computer, and they show up on the presentation computer – including presenter notes!

-Troy @ TLC

This is from our Look Back series, rediscovering previous blog posts with relevant PowerPoint tips, tricks and examples. The original September 29th, 2022 blog post can be found here.

By |2025-01-20T14:12:30-08:00January 24th, 2025|Tutorial|

TPP e214 – 2.5 Presentation Predictions for 2025

New episode of The Presentation Podcast now available!

Our three industry experts — Troy Chollar, Sandy Johnson, Nolan Haims — have a lively discussion about the future of presentation design in 2025. Each offering 2.5 presentation design predictions for this year, ranging from the impact of AI to the importance of accessibility and emerging design trends. Listen on your favorite podcast app, or at The Presentation Podcast site HERE.

By |2025-01-18T10:48:39-08:00January 22nd, 2025|Resource/Misc|

We save presentation files to the Desktop by default – Do You?

When using Microsoft PowerPoint on a Windows computer files save to the “Documents Folder” by default. But is that the best option for your workflow?

Where PowerPoint saves a file by default is an app setting that can be customized. For TLC Creative, we update to have presentations saved to the desktop as the default. Here’s how:

1. Open Microsoft PowerPoint.

2. In PowerPoint, click on the File tab located at the top-left corner of the window.

3. Near the bottom of the File menu, click Options.

4. In the PowerPoint Options dialog, click on the Save category on the left-hand side. This section contains settings related to saving presentations, such as file locations.

5. In the Save presentations section, locate the Default local file location field. This is where PowerPoint saves files by default, and the location can be changed here.

To get the desktop folder path, on Windows 11, do the following:

    • Open a File Explorer window
    • Navigate to the desktop folder. The path for the desktop folder is typically C:\Users\[ Username]\Desktop
    • Right click the Address bar and select Copy Address as Text

    • Back in PowerPoint, with the PowerPoint Options dialog still open, paste the copied address for the computer desktop into the Default local file location field.

6. Click OK in the PowerPoint Options window to save the changes. From now on, PowerPoint will save any new presentations to the desktop by default!

Notes

  • This is for Windows users only: The steps above apply specifically to users on Windows computers. If using an iPad or Mac, the process may differ, and we recommend checking specific support resources for those devices to find the correct method.
  • This is an app setting: The save setting will apply to all PowerPoint presentation files going forward. Every time a new file is saved, it will default to saving on the desktop unless a different location is chosen manually.
  • Corporate Environment Considerations: If working within a corporate environment, PowerPoint options may have been pre-configured to save files to a shared network drive or another location. In such cases, it’s usually best to leave that setting as-is. Changing it might interfere with company protocols for file storage, access, and sharing. If unsure, it’s always a good idea to consult the IT department before making this change.

There are several benefits to setting PowerPoint’s save location to the desktop. Saving directly to the desktop ensures that presentations are easily accessible. There is no navigating through multiple folders to find them. Also, customizability. While PowerPoint typically defaults to saving files in a more general location (like the Documents folder), customizing allows personalization of the workspace to make your workflow a little smoother.

By |2025-01-03T11:09:14-08:00January 20th, 2025|PowerPoint|

Pantone’s 2022 Color of the Year – A Look Back to February 2022

With Pantone having just released their Color of the Year for 2025, the TLC Creative team has decided to look back at our Pantone 2022 Color of the Year tie-ins. Pantone’s 2022 Color of the Year was #17-3938 Very Peri. And the TLC Creative design team created 4 free to use, full-feature PowerPoint templates inspired by the Very Peri color.

Pantone’s Color of The Year selection process:

  • Pantone Color of the Year started in 1999.
  • Each year Pantone has a global team of color experts that are not all Pantone employees.
  • Colors are recommendations based on anything and everything that influences color; entertainment, travel, lifestyles, etc. and a study of trends, but not a timely fad.
  • The process is generally identify, and agree, on a color. Then continue the process to determine the shade of that color.
  • Read this article on the Pantone website for more facts and information about the process.

Pantone released a series of color schemes centered on the Very Peri color of the year. The TLC Creative team created 4 PowerPoint templates inspired by the Pantone color schemes. Each is a full-feature PowerPoint template, FREE to download and use!

  1. From Pantone’s “Wellspring” color scheme, we created this PowerPoint template. The full February 9, 2022 is available. Download the ready to use PowerPoint template HERE.
  2. From Pantone’s “Amusements” color scheme, we created this PowerPoint template. The full February 21, 2022 post is available. Download the ready to use PowerPoint template HERE
  3. From Pantone’s “Balancing Act” color scheme, we created this PowerPoint template. The full February 23, 2022 post is available. Download the ready to use PowerPoint template HERE
  4. From Pantone’s “Star of the Show” color scheme, we created this PowerPoint template. The full February 25, 2022 post is available. Download the ready to use PowerPoint template HERE.

This is from our Look Back series, rediscovering previous blog posts with relevant PowerPoint tips, tricks and examples. 

By |2025-01-04T08:23:36-08:00January 17th, 2025|Templates/Assets|

2 FREE PowerPoint Templates – Inspired By the Pantone 2025 Color of the Year

Pantone’s 2025 Color of the Year, Mocha Mousse, is the inspiration for these 2 PowerPoint templates – and both are Free to download and use!

Christie, on the TLC Creative design team, used the Pantone Mocha Mousse color as PowerPoint’s Accent 1 and created a rich color template.

This full feature PowerPoint template has all core styling elements preset – and includes a theme layout, plus three full frame (eg. no placeholders) layout options!

Download the editable PowerPoint file HERE. (2.7 MB, .pptx)

Mike on the TLC Creative design team also used the Pantone Mocha Mousse color as PowerPoint’s Accent #1 for a PowerPoint template.

This full feature PowerPoint template has all core styling elements preset – and a master layout picture placeholder is preset for the logo on the Theme and Title layouts (insert either layout, click the picture placeholder to insert your logo).

Download the editable PowerPoint file HERE (2 MB, .pptx)

By |2025-01-07T08:27:33-08:00January 15th, 2025|PowerPoint|

Free PowerPoint Color Schemes Based on the Pantone 2025 Color of the Year

Pantone’s Color of the Year for 2025 is #17-1230, “Mocha Mousse”.

As an internal design project, Amber on the TLC Creative presentation design team, created a custom color scheme inspired by the Mocha Mousse color. Download this 3 slide sample, with custom PowerPoint color scheme (that can be applied to any PowerPoint file), HERE.

Jake on the TLC Creative presentation design team, created this custom color scheme using the Mocha Mousse color as the inspiration. Download this 3 slide sample, with custom PowerPoint color scheme (that can be applied to any PowerPoint file), HERE.

By |2025-01-03T14:16:58-08:00January 13th, 2025|PowerPoint, Templates/Assets|

When Everything is Bold, Nothing is Bold – A Look Back to August 2020

Are you designing a presentation with a lot of text? Not sure how to make your points stand-out? Typography is one of the most important aspects of a slide, and how well its done will determine how well you can communicate your message. We originally posted this in August of 2020, and the same design principles apply today!

One way to grab your viewer’s attention is to utilize a bold font, which is heavier and darker than the regular type. Bold fonts are used for emphasis, but too much bolding can have the exact opposite effect, because when everything is bold – nothing is bold.

Selective bolding is a design process we use often. Be choosing key words to be bold and standout the viewer can quickly see, and read, what is important.

Happy bolding! This is from our Look Back series rediscovering previous blog posts with relevant PowerPoint Tips, Tricks and Examples. Original August 7, 2020 blog post here.

By |2025-01-07T10:43:13-08:00January 10th, 2025|PowerPoint|
Go to Top