The PowerPoint® Blog

I work with PowerPoint on a daily basis and I am very honored to be a Microsoft PowerPoint MVP. We have a talented team of presentation designers at TLC Creative Services and ThePowerPointBlog is our area to highlight PowerPoint tips, tricks, examples and tutorials. Enjoy! Troy Chollar

New Version of ToolsToo Add-in Released (v5.1)

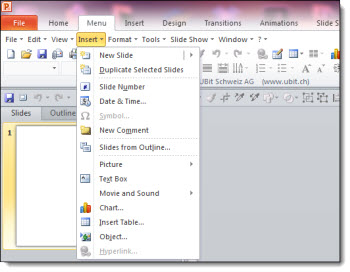
If you are regular visitor here, you probably know I am a big add-in/plug-in user for all programs. For PowerPoint, add-ins installed on all designer and show computers are those that make design work faster and easier. And the ToolsToo add-in is used daily.

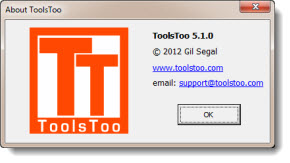
Last week v5.1 was released. It adds a few new features and bug fixes. Also interesting, this is the first add-in I have seen that is only for use with PPT 2010, not 2007 (since v5.0) because it uses some PPT 2010 only features (such as the animation paintbrush). Although v4.5 is compatible with PPT 2007 and 2010 and still available. And, like almost all add-ins, it is only compatible with the 32-bit version of Office.

Website with more details and download options is here.

– Troy @ TLC

By |2016-08-16T09:22:04-07:00July 11th, 2012|Software/Add-Ins|

Ubitmenu Puts PPT 2003 Menus into PPT 2010

The number of companies moving from Office 2003 to Office 2010 over the past year has been amazing. They skipped Office 2007 and are now going from menus in 2003 to the ribbon in 2007 or 2010, which is a bit like starting over – and a focus for many TLC Creative Services onsite PowerPoint training programs. The Ubitmenu.com add-in can make the transition easier by bringing the familiar PPT 2003 menus into the new ribbon interface.

The add-in does not remove or alter the ribbon. It remains accessible and full function after the add-in has been installed. The Ubitmenu add-in adds a new tab called “Menu” and in it are all the familiar PPT 2003 menus which let you work in PPT 20007/2010 almost like you did in PPT 2003.

The ribbon interface is here to stay, so the best course is to become familiar with it. But I can see the Ubitmenu add-in as a good option during that transition period. It is free for personal use. Read more and download from this Swiss company here.

– Troy @ TLC

By |2016-08-16T09:22:24-07:00July 9th, 2012|Software/Add-Ins|

Billboard Design by TLC Creative Services

Highway billboards are like large scale presentation slides, designed for an audience that is far away, not focused on the screen (presentation = presenter, billboard = car in front of you) and made to be a message that can be understood in a few seconds.

This is one of 20 billboards showing up around San Diego right now that Lori from TLC Creative Services designed for our client. Of course, the huge GB size Photoshop image is a big difference from a slide design project.

– Troy @ TLC

By |2016-06-23T14:49:34-07:00July 6th, 2012|Personal|

4th of July 2012 Free PowerPoint Template

Amber, another great presentation designer here at TLC Creative Services, created this 4th of July themed PowerPoint template. It is free for all to download and use – just click here – 1.1MB.

– PPT 2010
– 16×9
– Master layouts include all the standards, plus a Theme layout and alternate full frame layout.

– Troy @ TLC

By |2016-08-16T09:22:46-07:00July 4th, 2012|Templates/Assets|

Creating the “Open Again” Image in PPT

Yesterday’s post used a fun image that was downloaded from Fotolia.com and completely customized in PowerPoint. Here is what I did:

1. Research and download image from Fotolia.com (where TLC Creative Services has a subscription plan), then insert on slide.

2. Frame the right and bottom of the image with gradient lines.

3. Add a white box (white to match the slide background color).

4. Size and position the white box to cover the existing text.

5. Add PPT text with the new message using a custom font, same fill color as the marker in the image and positioned right over the marker.

6. Done – no Photoshop needed.

– Troy @ TLC

By |2016-08-16T09:23:07-07:00July 2nd, 2012|Tutorial|

July and a New Start!

Greetings to all that think I fell off the internet. I did not fall off, just into more projects and work needs than ever expected, which is good, so I am not complaining (but whining a bit)!

July, with Independence Day and celebrations of Freedom, seems like a great time to get things back in motion. The new TLC Creative Services office is up and running, great design projects are in process, and I just finished a fantastic 2 week family holiday that gave me some time to relax and refocus. All together, things are good and I am excited to have a game plan for ThePowerPointBlog again!

A few adjustments have been put in place to assure things are steadily posted:
– 3 posts per week (generally Mon-Wed-Fri)
– The full TLC Creative Services staff is now a part of writing posts
– Posts by guests are in the rotation

So tomorrow, Monday, is the first PPT post, Wednesday is a great 4th of July themed template that anyone is free to download and use, and there are a lot of reviews, tutorials and example posts all created and queued up!

– Troy @ TLC

By |2016-08-16T09:23:29-07:00July 1st, 2012|Personal|

Instant Eyedropper – New Favorite Tool!

This FREE tool is a must for every designer, tech, and creative using a PC – the Instant Eyedropper tool is the easiest way I’ve found to quickly identify and use colors on screen.

Instant Eyedropper is accessed through the system tray and is easy to use. Click the icon to launch, hover around the display until you get to the color that needs identification, and click to copy the HEX code right to the clipboard.

By |2021-05-01T16:19:20-07:00May 10th, 2012|Resource/Misc|

Doctors, Videos, and Presentations

Amber and I spent the week in Chicago managing the presentations for 130 Doctors. Internal medicine has been revolutionized by micro video camera technology – unfortunately, the same cannot be said for standard video CoDecs and videos working smoothly in every presentation. Happy to report that with very few exceptions, our work pre-flighting (great term from my print designer days) resulted in seamless presentations.

– Troy @ TLC

By |2016-08-16T09:24:06-07:00April 18th, 2012|Personal|

Add Slides to a Presentation and Keep Their Original Look

Adding slides from one presentation into another and hoping for a button that will automatically format the slides the way needed is just not a feature in PowerPoint. But, the almost magical “Destination vs. Source Formatting” button does exist. For this tutorial, we are going to add slides from the “Blue” presentation (Presentation #1) to the “Purple” presentation (Presentation #2) and keep the blue slides blue (ie. opposite of the last tutorial where the slides updated to the purple template).

Here is our “Blue” presentation (#1):

And here is our “Purple” presentation (#2):

Select the slides from Presentation #1 and copy. Then paste them into Presentation #2. To paste in the new slides, right-click and in the pop-up menu in the “Paste Options” sections, select “KEEP SOURCE FORMATTING:”

With the KEEP SOURCE FORMATTING option the template for the new slides keeps the template that was used in Presentation #1. So the blue slides stay blue.

Behind the scenes what happens is a new Master Slide set is added to the presentation. So if you look in the slide layouts (HOME >> SLIDES section >> LAYOUTS) there are two master slide sets to choose from (Presentation #1 and Presentation #2).

NOTE: If you paste in more slides from the Blue presentation in a new location and select KEEP SOURCE FORMATTING another blue master slide set will be added (which is not optimal).

– Troy @ TLC

By |2016-08-16T09:25:02-07:00April 8th, 2012|Tutorial|
Go to Top