Microsoft Has Removed The Font Icons in the Font Drop Down!!
PowerPoint has always lagged behind in font management, it is something that seems to have never been a priority for the dev team. And I have had a list of needed tools and ideas for implementation I have shared with the Dev Team at Microsoft over the years. But suddenly (this can be the evil side of subscription software), the only font management tool PowerPoint offered to indicate if a font is installed on a computer was removed!!!
This image is from a May 2016 post that shows the font drop down list in PowerPoint 2016.
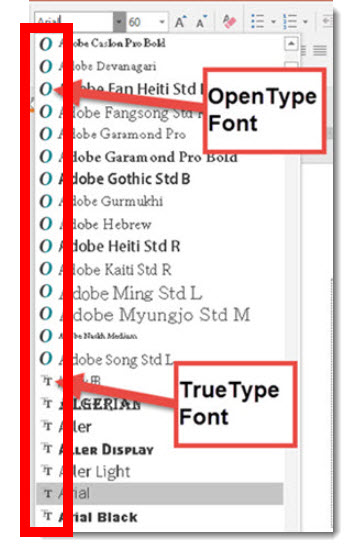
Note the small icons that indicate if a font is a TrueType or OpenType. The key is if the font is not installed on the computer, the font name is listed but no icon was shown – because the font is not available there is nothing to provide details on the font type. This missing icon was immeasurably valuable in troubleshooting font defaults (when slides do not display text as designed because PowerPoint randomly assigned an installed font for the missing font used).
This is a feasible feature at best, but it provided some help in identifying font issues.
Here is the font drop down menu from today, PowerPoint 2016, Windows Office 365, 32-bit – no font installed icons!!
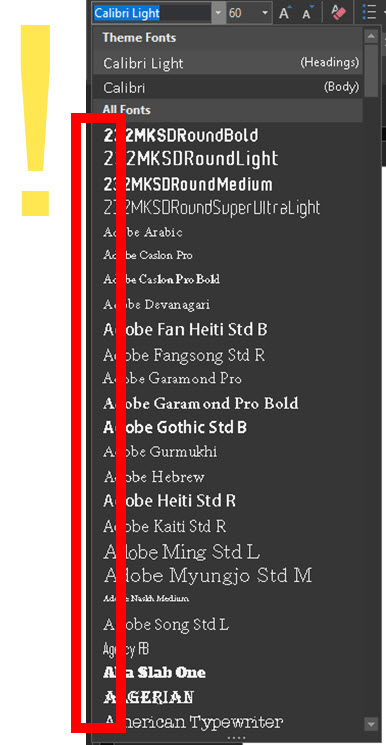
Note 1: back in October 2014 I posted about the same icons being removed from the Replace Font dialog – and Microsoft has still not made updates to put them back into that dialog.
Note 2: Several of the PowerPoint MVPs tested on their computers and it looks like the 64-bit version may still have the icons, the 32-bit version does not. Non Office 365 versions still have the icons.
Final word – Arghhh!
Troy @ TLC