Tutorial

Inception Effect with Zoom

Impractical – yes. A cool thing you can do in PowerPoint – yes!

Using the Zoom tool, you can create a slide that zooms into itself endlessly – an Inception effect. Here is my single slide presentation. First, I use the Zoom > Insert > Slide Zoom, and then I use the Drag-and-Drop way to make a slide a linked Zoom image (the music is what I hear when I think of an endless Inception loop).

-Troy @ TLC

By |2016-08-29T09:07:01-07:00August 29th, 2016|PowerPoint, Tutorial|

Zoom Thumbnail Formatting Tips & Tricks

Microsoft released Zoom with a lot of great formatting options and features for linked thumbnails. Here is a list of several tips & tricks we learned working with the Zoom thumbnails.

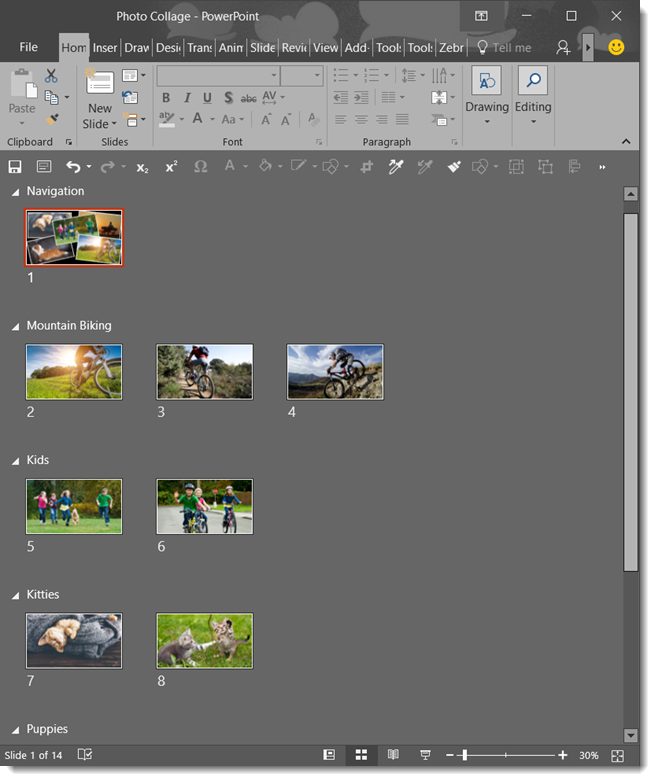
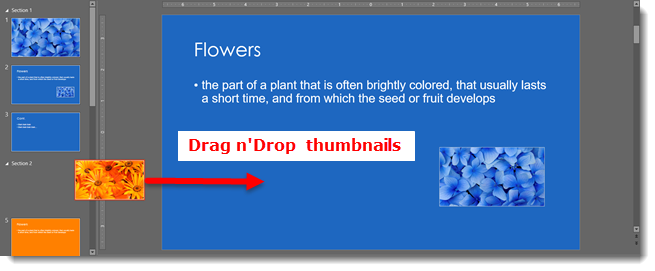
When creating a Slide Zoom (link to a specific slide, not a section), you can drag and drop a slide from the left navigation pane onto any slide!

Zoom thumbnail 01

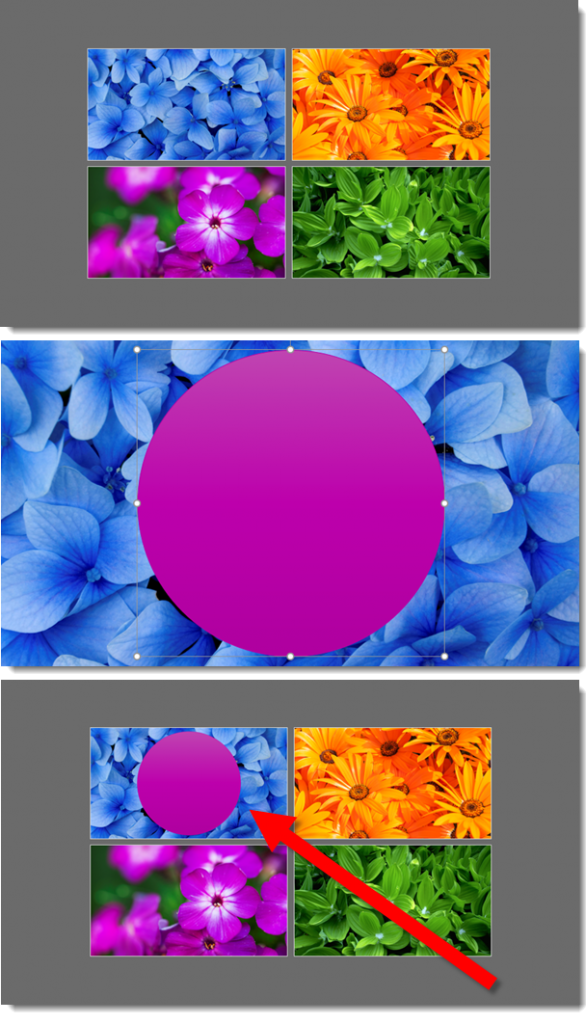
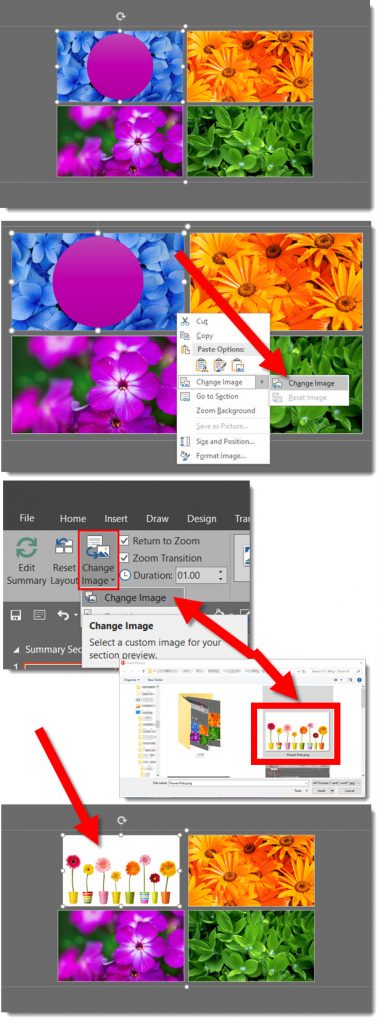
Thumbnails have dynamic live content. For example:

  1. Create a Summary Zoom
  2. Update one of the link slides (in this case, add a giant pink circle)
  3. Navigation slide thumbnail is instantly updated with the new slide content (amazing!)

Zoom thumbnail 02


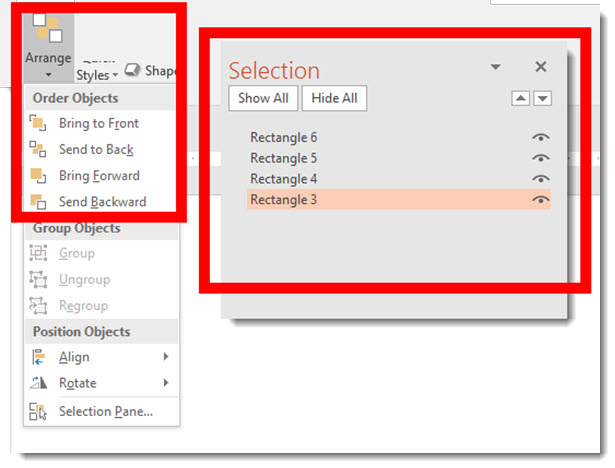
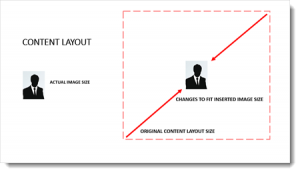
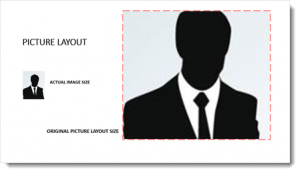
Any Zoom thumbnail can use a different image. Much like a video Poster Frame image, a Zoom thumbnail can be set to any external image.

  1. Select a thumbnail
  2. Either right-click thumbnail and select CHANGE IMAGE > CHANGE IMAGE or go to FORMAT > ZOOM OPTIONS > CHANGE IMAGE > CHANGE IMAGE
  3. In the pop up dialog, select any external image and OK to change thumbnail image

Zoom thumbnail 03


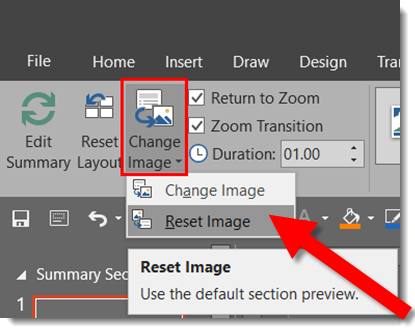
If the custom image is not wanted, it is easy to return the thumbnail to using the slide image. Just right click Zoom thumbnail and select CHANGE IMAGE > RESET IMAGE or go to FORMAT > ZOOM OPTIONS > CHANGE IMAGE > RESET IMAGE.

Zoom thumbnail 04

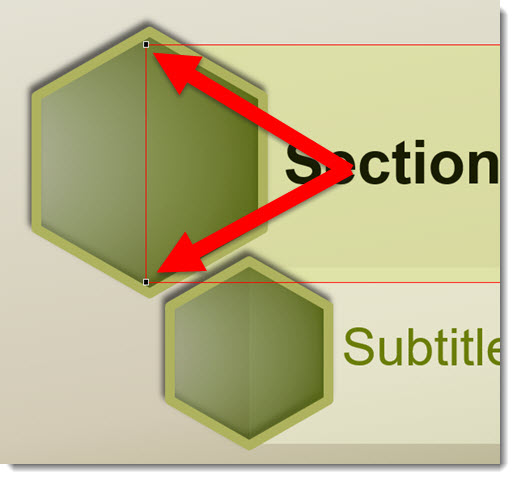
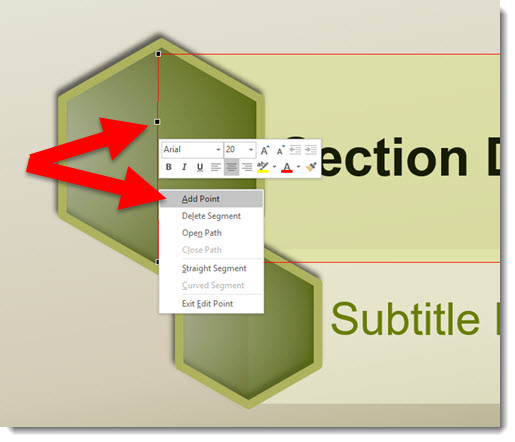
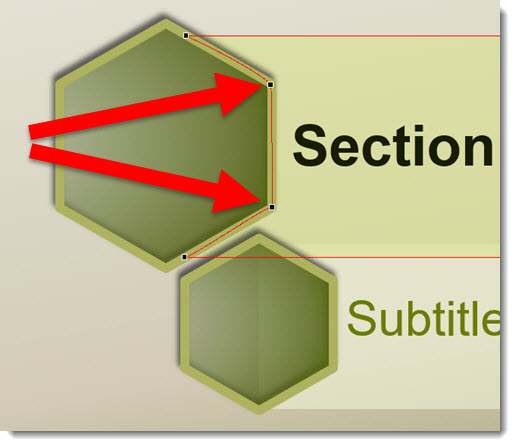
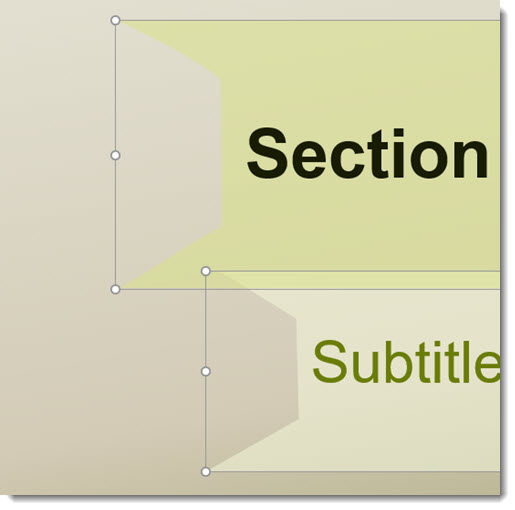
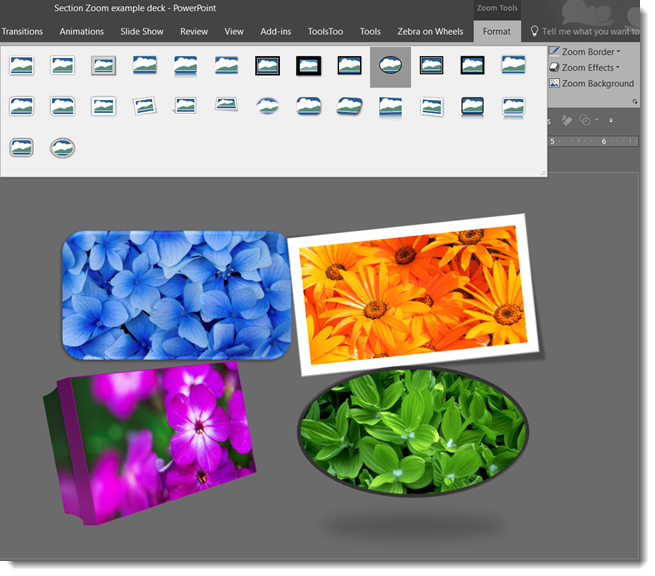
Also, any image styling options, such as drop shadows, outline, bevel, rotate, 3D perspective, etc., can be applied to a thumbnail. Note: 3D perspective is an example of a formatting option that can be applied, but does not always provide a nice transition effect.

Zoom thumbnail 05

Remove Background of thumbnails. This is a great design feature! Using the FORMAT > ZOOM OPTIONS section > ZOOM BACKGROUND and only the content on the slide will remain a part of the thumbnail. All slide master content (background image, logos, etc.) are removed from the thumbnail.

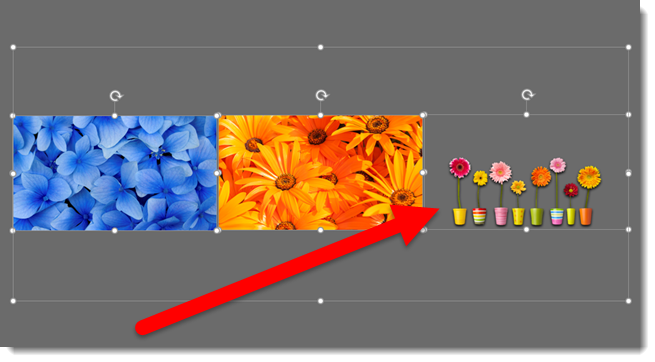
As example, here I have added a .png image of flower pots on the slide (and the flower background is set as the background image).


Zoom_Post3_10 

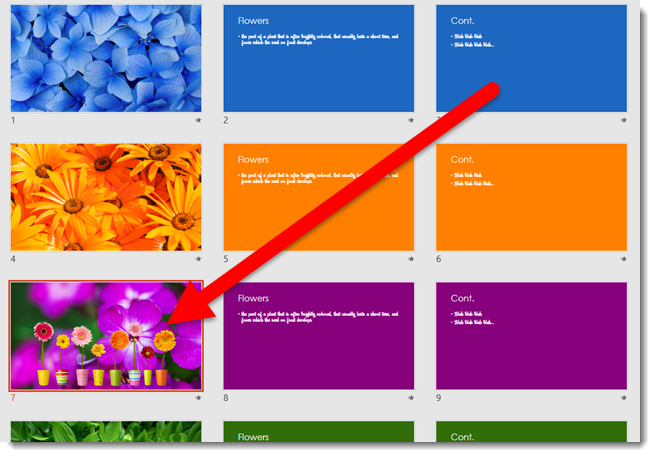
Next I added a SUMMARY ZOOM, which adds a new navigation slide with thumbnail navigation images of each slide selected.

Zoom_Post3_11

Selecting the right thumbnail and going to FORMAT > ZOOM OPTIONS section > ZOOM BACKGROUND to do an image ‘remove background’ effect.

Zoom_Post3_12

All content that is on the master layout and/or set background image are removed from the thumbnail and what is left on the navigation slide is a .png with transparent background that has only the content actually on the slide (this is great!!).

Zoom_Post3_13

 There are a lot of styling options and “hidden” features. Enjoy finding creative ways to develop non-linear presentations using Zoom!

-Troy @ TLC


By |2016-08-25T08:23:16-07:00August 26th, 2016|Portfolio, Tutorial|

Hide the PowerPoint Ribbon

The PowerPoint Ribbon is super helpful in being in the same place on all installs of PowerPoint. Sometimes, it uses valuable screen real estate. Luckily, it is easy to hide the Ribbon, just click the small upper arrow on the right.

PowerPoint Ribbon 1

When the Ribbon is turned off, PowerPoint frees up all that space just by displaying the menu bar (and on my install, the QAT that is below the menu bar).

PowerPoint Ribbon 2

Any time a menu item is clicked, the Ribbon temporarily displays.

To make the Ribbon stay visible, click any menu item, then click the small thumbtack icon on the right.

PowerPoint Ribbon 3

-Troy @ TLC

By |2016-08-12T10:51:19-07:00August 17th, 2016|Tutorial|

PowerPoint Content vs. Picture Placeholders

Inserting an image using the preset Picture Placeholders seems like a super shortcut, until things get frustrating with why images do not insert the same way every time a Picture Placeholder is used. The reason, almost always, is knowing there are two types of Placeholders – and each handles images differently.

Here is an explanation and example using a Content Placeholder vs. Picture Placeholder – and as a side note, neither option works the way I feel it really should…

CONTENT PLACEHOLDER

Inserting an image in the Content placeholder, identified by this icon, offers the option of inserting various elements: Tables, Charts, Smart Art, Video, and Images.

Insert Content icons

Inserting an image in the Content placeholder adjusts the layout to the size of the actual image. If you insert a small image, the placeholder shrinks to the small size image. If you insert a large image, the image will at maximum be the size of the slide and the placeholder will grow to that size. The downside is the preset position and size on the master layout is ignored and the slide content needs to be manually repositioned and sized.

Content placeholders


PICTURE PLACEHOLDER

Inserting an image in the Picture placeholder adjusts image to fill the size of the layout. The downside here is the image is often cut off and needs to be repositioned and resized using the Crop tool.

Picture placeholders


While both Placeholder options are pro’s and con’s, at least now you have an idea of what PowerPoint is doing and what to expect.


-Troy @ TLC

By |2016-08-09T18:15:45-07:00August 15th, 2016|Tutorial|

Using Morph for Animations

The PowerPoint Morph transition is PowerPoint’s best new animation feature!

using morph for animations

We have been leveraging the fantastic new transition in lots of presentation projects since its release, including using Morph for animations. Here is another example where we used Morph as the animation effect. Our client wanted to show the above three statements. The real request was to emphasize each as they were addressed. Our first step was to convert the provided bullet list into a dynamic visual; the end result was the above slide.

For the “emphasize each” request, using the Morph transition as our animation, we created a dynamic “flip” animation effect. It also was something that did not look like “PowerPoint.” Below is a video of the final animation effect:

[KGVID]https://thepowerpointblog.com/wp-content/uploads/2016/08/unnamed-file.mp4[/KGVID]

  • After the slide layout was approved, we duplicated the slide 3X.
  • On the first slide, we added the animated entrance effect for the 3 circles and text.
  • On the second, third and fourth slides, we simply horizontally flipped each circle. No animation on these slides. The Morph transition created the nice twirl, or flip, animation.
  • Done!

using morph for animations


– Troy @ TLC

By |2019-10-28T09:57:42-07:00August 5th, 2016|Portfolio, PowerPoint, Tutorial|

The TLC Custom QAT for PowerPoint

This month, I am focusing on PowerPoint add-ins because the ability to extend PowerPoint’s functionality is one of the biggest attributes that allows it to be a “professional” design tool. The first place to start is PowerPoint’s own extensibility with the QAT – Quick Access Toolbar.

QAT-2016-2

I am a big fan of the Quick Access Toolbar. My first post about it was back in 2009. Then, less than a year later, I became an even bigger fan when PowerPoint 2010 added the ability to export and import pre-made QAT toolbar setups. More recently, at the end of 2015, I became distressed over the QAT when an update to PowerPoint 2016 essentially limited its functionality – which has happily been fixed by the Microsoft PowerPoint Dev team (YAY!!).

The first step in effectively using and setting up the QAT is to move it from above the menus to below. By default, it is above the menu bar (with FILE / HOME / INSERT / etc.) and only has a few buttons. Click the down arrow on the right and select SHOW BELOW THE RIBBON.

At TLC, we have a very customized QAT installed on all of our computers – and has 37 time saving, always available buttons! For this blog post, I am showing our version that only uses standard PowerPoint features (I do run a more customized version that also integrates some tools from 3rd party add-ins – many of which will be in posts this month).

QAT-2016-1

Click HERE to download the TLC customized QAT (download .zip file, extract, then follow install information below).

To install:

– Go to FILE > OTPIONS

– In the POWERPOINT OPTIONS dialog, go to the QUICK ACCESS TOOLBAR tab

– In the lower right, click the ARROW on the Import/Export button

– Select IMPORT CUSTOMIZATION FILE

– In the FILE OPEN dialog, locate the custom QAT file and click OPEN

– At the warning dialog that existing toolbar setup will be overwritten, click YES

– Customized QAT is now installed!

QAT-2016-3

– Troy @ TLC

By |2016-08-10T08:10:12-07:00June 2nd, 2016|Software/Add-Ins, Tutorial|

Use a PDF for a Slide Show

A PDF of slides, or any document if in the correct aspect ratio, can be used for presentation slides. I am using Adobe Acrobat, but most PDF viewing apps have the same capability.

Here is my sample 16×9 presentation of 4 slides exported as a PDF, now open in Acrobat.

PDFView_4

I have selected the first page vs. the Organize/Grid view.

PDFView_1

Go to VIEW > FULL SCREEN MODE, or use the keyboard shortcut CTRL+L

PDFView_2

The Acrobat tool bars disappear and the slide displays full screen. Using the arrow keys or Page Up/Down keys, you can go through the pages just like a presentation.

PDFView_3

Notes:

  • No animation
  • No slide transitions
  • No video or audio (There are ways to add these, but not covered in this tutorial, and not part of PowerPoint’s PDF export)
  • Cannot be added to a master slide deck of all presenter slides (This is a separate file that just look like slides)
  • No presenter view (Duplicate display is recommended vs. extended desktop)

-Troy @ TLC

By |2016-08-10T08:12:27-07:00May 23rd, 2016|Software/Add-Ins, Tutorial|

How to Install Custom Fonts

Custom fonts can make a presentation unique, dynamic, align with corporate branding and many other fantastic things. But if a custom font is not installed on the device being used to show the presentation, the presentation may fail visually.

CustomFonts-1

If your presentation is using a custom font, here is an overview on how to get that font installed on all the main device types – if it is possible to install.

Windows Desktop OS

custom-fonts-2

Installing a custom font is a simple process on Windows.

Option 1: Select Install

Confirm the font files are copied to the computer (not on a portable drive or network folder). Right-Click the font file and select > Install. Windows will do everything and the font is now available to all programs on that computer.

custom-fonts-3

Option 2: Drop and Drag into Fonts Folder

Manually copy font files into the Windows Fonts folder. When a font file is copied into the Windows Font Folder it is automatically installed.

Windows 10: To see what fonts are installed, go to the Windows icon> Settings > type “Fonts” in the search bar on the top right. Your fonts folder should open, displaying currently installed fonts. Drag-and-drop, or copy/paste, font files to be installed.

Win XP, 7 and Win 8.1: To see what fonts are installed, go to Windows Start > Control Panel > Fonts, this will take you to a list of all fonts installed on your PC. Drag-and-drop, or copy/paste, font files to be installed.

custom-fonts-9

A few notes about PowerPoint using custom fonts on Windows:

  • PowerPoint (all versions) can only recognize TrueType (TTF) and OpenType (OTF) formats.
  • PowerPoint needs to be opened, or restarted, AFTER the custom font is installed. If a font is installed while PowerPoint is open, it will not show up in the font list until PowerPoint is restarted.


Mac OS

custom-fonts-3


Option 1

  • Double-click the font file to open a dialog fonts displaying the font. Click “Install Font” button.

custom-fonts-13


Option 2

  • Launch Font Book, a Mac OS application. This displays all fonts on the computer. Choose Add Fonts from the file menu and select the font you want to install.

custom-fonts-12

A few notes about PowerPoint and Keynote using custom fonts on the Mac OS:

  • PowerPoint and Keynote can use TrueType (TTF), OpenType (OTF), and PostScript (PS) formats.
  • The Mac OS fonts cannot be used on Windows computers.
  • PowerPoint needs to be opened, or restarted, AFTER the custom font is installed. If a font is installed while PowerPoint is open, it will not show up in the font list until it is restarted.
  • Keynote dynamically recognizes newly installed custom fonts and are immediately available without restarting the app


iOS on iPad and iPhone

custom-fonts-15

  • Custom fonts can be download and installed, but not all apps can use/see the custom fonts.
  • iOS uses TrueType (.TTF) and OpenType (.OTF) fonts.
  • PowerPoint for IOS installs with selection of preset “safe” fonts that are available on all platforms.
  • Microsoft has recently implemented a new dynamic font library that will download and install additional fonts if they are used in a presentation. The presentation opens and if the font is not currently installed on the iOS device, a substitute font is automatically used. Then in the background, if the device has online access, the additional fonts are downloaded, installed and the presentation is dynamically updated to use the fonts. So a slide with a font not currently installed (but a Microsoft font) may initially display with a font substitution, and while you are looking at it, change to the correct font that has been downloaded and added to PowerPoint’s font library.
  • The dynamically installed fonts on iOS are only “Office compatible” fonts, or fonts from Microsoft. So true custom fonts, non-Microsoft fonts, are not available.
  • Keynote application uses the preset fonts installed with IOS. Third party apps can be used to install other fonts onto the IOS device, which are then available to Keynote.

Android and Chromebooks

custom-fonts-20

  • Android uses TrueType (.TTF) and OpenType (.OTF) font formats.
  • The Android OS is similar to IOS, it has preset fonts installed. There are several addon apps that allow additional fonts to be installed.
  • One confusing thing when talking about fonts for Android is they have a font named “Android” and another named “Droid”, but other fonts are available. what happens when other fonts are used in a presentation – I will send details when I get them so you can add to post)
  • PowerPoint for Android installs with selection of preset “safe” fonts that are available on all platforms.
  • Microsoft has recently implemented  a new dynamic font library that will download and install additional fonts if they are used in a presentation. The presentation opens and if the font is not currently installed on the Android device, a substitute font is automatically used. Then in the background, if the device has online access, the additional fonts are downloaded, installed and the presentation is dynamically updated to use the fonts. So a slide with a font not currently installed (but a Microsoft font) may initially display with a font substitution, and while you are looking at it, change to using the correct font that has been downloaded and added to PowerPoints font library.

Windows Mobile Phone

custom-fonts-18

  • Windows 10 Mobile installs with a preset list of fonts.
  • Additional fonts cannot be installed on Windows 10 Mobile beyond those provided with the OS and the ones apps add.
  • Microsoft has recently implemented a new dynamic font library that will download and install additional fonts if they are used in a presentation. The presentation opens and if the font is not currently installed on the Win10 Mobile device, a substitute font is automatically used. Then in the background, if the device has online access, the additional fonts are downloaded, installed and the presentation is dynamically updated to use the fonts. So a slide with a font not currently installed (but a Microsoft font) may initially display with a font substitution, and while you are looking at it, change to using the correct font that has been downloaded and added to PowerPoint’s font library.
  • The dynamically installed fonts on iOS are only “Office compatible” fonts, or fonts from Microsoft. So true custom fonts, non-Microsoft fonts, are not available.

Prezi

custom-fonts-14

Prezi is not a device, but because it can be used on all devices listed, here is basic overview of font use by Prezi.

  • Prezi uses preset fonts from its own font library. All of the Prezi fonts are mapped to common Microsoft fonts (for example, Prezi’s Arimo font, maps to Arial)
  • If the desktop version of Prezi is used, custom fonts can be used, but only on desktop Prezi and it can be tricky to have Prezi recognize the custom, non-Prezi, True-Type fonts.
  • Prezi uses .Keg (Prezi’s own font format) and TrueType (.TTF) Fonts.
  • A nice option is the ability to install the full Prezi font library on your computer if desired. Here is a tutorial on the process:  https://prezibase.com/how-to-use-custom-fonts-in-prezi-tutorial/

PowerPoint Web App

custom-fonts-16

  • The online version of PowerPoint can be used on all devices in a web browser. PowerPoint online is basically the same story as Windows 10 Mobile – it has a list of preset fonts and no additional fonts can be added to the list. But Microsoft has expanded list with additional fonts as this variation of PowerPoint has matured.

-Troy @ TLC

By |2016-08-10T08:15:24-07:00May 9th, 2016|Resource/Misc, Tutorial|

Can I Use Google Fonts?

GoogleFonts-1

PowerPoint and Google Fonts:

  • Professional fonts that display great in presentation apps (PowerPoint, Keynote, Adobe apps, etc.).
  • The ENTIRE library is FREE!
  • Primarily for web use and designed to dynamically load when a website or web-connected app uses them (so they do not need to be installed on a device to be used. Unfortunately both PowerPoint and Keynote are not able to leverage the web-based dynamic use of Google Fonts).
  • Can be downloaded as actual font files, installed on any computer, and both PowerPoint and Keynote can use them.
  • A few considerations about using locally installed Google Fonts in PowerPoint and Keynote:
    • get previous post details.

Details about Google Fonts

  • Google describes their font collection as “hundreds of free, open-source fonts optimized for the web.”
  • They have 708 font “families” (a Family is one typeface with several styles).
  • Find them here.
  • The online Google Fonts viewer has some great features, that can be used on any device. All fonts are displayed with a sample sentence that you can change to be any test. There are also options to see fonts used in a sample paragraph, a single word or very large in poster size text (good example for presentation callouts).
  • The ENTIRE library can be downloaded!
    • Use the down arrow icon in upper right of webpage to download Google Fonts to your computer.
    • Optionally, fonts.com has the SkyFonts app which works with Google Fonts and works similar to the Adobe Typekit. It will sync selected fonts to any computer that has the SkyFonts app installed. Go to it here.
    • Download the library at GitHub here.

GoogleFonts-3

So, should Google Fonts be a part of your workflow?

Adding Google Fonts to your presentations is a good option, assuming you are prepared for managing Custom Fonts in a presentation and assuring everyone has knowledge of how to install custom fonts on a computer, has web access to get the font to install, and is prepared for things not displaying as designed if not installed. The other consideration is, do you need another font option? With our internal library of thousands of custom fonts, and the addition of Adobe Typekit providing its thousands of fonts to our design options, too many options can be more to manage and may provide more design options that are not really needed. But, Google Fonts is a great resource every presentation designer has available if needed.

-Troy @ TLC


By |2016-08-10T08:17:06-07:00May 6th, 2016|Resource/Misc, Tutorial|

Using Adobe Typekit Fonts

Adobe Typekit is a combination between an online tool that previews fonts and an installer that adds them to a computer. Adobe TypeKit is included with Adobe Creative Cloud subscriptions.

Adobe TypeKit -1


Can Presentation Apps Use Adobe Typekit Fonts?

Yes, if we are talking about desktop PowerPoint and Keynote. Once the Adobe Typekit font is selected and synced to the computer, the font is available in other applications. At TLC, we use PowerPoint for Windows and Mac and Apple Keynote – we can confirm Typekit fonts are available for all of them. Note: PowerPoint may need to be restarted for the font to become available in the font menu.

Adobe Typekit Windows Mac
PowerPoint YES YES
Keynote N/A YES


HOW TO FIND AND INSTALL ADOBE TYPEKIT FONTS

Adobe Typekit is a hybrid app that is web-based, and can also be viewed through the Adobe Creative Cloud app and most Adobe applications (PhotoShop, Illustrator, InDesign, etc.). For our example, we are looking at Typekit through a web browser, which has the most options. Select the font to use in your presentation by going through the font library, select by clicking +USE FONTS (there are a lot of ways to view and search for fonts, and there are thousands of fonts).

adobe typekit menu


This is where things get a bit confusing. There are two options for using the font: (1) Web Sync, which will make the font available for web use (ie. a website), or (2) Creative Cloud Sync, which will make the font available for use in Desktop apps on a computer. We are installing fonts to a computer for use in PowerPoint.

adobe typekit

After selecting fonts and use, click SYNC SELECTED FONTS and they will  be installed on the computer.

adobe typekit sync

The Creative Cloud Desktop application will open and prompt you to add fonts from Typekit. Below that is a list of all Adobe Typekit fonts currently available.

adobe typekit -1

PowerPoint and Adobe Typekit

All Adobe Typekit fonts can be used by PowerPoint on both Windows and Mac, but there are some considerations:

  • PowerPoint needs to be started AFTER fonts are installed, or the new fonts will note show up in the font list.
  • Typekit fonts are considered “custom fonts” and will need to be installed on any computer that is going to show the presentation.
  • Only a computer that has Adobe Creative Cloud installed and has an active user account logged in to an Adobe CC account is going to be able to sync and install Typekit fonts.
  • PowerPoint will not warn you that fonts are missing, nor will it tell you where the fonts are from (So an end user needs to look at the font list for missing fonts and know they are Typekit fonts that they can install. TIP: Add a hidden slide or off-slide note about custom fonts and where to find them to help other users).
  • Typekit fonts installed on a computer are not actual files that can be accessed and copied to other computers.

2

Keynote and Adobe Typekit

All Adobe Typekit fonts can be used by Keynote, but there are some considerations: Keynote dynamically recognizes newly installed fonts, so there’s no need to restart it after fonts are installed (great!).

  • Adobe Typekit fonts are considered “custom fonts” and will need to be installed on any computer that is going to show the presentation.
  • Only a computer that has Adobe Creative Cloud installed and has an active user account logged in to an Adobe CC account is going to be able to sync and install Adobe Typekit fonts.
  • Adobe Typekit fonts installed on a computer are not actual files that can be accessed and copied to other computers.

2


-Troy @ TLC


By |2016-08-10T08:17:25-07:00May 4th, 2016|Resource/Misc, Software/Add-Ins, Tutorial|
Go to Top