Tutorial

Download Streaming Videos using Keepvid.com


Keepvid.com allows you to download streaming videos from of a variety of websites, including YouTube, Vimeo, Facebook and more. The process is quick, easy and very convenient.

A video version of this process is below.

1

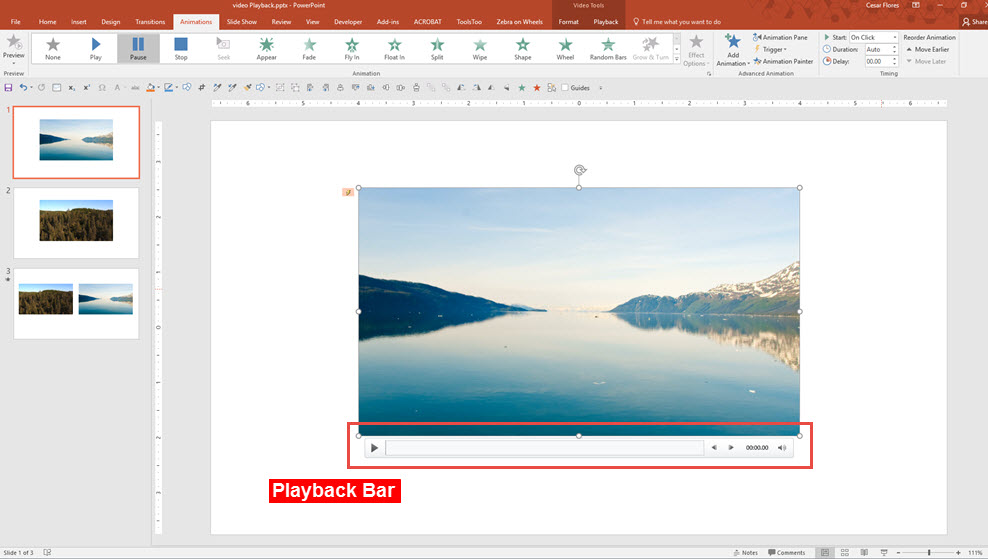
To get started, you must first make sure that Java is enabled. According to keepvid.com/help, Java is sometimes required to fetch download links.


keepvid.com 1

2

Find the video that you want to download, copy the link – URL (Uniform Resource Locator) to your video and paste it in the field to the left of the Download button.


url

 
2

3

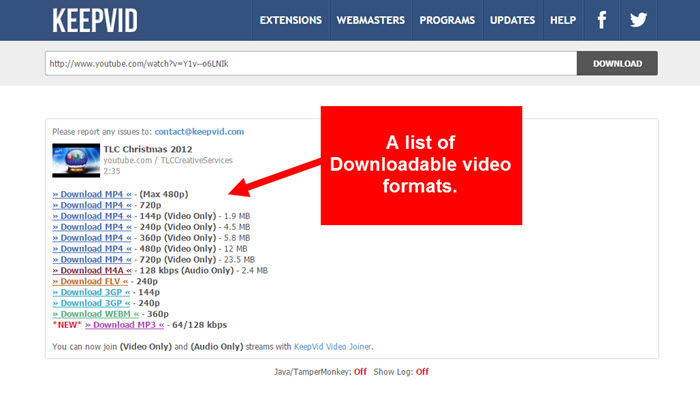
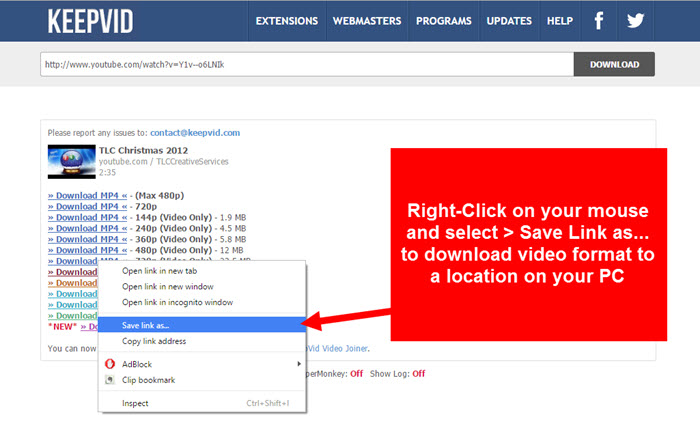
A list of links to your video file will appear on the bottom of the page in various sizes and formats.

Formats to select from include Video formats: MP4, FLV, 3GP, WebM and Audio Formats: M4A, MP3.


3

Click on the actual link for your specific format and size to simply save the video file.

 
4

4

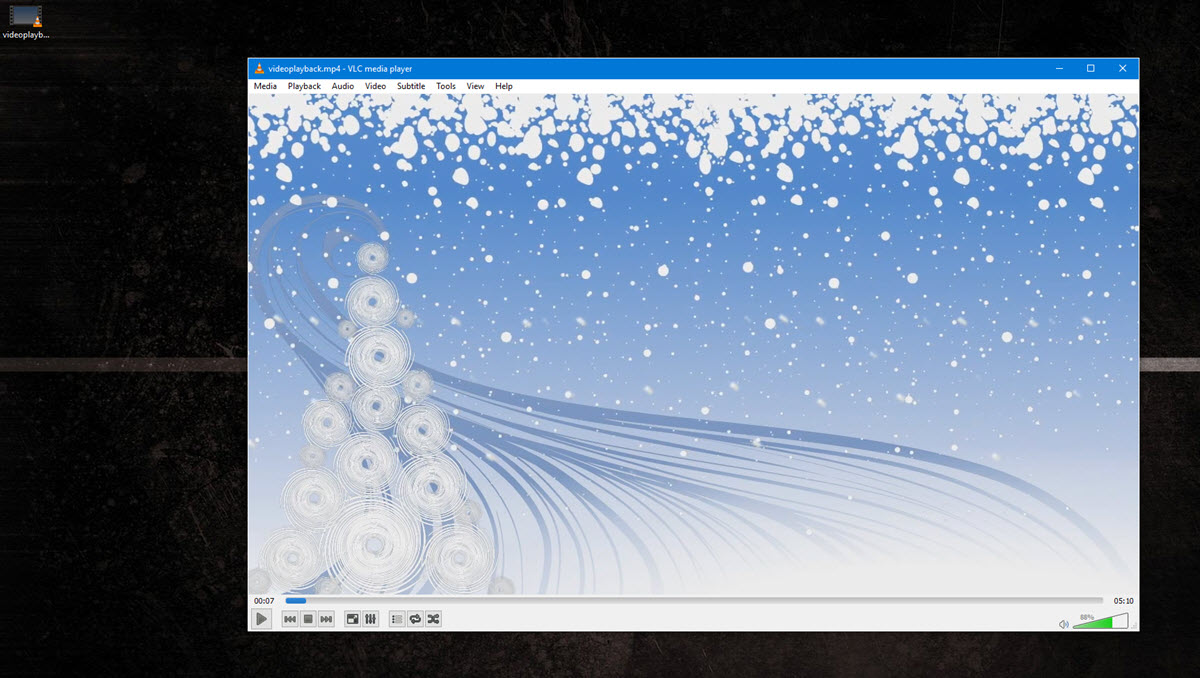
You now have the video (in the format of your choice) downloaded onto your computer!

2016-03-17_11-34-36


– Troy @ TLC


Video Demonstration.

[KGVID]https://thepowerpointblog.com/wp-content/uploads/2016/03/unnamed-file-3.mp4[/KGVID]

(Note: This an updated post. Original post 05/07/2014)

I’m sure you’re aware of the legalities over Copyright Infringement. Download videos that are not yours at your own risk.


By |2019-10-28T10:00:53-07:00March 18th, 2016|Resource/Misc, Tutorial|

Recolor Content with Powerpoint Tools

In PowerPoint, you can place content on top of a video background to create a dynamic and dimensional design.

Find a great example we created here:

[KGVID]https://thepowerpointblog.com/wp-content/uploads/2016/03/unnamed-file-7.mp4[/KGVID]

Here’s how to create a similar effect to your video

1

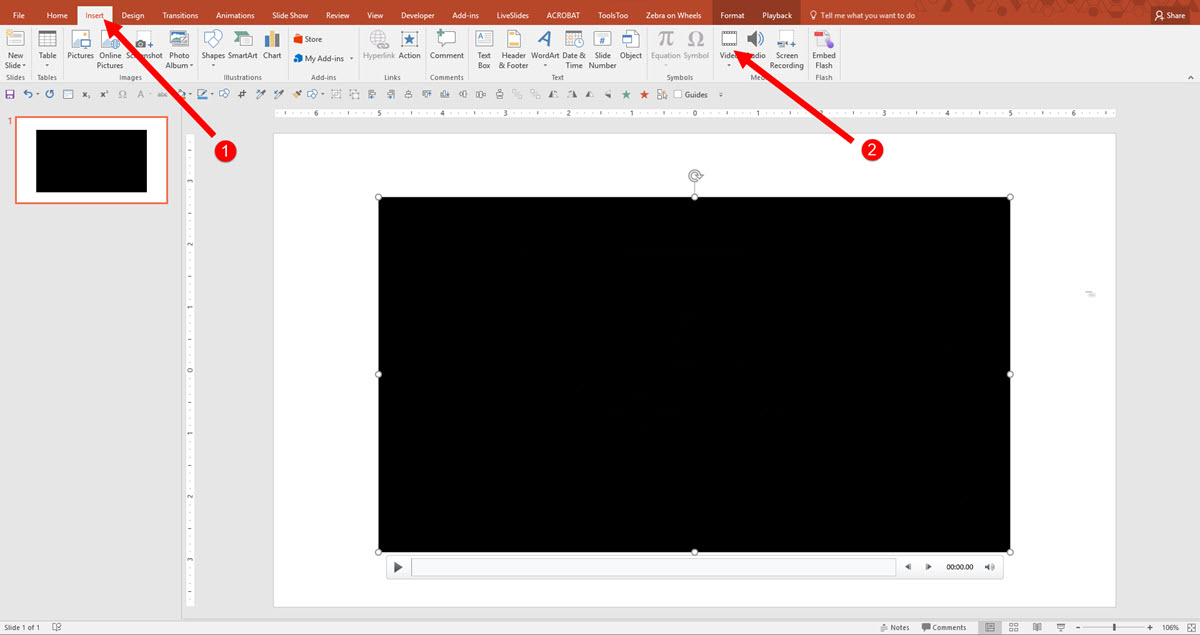
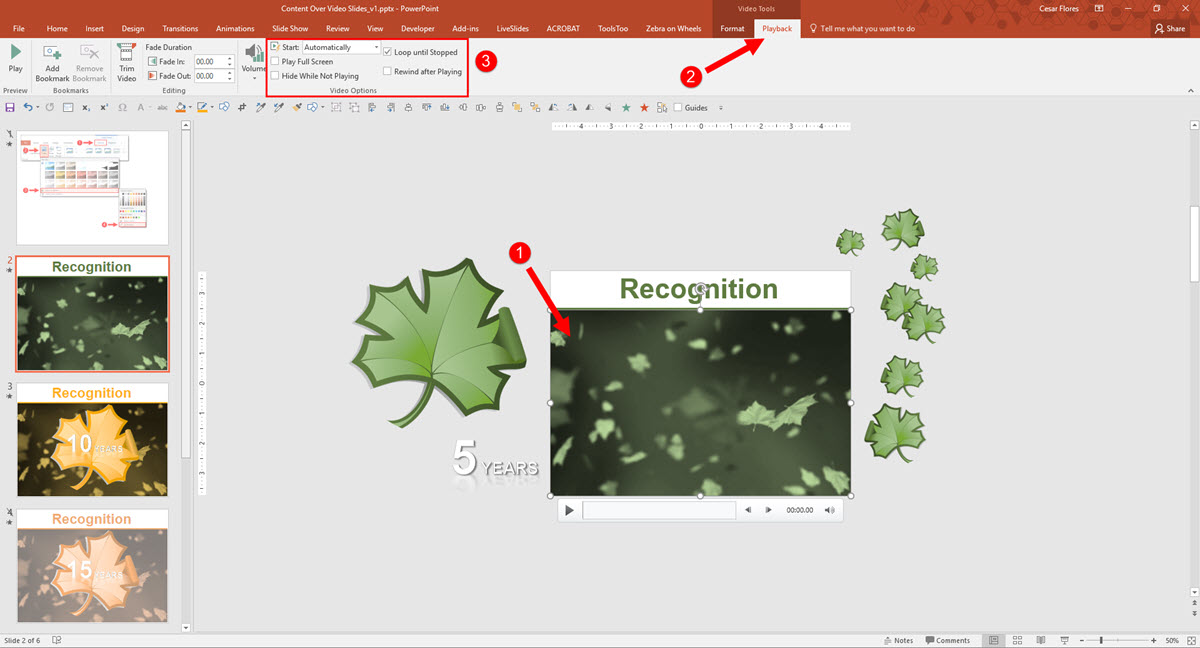
Insert  (1) Video onto your Canvas , click (2) Video and select your Video.

2016-03-01_11-02-20


2

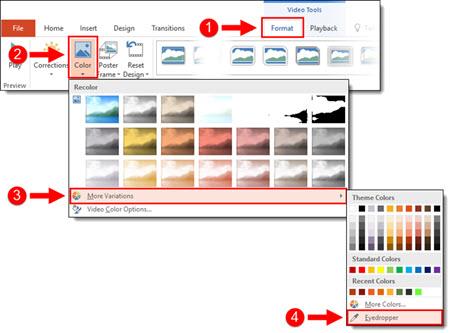
To recolor your video, click on (1) Format Tab, select (2) Color tool in the drop down, you get Recolor options.You can add custom colors by Selecting the (3) More Variations or using the (4) Eyedropper tool.

1_ Recolor Content Over Video


3

Once you are satisfied with the styling of the video, select your (1) video on the Canvas, select (2) Playback, set the video to (3) Start Automatically and Loop until Stopped.

2016-03-01_11-35-523

4

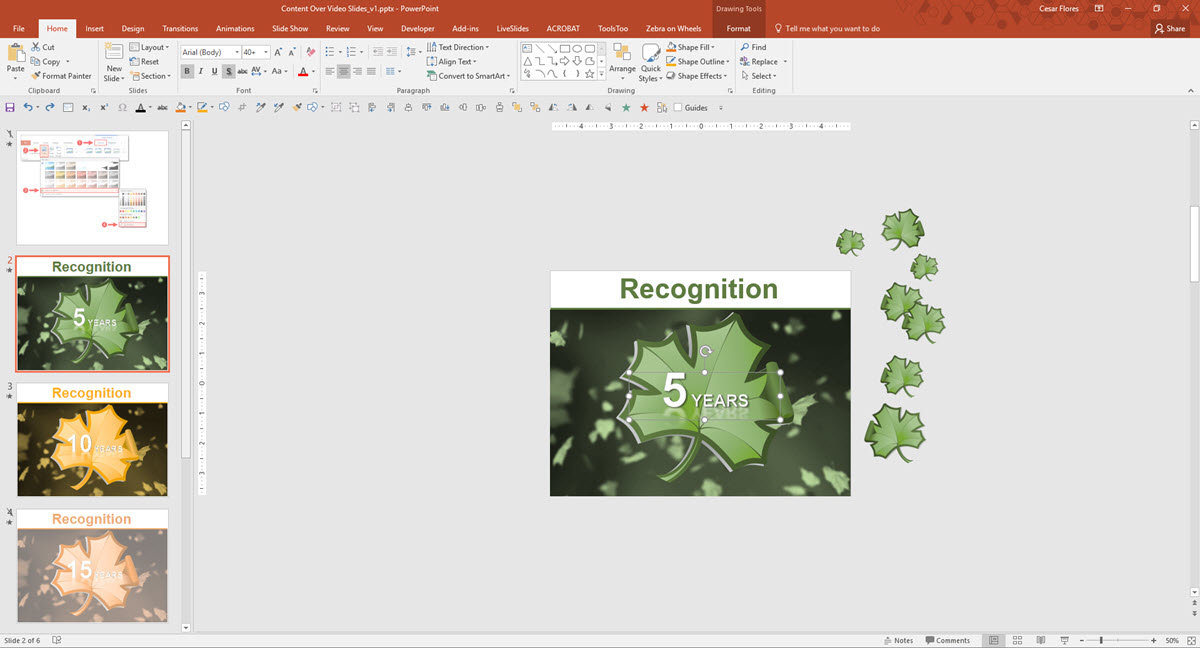
Next, add stylized text and graphics directly on top of the video and animate as desired. The end result is a slide with content that animates directly on top of the video background.


2016-03-01_11-54-45


-Michelle @ TLC

By |2019-11-12T11:50:22-08:00March 2nd, 2016|PowerPoint, Tutorial|

Create a Picture Frame Using a Video

Here’s how we created a Video Picture Frame in PowerPoint

My example is a standard 4×3 slide. The goal was to create a picture frame that was full slide size and for the picture frame to have motion. By layering a video under the photo and sizing it to the same aspect ratio as the photo, the result is a dynamic motion picture frame. The steps to make it happen are pretty easy.

Step 1

Add the photo to the slide (we prepped this image in Photoshop by making it semi-transparent and saving out as a .png).

Video Picture image 01

Step 2

Add the video to the slide, send to back, resize and crop to proportionally be a bit larger than the photo.

Video Picture Frame-centered


Step 3

Fine tune position of video and photo. Select both and use the ARRANGE > ALIGN > ALIGN CENTER and ALIGN MIDDLE to make them exactly centered on each other.

Video Picture image 03

Step 4

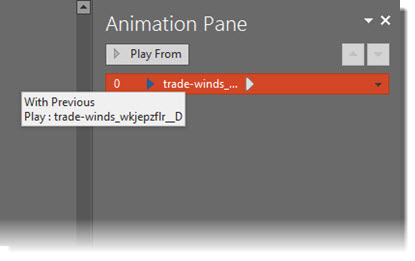
Set video animation. Select the video, remove the current trigger animation, add a new PLAY animation set to WITH PREVIOUS.

VideoFrame Animation

Step 5

Set video to loop. Select video, go to PLAYBACK > VIDEO OPTIONS > LOOP UNTIL STOPPED.

Powerpoint Video Picture Frame 6

Step 6

Stylize video with an outline and drop shadow. Stylize photo with an outline and inner shadow.

Video Picture Frame with Shadow

Step 7

View in slide show!

[KGVID]https://thepowerpointblog.com/wp-content/uploads/2016/02/unnamed-file-1.mp4[/KGVID]

-Troy @ TLC



By |2019-11-15T09:42:16-08:00February 22nd, 2016|PowerPoint, Tutorial|

How to Prevent Resize Slide From Erasing Formatting (part 3)

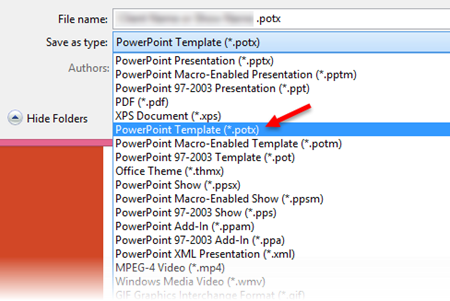
The solution we use at TLC Creative Services is to remove the variant. The simple answer is to save the presentation as a PowerPoint template (.potx) which creates a file with no variants. Here is a quick step-by-step process:

1. Go to File>> Save As >> POTX from drop down list

  • Save to the desktop (this is a temporary file you will delete)
  • Use a file name that is applicable to the template
  • Note 1: The file name will be seen in the file properties
  • Note 2: A .potx is a PowerPoint template and it cannot contain slides, so doing this is going to DELETE all slides (which will be added back in a few steps)

SlideResize-8

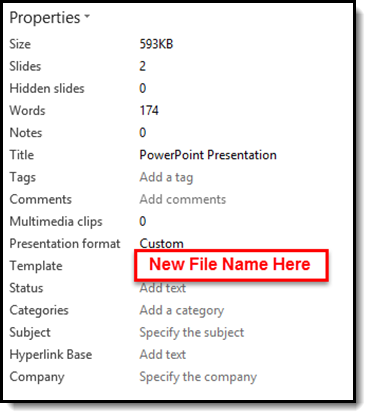
2. Open the new .potx file and look at the file properties

  • Creating a .POTX removes the Default Theme ID
  • The TEMPLATE property will now list the .POTX file name
  • Note: When you open a .potx, it automatically creates a .pptx presentation file.

SlideResize-12

3. Go to FILE > SAVE AS > POWERPOINT PRESENTATION (.pptx) from the drop down list

  • Opening a .potx automatically creates a .pptx presentation file
  • Open file is most likely named “Presentation1.pptx”
  • Save presentation with a new file name – Best Practice: Name same as original file name + version # (eg. _v2)

4. Go to DESIGN tab > VARIANTS section

  • The presentation now has no VARIANTS

SlideResize-13

7. Add slides from original presentation to the new, no variant, presentation and save file

8. Delete the temporary .potx and the original presentation

9. Use the Resize option without losing template formatting!


– Troy @ TLC
By |2016-08-10T09:00:17-07:00August 19th, 2015|Tutorial|

Why Resize Slide Erases All Formatting (part 2)

The previous post showed how template formatting is often stripped out of a presentation when it is resized.

SlideResize-1      SlideResize-9

So here is my simple, non-tech description of what is happening inside PowerPoint (Note: If you really want details on templates and themes, I highly recommend Echo Swinford and Julie Terberg’s excellent book: Building PowerPoint Templates Step by Step with the Experts).

The resize “bug by design” will only happen with presentations and templates developed in PowerPoint 2013 and above.  Files created in PPT 2007 and 2010, even if edited in 2013, do not have the resize issue because those versions of PowerPoint do not have the troublemaking feature. With PowerPoint 2013, a new option for templates was added, VARIANTS. Variants will eventually be a great feature, but currently they are not really used and the “Super Theme Templates” they open the door to create are so difficult to develop, I only know a few designers in the world who really understand them and are willing to tackle them (and I am not one of them).

Variants, which you see in the Ribbon on the Design Tab, are basically template styling options.

SlideResize-5

When resizing slides, PowerPoint needs to use a variant. If there is not a custom variant already there from a Theme, PowerPoint reapplies the Microsoft Default Theme. The default theme, called “Office Theme,” is what you get when opening a new blank presentation (boring, white, no stylized formatting).

SlideResize-10

When the default theme, and its variants, are applied, all formatting to the master slide and layouts are replaced with this “default” setup. What this means is nicely designed slides lose their existing template styling attributes. See the previous post for a downloadable sample slide you can test and see formatting stripped.

Here are 2 ways I do a quick check to see if a provided file is going to have an issue if it needs to be resized:

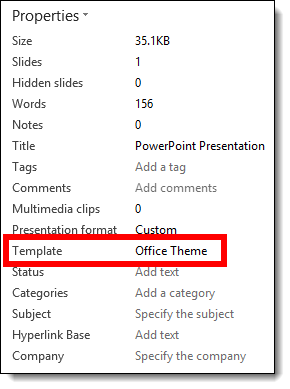
1. Go to FILE > PROPERTIES > expand to see all properties > TEMPLATE

– If the TEMPLATE property is BLANK or has “OFFICE THEME,” I know it is almost 100% certain to have formatting issues if resized

SlideResize-6

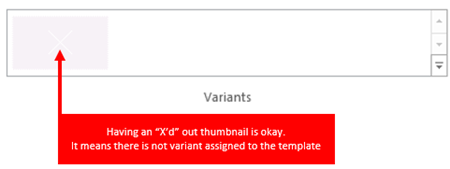
2. Or I look at the DESGIN tab >> VARIANTS section and see what variants are available (Note: If there are no variant thumbnails, that is covered in part 3, and it is okay)

SlideResize-11

The next post, part 3, is a step-by-step solution to avoid PowerPoint adversely affecting slides when resized.

– Troy @ TLC
By |2016-06-16T14:07:02-07:00August 17th, 2015|Tutorial|

Resize Slide Erases All Formatting! (part 1)

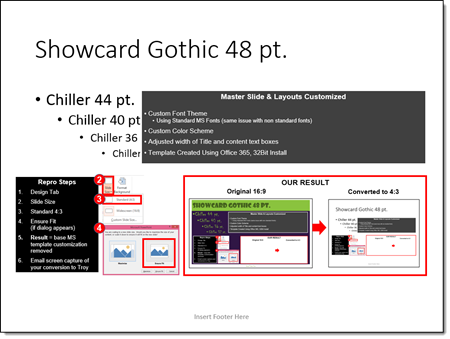
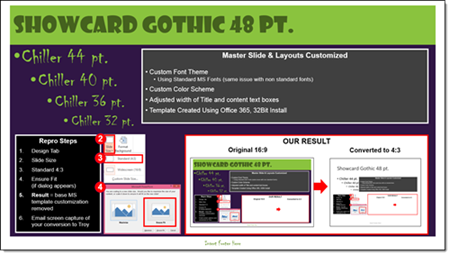
Here is the scenario: you have a 16×9 presentation that needs to be changed to 4×3. Easy! PowerPoint has a great feature to change the aspect ratio (via Page Setup) and it keeps everything proportional (eg. circles stay round) and adjusts the position of everything to fit the new slide layout – but things don’t go as smoothly as planned.

1. Here is your 16×9 slide (download this PowerPoint 2013 Resize Test Slide):

SlideResize-1

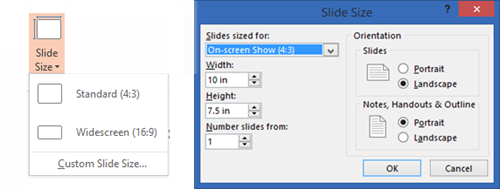
2. Go to DESIGN > SLIDE SIZE > STANDARD 4×3

Resize14

3. Here is the disaster you get when converting to 4×3

SlideResize-9

Note: This problem is not the size selected (4×3), it happens when going from any size to another size. And this is not a bug, but by design (I really like how Echo Swinford  describes this as “a bug by design”). What you end up with is:

– Correct page size – yay!

– Custom background – gone

– Custom fonts – gone

– Custom color scheme – gone

– Any template customization – gone

Part 2 and 3 of this series detail what is happening behind the scenes in PowerPoint and a (fairly) simple step-by-step solution.


– Troy @ TLC
By |2016-06-16T14:09:24-07:00August 14th, 2015|Tutorial|

Find and Replace Double Spaces in a Presentation

[text]Presentations are the creation of many people copy/pasting content into a single slide deck. One of the common content edits is double spaces in sentences. Here is a quick and easy method for removing them.[/text]
[text]1. On the Home ribbon, select “Replace” on the far right.[/text]

replace double spaces 1

[text]2. Under “Find what:” Hit the space bar 2x. Then, under “Replace with:” Hit the space bar 1x. Click “Replace all.”[/text]

replace double spaces 2

[text]3. PPT will find all instances of double spaces and replace with a single space with 1 click! It searches the Notes section as well as slides, but it’s certainly very helpful in catching the ones hiding in slide content.[/text]

replace double spaces 3

[text]4. If you wanted to see exactly where the erroneous double spaces are, you can opt to click “Find Next” and PPT will take you slide by slide highlighting where the spaces are. You can then choose which ones to change by clicking “Replace” rather than “Replace all.”[/text]

replace double spaces 4

By |2016-08-10T09:02:39-07:00July 22nd, 2015|Tutorial|

Set An Angle In PowerPoint

As everyone that has worked in PowerPoint knows, matching rotated items to the same angle can be a challenge. This is especially true when using the rotation handle (the click and drag method). To take the frustration out of this task, let us walk you through manually setting the angle and easily getting multiple items exactly aligned with the same rotation!

Here is our sample slide being created. It has a green rectangle (not a triangle, so we can know the exact angle), and a text box matched to the same rotation as the green rectangle.

Set Angle 5

1. First add a rectangle.

Set Angle 1

2. Next, bring up the Format Options Dialogue Box either by going to Format tab on the tool bar or by right clicking the shape.

– Select SIZE AND POSITION from the right-click pop up menu.

– The Format Shape pane opens to Size and Properties tab.

Set Angle 1a


3. In the SIZE section is the ROTATION box.
4. Enter any angle needed (this has a live update, so you can see the angle applied to selected item). For this sample, we used -26 degrees.

Set Angle 2
5. Add a text box and type (we added TLC CREATIVE SERVICES).

Set Angle 3

6. With the text selected, we followed the same steps above to rotate the text. Using the Format tab on the tool bar, or by right clicking the text, bring up the Format Options Dialogue Box.

– Select SIZE AND POSITION from the right-click pop up menu.

– In the ROTATION box, enter the angle as the rectangle (-26 degrees in our sample).

Set Angle 3a

7. Position the angled text box above the rectangle.

Set Angle 4

8. Select both the rectangle and text box and move to the lower right of the slide for a great visual layout using perfectly aligned and angled elements for your design!

Set Angle 5

– Troy @ TLC
By |2016-08-10T09:08:31-07:00February 27th, 2015|Tutorial|

Design Idea – Image Fill Text (Part 2)

As a continuation of the previous post, we are looking at some of the advanced image sizing and placement options for Image Fill Text. Thanks to TLC staff designer, Christie, for this step-by-step tutorial and examples.

 

We are working from the same sample text.

Image Fill Text 1

1. Select the text to add an image fill too.

2. Open the FORMAT SHAPE pane to the text options.

– How to…

3. Select TEXTURE OR PICTURE FILL.

4. Click FILE.

5. Select an image. For this example, I am using a nice flower image that has lots of vibrant colors.

Image Fill Text 0

6. The auto fill position and size do not really do much for the overall visual.

Image Fill Text 13

7. Select TILE PICTURE AS TEXTURE. This will allow access to additional formatting options.

Image Fill Text 9

8. Adjust the OFFSET (X and Y), SCALE (X and Y) and ALIGNMENT options to size and position the image for the best visual.

Image Fill Text 11

8. Now the image fill adds a lot of the pink tones and a bit of the green on the edges.

Image Fill Text 5


By |2016-08-10T09:09:17-07:00February 20th, 2015|Resource/Misc, Tutorial|
Go to Top