NEW Podcast on Presentation Design!!
Yes! It’s true! You can now hear me and other Presentation Design professionals on a new Podcast entitled The Presentation Podcast! New episodes will be available 2 times a month and we’ll cover different topics each week!
![]()
I am constantly listening to Podcasts, so I am extremely excited about the opportunity to put together a new Podcast specific to the presentation industry. The hosts are Nolan Haims, Sandra Johnson and Myself. We will have discussions all about presentation design, best practices, running a design studio, tips & tricks and lots more so be sure to tune in!
Add The Presentation Podcast to your iTunes Podcasts and join us for the fun!
-Troy @ TLC
Can a Video Morph in PowerPoint?
Can a video morph in PowerPoint? The answer is yes (but not completely).
The great thing is – a video placeholder works with Morph. Here is my two slide sample, the video on the second slide has been resized to full screen.

In the demo video below, the sample video growing to full slide size with a Morph transition works perfectly. However, due to a limitation of how PowerPoint plays videos, a video cannot play across slides. In this sample, the visual works nicely with the 2nd slide set with a shorter slide transition duration (morph) and a Play-with-Previous to have the video start playing instantly after the morph finishes. But a video with audio or content that would look awkward with a pause will not work as well (visually).
[KGVID]https://thepowerpointblog.com/wp-content/uploads/2016/03/unnamed-file-6.mp4[/KGVID]
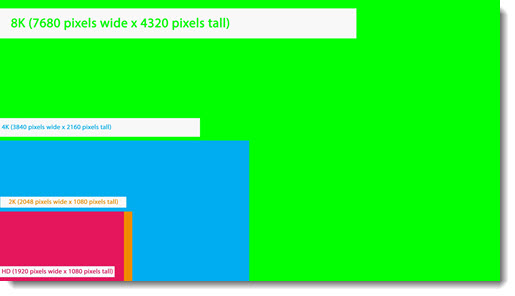
HD, 2k,4k, 8k Resolution Guide
Living in the digital era isn’t always easy. It is difficult to keep up with aspect ratio and resolution for PowerPoint Presentations. Here is a quick reference beyond this modern marvel of technology:
Why is it called 2K-4K-8K?
An easy way to know what to call a resolution is to look only at the horizontal pixel count. 2K, 4K, 8K, etc. all refer to the horizontal resolution – approximately that number.
Note: For this post, all resolutions referenced are for 16×9 aspect ratio displays (with the exception of 2K).
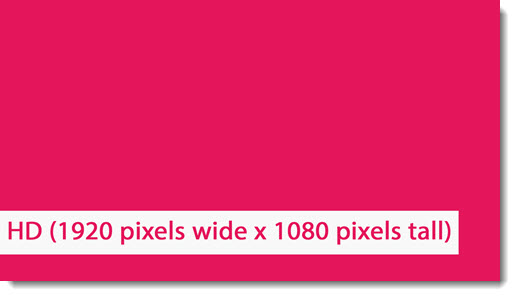
HD (1920×1080)
HD, or High Definition, is used for two resolutions 1280×720 or 1920×1080. These are commonly referred to as 720p or 1080p (see this post that explains “P” and “I”). I am going to refer to 1080p as HD.
2K
HD, or High Definition, almost 2K, but not quite. 2K resolution is 2048×1080. It is a long story why computer displays did not just go with 2K, we’ll save that for another post. But needless to say, true 2K resolution is not used a lot in an HD world.

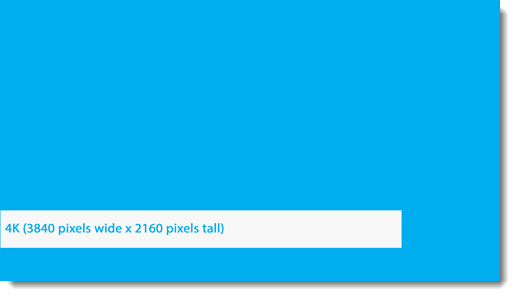
4K
Like HD, 4K is actually 2 different resolutions depending on the context. The resolution we use for PowerPoint resolution and 4K monitors is called UHDTV 4K @ 3840 x 2160 pixels. The film industry will use 4096 x 2160 pixels, but this is not a 16×9 aspect ratio so it is not a part of this discussion and something you will most likely never use.
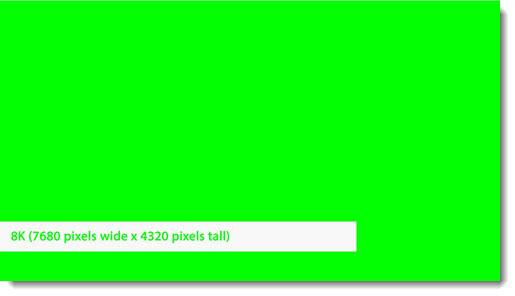
8K
Yes, I am skipping 6K (noted below), because 8K is the next industry standard, also called UHDTV 8K @ 7680 x 4320 pixels. This is a lot of pixels and yes we design presentations for beyond 8K projection!
6K, 10K, 12K and beyond are all resolutions, but they are not industry standards. Here is a quick list of resolutions, that includes them for reference.
HD = 1920×1080
2K = 2048×1080
4K = 3840×2160
5K = 5120×2880
6K = 6144×3160
8K = 7680×4320
10K = 10328×7760
Yes, PowerPoint can handle any of these resolutions. It is not so much a question of can PowerPoint handle a high resolution as it is can the computer and monitor/projector handle the high resolution. In addition, many stage events we develop presentations for use an array of side-by-side projectors to create a custom resolution. Usually, it is an array of HD, 1920×1080, projectors, so (and I am simplifying the details) a 4 projector wide setup will create an 8K wide by HD height image. TLC then creates a custom PowerPoint for the 7680 x 1080 pixel resolution, which we generically refer to as “Ultrawide Presentations.”
Industry Standard Resolutions in 1 Chart
-Troy @ TLC
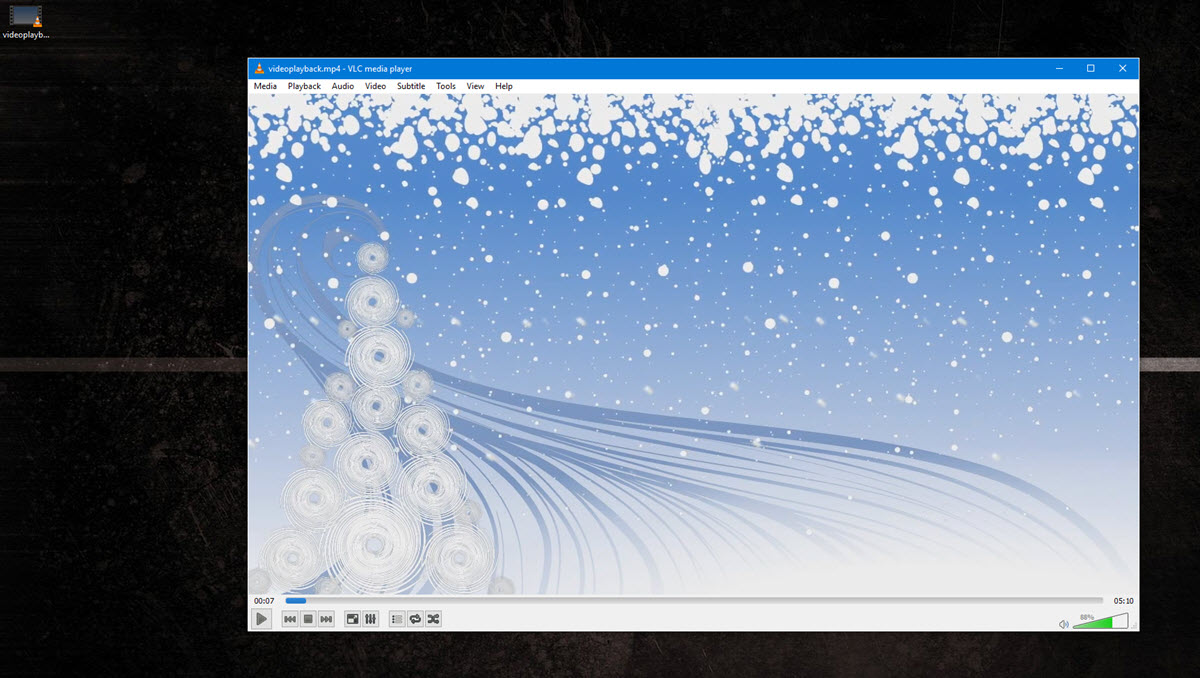
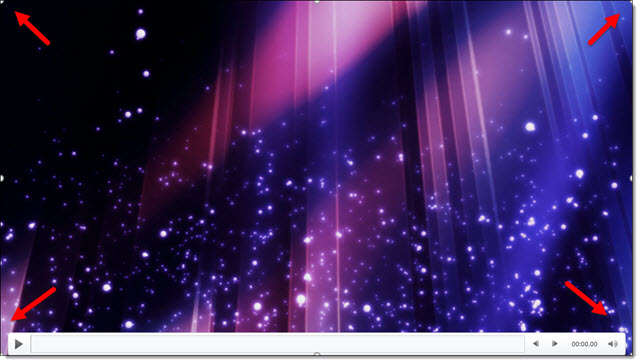
Use The PowerPoint Video Playback Bar
Inserting video into Powerpoint is an easy task. Using the video playback bar also makes controlling the video playback easy.

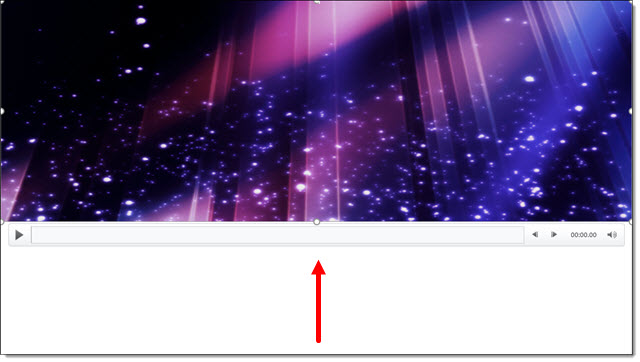
The playback bar is available in slide edit view – when a video is selected, it appears. The playback bar can be used to preview the video, click-and-scrub through a video, pause a video, and see a live time code.
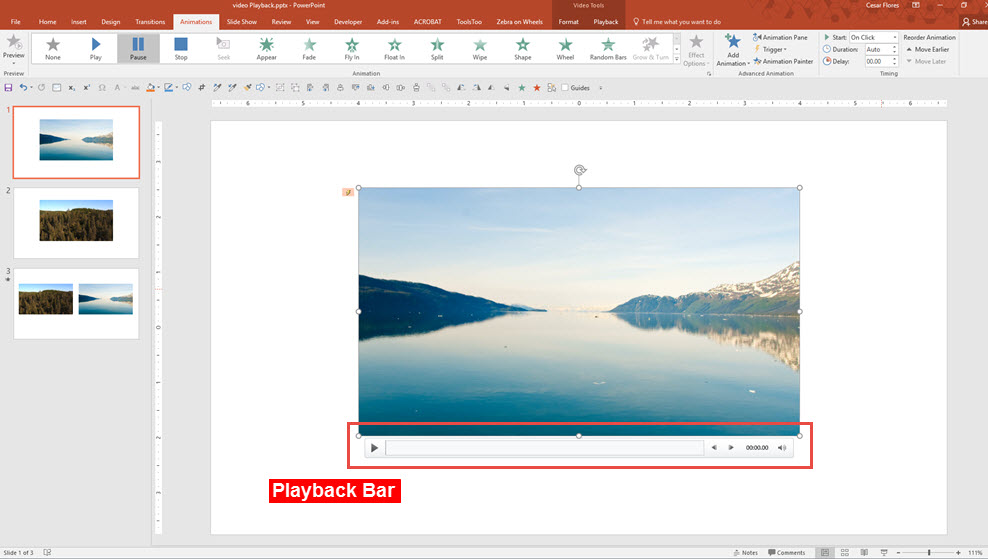
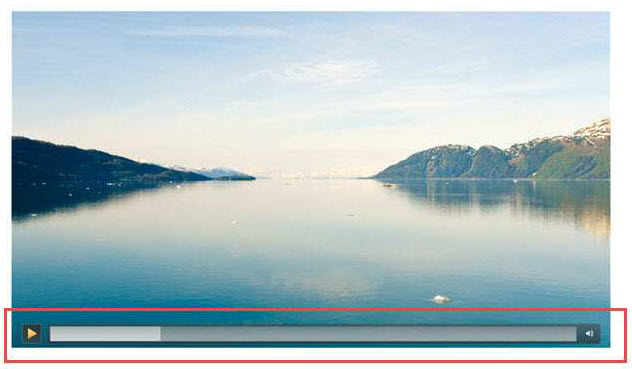
During a presentation, when the mouse is moved over the video, a simplified semi-transparent playback bar will pop up. Most of the same functions are available; time code and incremental incremental jumps are not on the playback bar in slideshow.
The playback bar position cannot be moved (although this functionality is definitely on my wish list for the Microsoft Dev team). When the cursor is moved off the video, the playback bar hides almost immediately (and reappears with any mouse movement over the video).
Slideshow playback control options:
- Play / Pause Button.
- Timeline bar (click anywhere on timeline and jump video to that position, click-and-drag and “scrub” through the video forward and back).
- Volume Control (very helpful for muting a video during a presentation).

The semi-transparent playback bar is not overly distracting because it’s nicely designed. Here are a few examples over different color videos. In addition, these two videos are on the same slide, side-by-side. See demo video of this slide below.
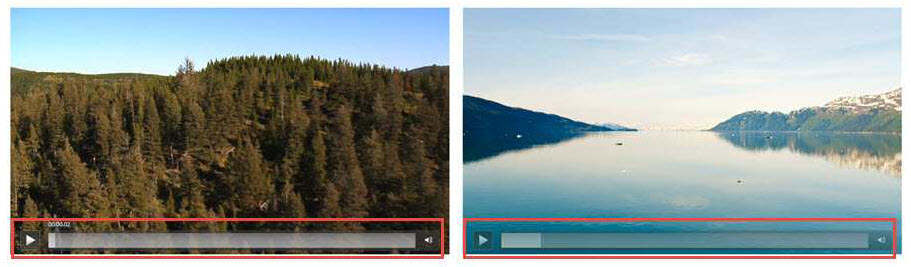
Here is a video demo of interacting with videos during a slide show.
[KGVID]https://thepowerpointblog.com/wp-content/uploads/2016/03/unnamed-file.mp4[/KGVID]
-Troy @ TLC
Happy Easter 2016 Powerpoint Template
Happy Easter 2016 from TLC Creative!
In the spirit of Easter week, here’s an awesome Easter 2016 PowerPoint Template, put together by Designer Amber, that you can download for free and use it for personal or commercial use.
Have a safe and festive Easter 2016.
Download Your Easter 2016 Powerpoint Template

[KGVID]https://thepowerpointblog.com/wp-content/uploads/2016/03/unnamed-file-5.mp4[/KGVID]
-Troy TLC
Download Streaming Videos using Keepvid.com
Keepvid.com allows you to download streaming videos from of a variety of websites, including YouTube, Vimeo, Facebook and more. The process is quick, easy and very convenient.
A video version of this process is below.
1
To get started, you must first make sure that Java is enabled. According to keepvid.com/help, Java is sometimes required to fetch download links.
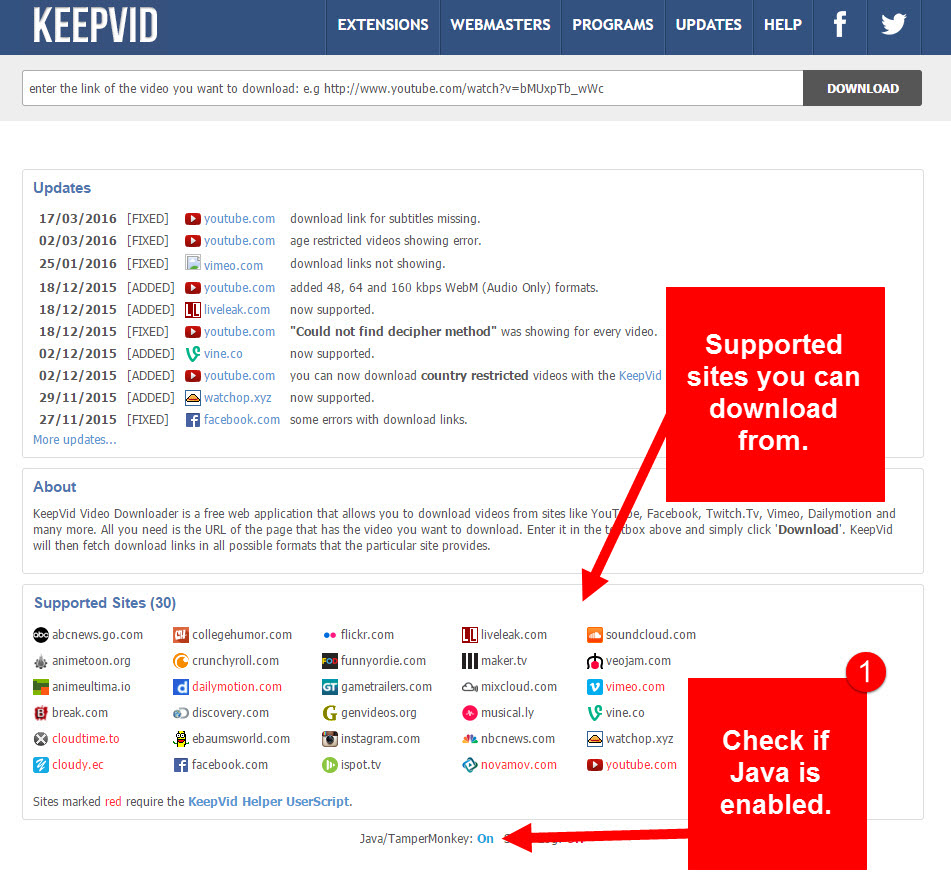
2
Find the video that you want to download, copy the link – URL (Uniform Resource Locator) to your video and paste it in the field to the left of the Download button.

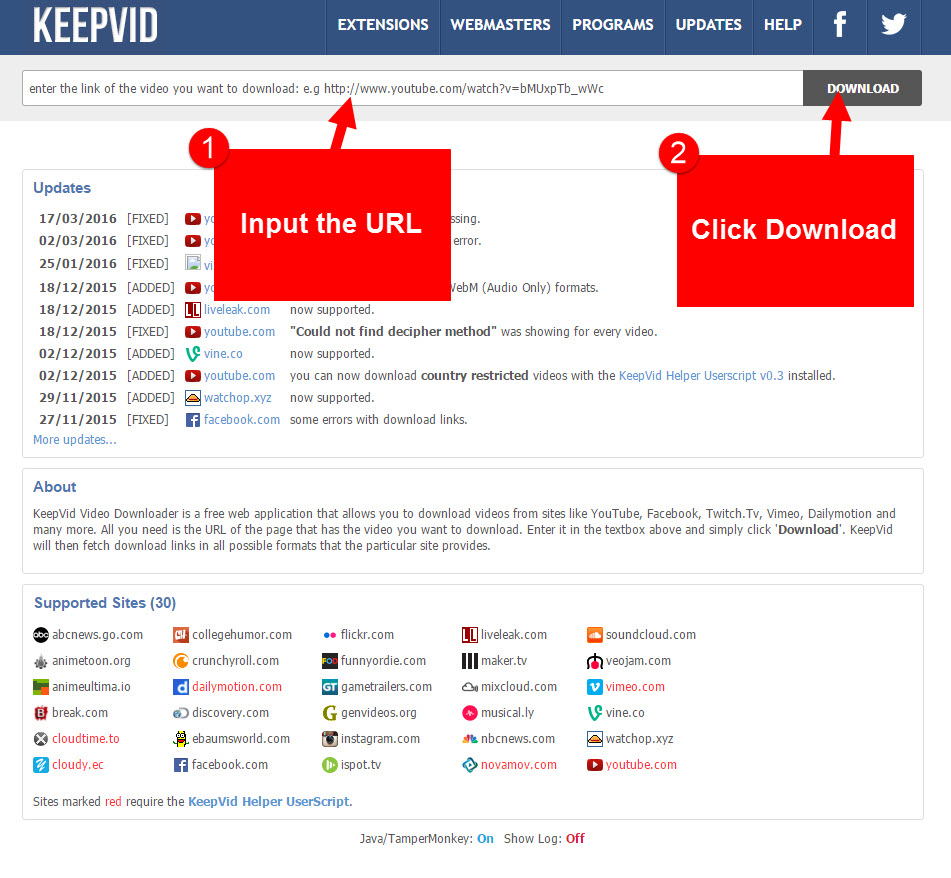
3
A list of links to your video file will appear on the bottom of the page in various sizes and formats.
Formats to select from include Video formats: MP4, FLV, 3GP, WebM and Audio Formats: M4A, MP3.
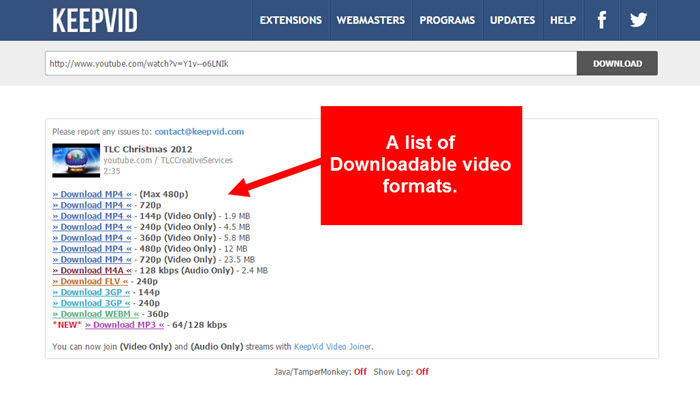
Click on the actual link for your specific format and size to simply save the video file.
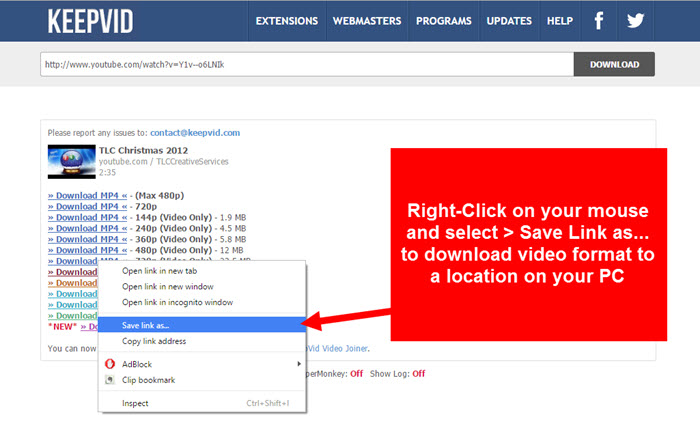
4
You now have the video (in the format of your choice) downloaded onto your computer!
– Troy @ TLC
[KGVID]https://thepowerpointblog.com/wp-content/uploads/2016/03/unnamed-file-3.mp4[/KGVID]
(Note: This an updated post. Original post 05/07/2014)
I’m sure you’re aware of the legalities over Copyright Infringement. Download videos that are not yours at your own risk.
Stretched Video using Powerpoint
What we’re doing here is creating a top and and a bottom banner by inserting a stretched video with animation. There is a video demonstration below.
The video used for this blog was sourced from Videoblocks.com. The aspect ratio of HD MOV 1920 x 1080.
Link to sourced video Abstract Purple and Magenta Sparks
Stretched Video in Powerpoint
1
To insert a video > insert tab > video > for this blog I am using the “VIDEO ON MY PC” option. This will insert the video at original aspect ratio 1920 x 1080.

2
Scale the video to fill the width and height of page.
3
Scale the video from the bottom/center tab of the video to shorten the height. This creates a scaled video banner.
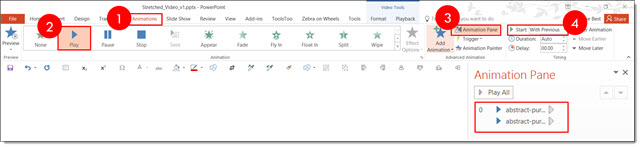
4
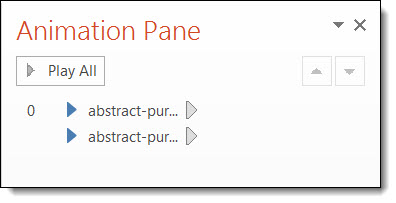
Duplicate and send the other video to the bottom of the page. Select both videos > Animation Tab > Click Play > Click the Animation Pane > Start with Previous. This allows both videos to be played at the same time on the initial startup.
5
With both videos selected Click on > Video Tools Tab, then Playback Tab > Start Automatically > Loop until Stopped.
This allows both videos to play automatically and loop in Slide Show Mode until stopped.


Pros and Cons
Pro for stretching a video: By using a stretched video, the user can display the video in numerous shape and scale options, creating a unique styling display.
Cons for stretching a video: Stretching a video may work for most abstract displays, however it will not retain the original scale ratio of the object being displayed and will result in ruining the original image.
Christie @ TLC
Video Demonstration
[KGVID]https://thepowerpointblog.com/wp-content/uploads/2016/03/unnamed-file-4.mp4[/KGVID]