How to Use – and install – a Custom Font for PowerPoint
Custom fonts are tricky, because PowerPoint needs them installed on the computer to accurately display text with the custom font. However, Microsoft PowerPoint does not tell us if a font is missing on that computer, and “helps” us by swapping the missing font with a Microsoft font, which may or may not (and usually does not) keep the slide formatting as intended. Often, we are left looking at slides wondering why the text is jumbled and wrong… with a puzzle, a missing piece is obvious. With PowerPoint, the user needs to first on their own identify the piece is missing, then work on fixing the issue.

Once you know custom fonts are needed and missing, the solution is to install the custom font(s) on the computer, so PowerPoint slides display as they were designed. 
Here’s a quick how-to for adding custom fonts to PowerPoint, with two notes:
- these steps are for Windows computers. Mac users have a similar process (using the default FontBook app).
- These steps assume you have know what custom fonts are needed, and have the font files on the computer (SlideWise is a great third party app for auditing a presentation and knowing what fonts are used on the slides).
The process is easy on Windows computers. First close the PowerPoint app. In File Explorer, right-click the font(s) and select “Install”. Done. The font will be added to the computer’s font folder (c: > Windows > Fonts).

It’s important to note that if you have PowerPoint open when you install the font, it will not show up in the font dropdown menu. Simply close and restart the application. Don’t just close and reopen the presentation; the entire app needs to be closed and then restarted. When launching PowerPoint includes all installed custom fonts in the font library dropdown menu (same for Word, Excel, etc.).

Troy @ TLC
Slidewise’s Font Management is My Favorite Feature! – A Look Back to July 2022
Font management has unfortunately not improved in PowerPoint since this July 2022 post. As such, the Slidewise PowerPoint Add-in still is the most robust font management solution for PowerPoint – and it has gotten better since the original post!
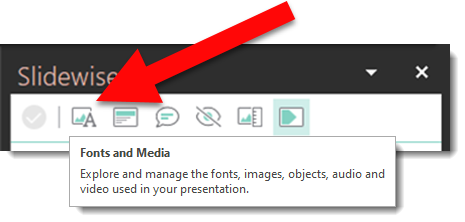
Neuxpower’s Slidewise PowerPoint add-in has many fantastic tools. When initially testing it, the font audit and management functionality instantly won me over and quickly was installed on all computers at TLC Creative Services!
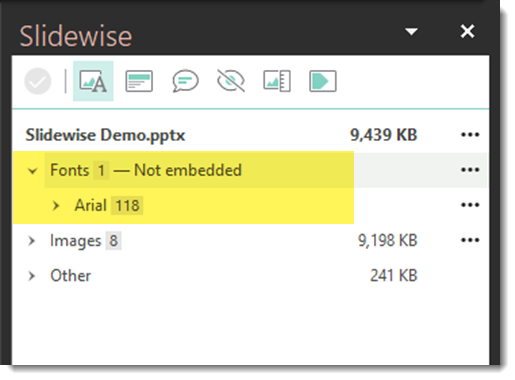
In this sample demo deck, the Slidewise Font Audit shows there are 5 fonts used in presentation.
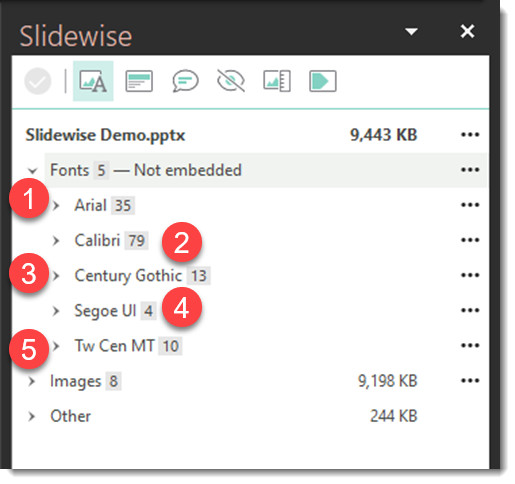
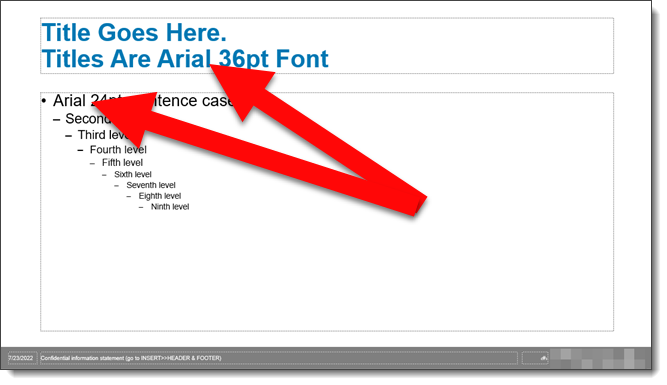
Doing a review of the content master slide confirms Arial is the only font that should be used throughout the presentation.
With this information, Slidewise makes it incredibly quickly to consolidate the fonts in the presentation. In a few clicks all instances of Calibri and Century Gothic are changed to Arial by using the the 3-dot menu and REPLACE FONTS function.
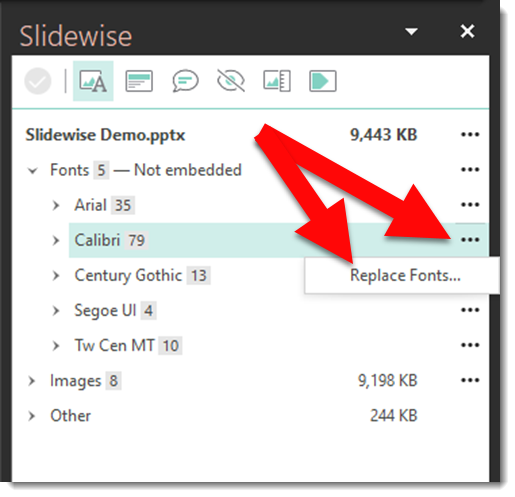
From the REPLACE FONTS dialog, choose the REPLACE WITH font (Arial in this deck) and REPLACE FONTS button. Note: the presentation will close, process and then reopen to the same slide. This is a bit unsettling (to have your work file close), but know it is part of the process.

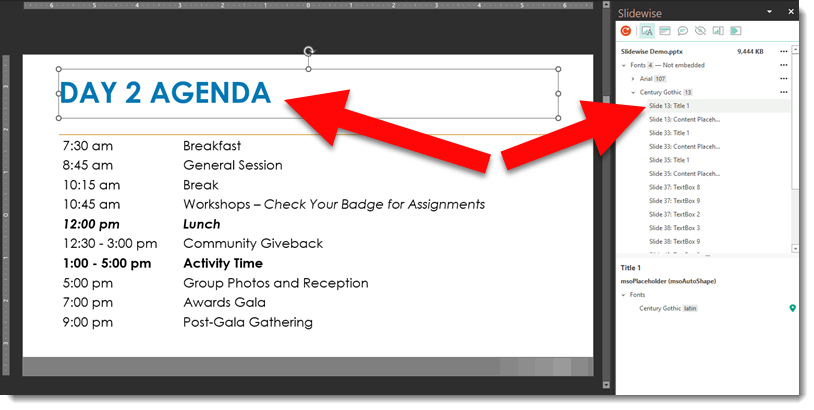
For Century Gothic, I wanted to see where it is used to determine if it should remain or go. Click any slide in the Slidewise list and PowerPoint jumps to that slide and the text box of that font selected (which is amazing!). Clicking through the Century Gothic instances, all are slide content that should use the theme font, Arial. An easy and quick update using the Replace Fonts dialog.
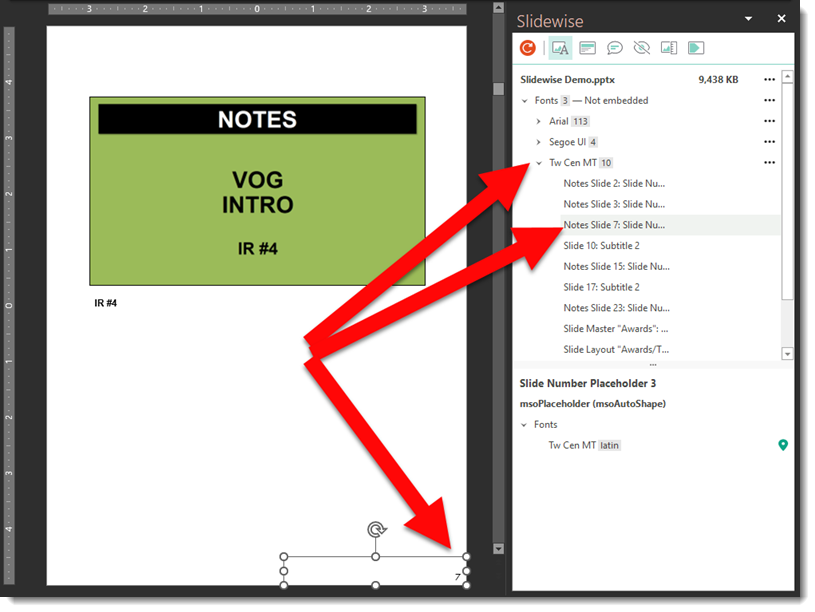
Investigating the Tw Cen MT font, it is the Master Handout text boxes. First, this is a detail level that would virtually never be identified without the Slidewise Font Audit. These fonts can also be updated to the theme font, Arial.
In a very short time every font used in the presentation is consolidated to a single font – Arial.
Tip: review all slides to confirm line breaks, text fitting in shapes, and overall text formatting has not been adversely impacted!
Get more info about Slidewise here.
-Troy @ TLC
This is from our Look Back series, rediscovering previous blog posts with relevant PowerPoint tips, tricks and examples. The original post from July 29th, 2022 can be viewed here.
New Podcast Episode Available! “Based on the PowerPoint template, is this Going To Be A Difficult Project?”
New episode of The Presentation Podcast now available!
In the latest episode of The Presentation Podcast, our three seasoned presentation designers: Troy Chollar from TLC Creative Services, Sandy Johnson from Presentation Wiz, and Nolan Haims from Nolan Haims Creative discuss PowerPoint templates from the perspective of evaluating client provided files – and the state of the template provided. A conversation with a wealth of knowledge on PowerPoint templates! Listen on your favorite podcast app, or at The Presentation Podcast site here.
How to use Google Fonts in PowerPoint
Google Fonts is a great resource for finding and using custom fonts for design projects; print, app, web, and PowerPoint.

Google Fonts is one of the most extensive libraries of royalty-free and open source fonts. Read the details, but I interpret the FAQ that these fonts can be used anywhere!
A unique feature of Google Fonts is that they can be used dynamically. For example, when creating a website that uses Google Fonts, users will be able to view the Google Font content without having to install the fonts on their device. However, PowerPoint does not have the ability to dynamically load Google Fonts. That said, because Google Fonts are available as a downloadable file, they can be used for PowerPoint presentation the same way as any other custom fonts (see our “How to Install Custom Fonts” post for more details).
NOTE: this process is for installing Google Fonts on Windows or Mac computers. Microsoft Teams and web-based presentations will not be able to use custom fonts unless they are embedded (and even then, there are lots of variables on if the custom fonts will display).
- Head over to the Google Fonts website at https://fonts.google.com/ to browse the library, by searching for a specific font family or using their various filters.

- After choosing a font, simply click the “get font” button in the upper right corner. and download the .zip file.
NOTE: Google fonts are available in a variety of file formats; OTF, TTF and the newer variable font format, WOFF. Currently, it’s best to install and use the OTF format for maximum compatibility.

- Uncompress the .zip folder. Install the .OTF file(s) by right clicking the file and selecting “Install”. Or double-click the font to open the preview, and use the install button here.

TIP: Because Microsoft PowerPoint does a poor job of informing users of custom fonts needed for a presentation, be sure to include custom font info in the slide deck (as a hidden slide, or in the Presenter Notes on slide 1).
It’s A Bright Pink World Full of Animation! – A Look Back to June 2018
What a great look back for our design team! Yes, PowerPoint 7 years ago was capable of great animation and video export – as shown in this project from 2018. For our team, this project is also full of memories, as several of the marketing campaigns are no longer current. But we were there and supporting Barbie!
Sometimes a presentation project is just all about the animation. In this case, we were tasked with developing a 2+ minute motion graphics video to be used as a meeting opener. A short segment is here for preview. We developed all in PowerPoint, and then exported to video with a music track. It is not the tool that creates bad, boring and bland presentations; PowerPoint is just a canvas, and can accomplish wonderful results in the hands of professional design team.
-Troy @ TLC
This is from our Look Back series, rediscovering previous blog posts with relevant PowerPoint tips, tricks and examples. The original post from June 1st, 2018 can be viewed here.
Manage PowerPoint’s Slideshow Popup Controls
If you’ve ever found the popup toolbar distracting while presenting a slideshow in Microsoft PowerPoint, you’re not alone.

Fortunately, PowerPoint offers a setting to disable this feature, providing a cleaner and more focused presentation experience.
- Open PowerPoint
- Go to > FILE > then, select OPTIONS

From the PowerPoint Options dialog box:
- On the left column go to ADVANCED
- On the right, scroll to the SLIDE SHOW section
- Disable SHOW POPUP TOOLBAR

- Click OK to apply the changes
- Done!
Important Notes:
- App-Level Setting: This is an application-wide setting, meaning it applies to all presentations you open or create in PowerPoint. You won’t need to disable the popup toolbar for each presentation individually.
- Accessing Presentation Controls: Even with the popup toolbar disabled, you still have access to all the same presentation controls by simply right-clicking anywhere on the slideshow screen. This brings up a larger overlay menu with all the necessary options, but it’s not persistent and disappears after selecting.


By disabling the popup toolbar, you can deliver a more polished and distraction-free presentation. Should you ever need the toolbar back, you can easily re-enable it by following the same steps and checking the Show Popup Toolbar box again.
Hope this PowerPoint tutorial helped. Enjoy presenting with a cleaner interface!
-Christie @ TLC
Get Credit for Creating a Presentation
GET credit where credit is due.

PowerPoint has file properties that list who created the presentation (really!).

Below is a the step-by-step of where to find the properties field that lists the name. But first, take a look at some of your recent presentations. Mouse over the file. Is your name listed as the Author – of your presentations? When PowerPoint is first setup, it asks for a few details about you, and automates the Authors property to use that name. Two things happen that often results in your name, not being the name listed. IT sets up your computer with a generic User Name, which is what PowerPoint uses for each presentation created. Or you opened a presentation that someone else started, which keeps the original person who started the presentation, listed as the author. So, where do you confirm your name is the name PowerPoint lists as the author for new presentations? Go to File > Options > the General tab > and the “Personalize Your Copy of Microsoft Office” section.
Is your name and initials shown? These settings are used for all presentations created on the computer (assuming Office is signed into the same profile).

But how is an existing presentation updated to your name when another name is already there?
In the presentation go to File > Info > and expand the far right list of properties. There are AUTHOR and a LAST MODIFIED BY fields. If your name is not listed in the AUTHOR field you can click the ADD AN AUTHOR and add yourself.

But, if you want to remove a name and replace with your name, there are a few additional steps. Go to File > Info > Check for Issues. Then Inspect Document > and run by clicking Inspect.

Click REMOVE ALL for the Document Properties and Personal Information and close the dialog.
Note: this action removes the existing Author listed, AND also removes other properties such as comments, Company, Last Modified, and more.

After the properties are clear, just save the file and your name (from the Personalize Your Copy of Microsoft Office fields) will be listed as the Author! Or, if the author field remains empty, click the ADD AN AUTHOR option to select your name.
There it is. How the mysterious “Author” name is added to presentations, and how you can manage who is listed as the author of your presentation!
Troy @ TLC