add-in

Ubitmenu Puts PPT 2003 Menus into PPT 2010

The number of companies moving from Office 2003 to Office 2010 over the past year has been amazing. They skipped Office 2007 and are now going from menus in 2003 to the ribbon in 2007 or 2010, which is a bit like starting over – and a focus for many TLC Creative Services onsite PowerPoint training programs. The Ubitmenu.com add-in can make the transition easier by bringing the familiar PPT 2003 menus into the new ribbon interface.

The add-in does not remove or alter the ribbon. It remains accessible and full function after the add-in has been installed. The Ubitmenu add-in adds a new tab called “Menu” and in it are all the familiar PPT 2003 menus which let you work in PPT 20007/2010 almost like you did in PPT 2003.

The ribbon interface is here to stay, so the best course is to become familiar with it. But I can see the Ubitmenu add-in as a good option during that transition period. It is free for personal use. Read more and download from this Swiss company here.

– Troy @ TLC

By |2016-08-16T09:22:24-07:00July 9th, 2012|Software/Add-Ins|

Why Does My Add-in Not Install With 64-bit Office?

Following the previous post, this is another confusing issue I am hearing a lot. Here is the scenario:

– Super cool new 64-bit operating system computer
– Install the latest and greatest MS Office 64-bit
– Attempt to install favorite PowerPoint add-ins and nothing works….

Add-ins need to be written/coded to work specifically with the 64-bit version of PowerPoint. At this moment there are very few add-ins that have 64-bit versions. So, if you are running the 64-bit version of PowerPoint, do not plan on using any add-ins.

This of course will change over time as the add-in developers have opportunity to create 64-bit versions of the existing 32-bit versions (and I am waiting just like you for this to happen!).

– Troy @ TLC

By |2016-08-16T11:10:32-07:00August 28th, 2010|Resource/Misc, Software/Add-Ins|

Review: ToolsToo PPT Add-in

ToolsToo is a productivity add-in for PowerPoint 2007 and 2010. It is a collection of incredibly valuable tools used when designing slides. It adds a full tab full of 20+ tools that I first tested on a test computer and quickly installed on my main computer and have integrated it into my daily production.

Some tools can be found in other add-ins and I cannot function without, such as:
Equal – width, height, size

And there are a number of tools that I am amazed have not been thought of before as they are so incredibly useful. Here are a few of my favorites:

Adjoin

and make line straight (veritical or horizontal)

AND any tool can be added individually to the QAT! As example: make equal width, make equal height and make same size buttons have been added to my QAT.

There is a free version offered called “ToolsToo Lite” that offeres a limited set of tools. The full tool set reviewed is $20 and is highly recommend.

– Troy @ TLC

By |2016-08-16T11:14:33-07:00August 12th, 2010|Software/Add-Ins|

Where Are The Add-Ins in Windows 7?

Finding the general Microsoft add-ins folder is very different in Windows 7 vs. Windows XP (I skipped Vista and just recently have been updating office computers from Windows XP to Windows 7). Here is the path the folder:

Windows7_OS (C: ) >> Users >> (Name) >> AppData >> Roaming >> Microsoft >> AddIns

– Troy @ TLC

By |2016-08-16T11:24:35-07:00June 27th, 2010|Tutorial|

PPTXtreme Add-ins and Windows 7 with PPT 2010

I am a huge fan of the PPTXtreme PowerPoint add-ins. They make much of my development time up to 5X more efficient and in some cases make the impractical, practical.

With PPT 2007 a few of the add-ins lost functionality. Namely ‘Color Picker’ and ‘Photoshop Import’ (which is one of those HUGE time saver add-ins for me).

Now with my new computers running Windows 7 and PPT 2010 I have the sad reality that none of the PPTXtreme add-ins function… I did some experimenting to try and find a solution like I did with Vista (where I installed outside the ‘Programs’ folder and then manually added permissions). The bad news is nothing, for me, got these add-ins functioning.

The good news is, it is not entirely PPT 2010 that is the conflict. Here is PPT 2010 opening and a selection of the PPTXtreme Add-ins loading – and working.

In this case it is PPT 2010 installed on a Windows XP Pro OS. My install tricks for Vista have no effect in Windows 7, so the sad reality is Windows 7 + PPT 2010 leaves PPTXtreme unavailable.

I have talked with the PPTXtreme developer and fingers crossed that there may be a round of development going into the add-ins as soon as this summer to update compatability (which would hopefully mean a fall time release).

Stay tuned for a hopeful update later this year.

– Troy @ TLC

By |2016-08-16T11:34:17-07:00May 24th, 2010|Software/Add-Ins|

PPT 2010 and Addins

After installing Office 2010 one of the items I noticed is at launch it lists the add-ins being loaded (previous versions did not display this information).

This is most noticeable the first time the application is launched as each addin is recognized and setup. Subsequent launches go much faster, which is very good.

– Troy @ TLC

By |2016-08-16T11:40:18-07:00April 26th, 2010|Software/Add-Ins|

Google DocVerse

DocVerse is a company Google purchased last week that aims at making its online Google Apps more appealing to MS Office users. DocVerse is ironically a startup founded by two former Microsoft key employees.

Colaboration (having multiple people work on a document seamlessly) and cloud computing are what 2010 is going to be all about. DocVerse is an add-in to Office 2007/2010 that adds great colloboration tools to PowerPoint, Word and Excel. While they are really good, starting in June these features are going to be a part of the upcoming Office 2010.

Google is all about cloud computing and while DocVerse does not add any new features to its apps directly, what is does do is allow MS Office users to upload their MS documents into the Google cloud and work with them, colloborate on them and enter the Google app world without changing them from the MS format. It seems to me, this is acknowledgement that every company, even Google, needs to integrate working with MS document. And second, the full featured desktop application is still superior to cloud based versions.

– Troy @ TLC

By |2016-08-16T11:58:38-07:00March 14th, 2010|Resource/Misc|

Color Swatch Add-In (for Templates)

If you develop PowerPoint templates, this new add-in from OfficeTips (PowerPoint MVP Shyam Pillai) is a MUST HAVE. Adding a custom color scheme is a tedious process that is now super easy, just fill in the swatches with the colors needed for the template, click apply, done!

Install the free ‘Color Swatch’ add-in (PPT 2007, 2010) and it adds these 2 options to the ribbon:

Click ‘Create Swatch Slide’ and this slide is added to the presentation:

Simply change the fill color to all boxes as needed for the template custom color scheme. Here I have created a blue/green color pallette (leaving the first 4 boxes the same):

With the colors set click ‘Apply Swatches to Color Theme’ and give the color scheme a name (which will show up in DESIGN >> COLORS):

When applied the RGB value for each color swatch is updated automatically!

But wait, there’s more!

Here is a standard color pallette. It shows theme colors, MS standard colors, and additional options:

Maybe you have seen a corporate template another section called ‘Custom Colors’. PPT can pin additional colors to a theme, but up until now it involved xml coding with no visual interface to get these often needed colors into the template. Now it is as easy as applying a fill color to some boxes!

Here I have updated the Swatch slide with 3 custom colors. I have also named them (Yellow, Red, Moss).

Now when I look at the color pallette I have a new row of colors. And the Custom Color row travels with the presentation:

And the tooltip shows the color names assigned:

WOW!! This is a really, really incredible (and if you don’t develop templates, trust me, this is incredible!). Here is the info and download page.

– Troy @ TLC

By |2016-09-16T08:57:26-07:00March 8th, 2010|Tutorial|

Webex + PPT = Add-ins Not Working

If you use Webex, and have installed the Webex PPT add-in (to convert presentations to be uploaded), you may find that some of your add-ins don’t work.

Apparently the Webex installer is very clever and smart, but too clever and smart for some addins. It uninstalls all (or a lot) other add-ins, then reinstalls after it is installed. Most add-ins are okay with this, but many of the more robust ones cannot simply be removed and replaced, they access other files that this process breaks.

Webex does make upgrades to its software and I have been told by at least one add-in developer they are working on fixing things… but just last week it rendered a few add-ins broken on a new system I was building.

So no solution or work around, but now we all know.

-Troy @ TLC

By |2016-09-16T09:02:16-07:00February 10th, 2010|Resource/Misc|

Use Nvidia Control Panel to Set Mirrored or Extended Desktop

PowerPoint presentations given to a live audience usually involve the computer being attached to a projector. And sometimes the technical issues of getting the computer and projector to cooperate are the downfall of the presenter…

Here is what I hear a lot:
– I have a great laptop!
– I hooked up the projector (via VGA or DVI cable).
– I clicked the Function + F4 keys.
– Nothing happened, my presentation would not show up!

It happens and there are technical complexities, but I run anywhere from 1 to 12 computers outputting to projectors for any given meeting. Here is my approach to assuring the presentation shows up on the projector (note: the following tutorial is based on the Nvidia Control Panel as most of show computers currently run their graphics cards).

1. First, I do not use the Function+F4 key. This is just a shortcut to the control panel that does not show me any of the real settings.

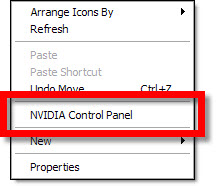
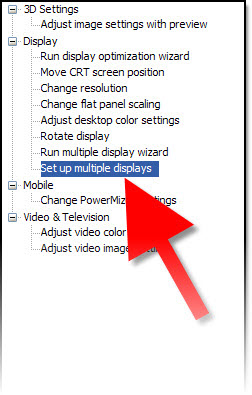
2. I open the graphic card control panel. My preferred method is to right-click the desktop and select “NVIDIA CONTROL PANEL”

3. This opens the Nvidia Control Panel. From here you can see and adjust every aspect of how images are put onto any monitor, or projector, connected to the computer/laptop.

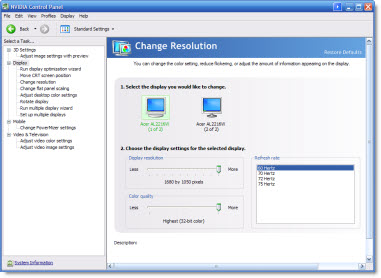
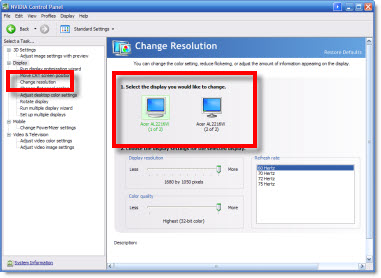
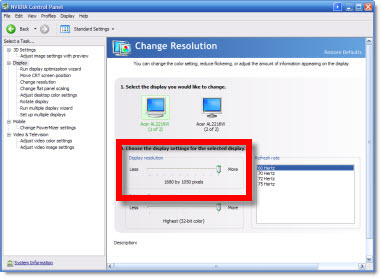
4. I first go to CHANGE RESOLUTION. I can quickly see on the right if the computer ‘sees’ the 2nd monitor/projector by the two display icons.

5. If 2 icons are seen I go to #6. If only 1 icon is seen (the laptop monitor) I then have a few steps:
A. Check cable is plugged into computer.
B. Check cable is plugged into projector (or switcher).
C. Verify projector is powered on and set to correct input.
D. If using a docking station for the laptop (as I do), check docking station has power by checking power supply has light, is plugged into dock and dock has power lights (video out from all docks is not passive and will not work if dock does not have active power).
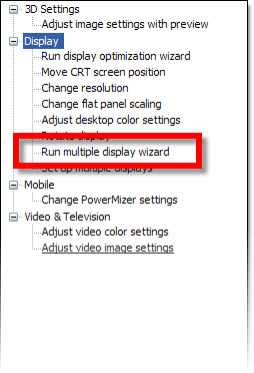
E. Run the RUN MULTIPLE DISPLAY WIZARD to force the graphics cards to identify and recognize the external monitor.

6. To setup a projector I go to the SETUP MULTIPLE DISPLAYS option.

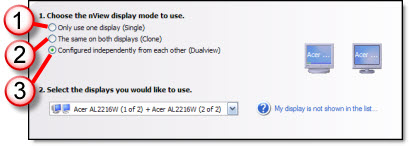
7. On the right I can tell the computer how I want to use the projector.

1. Do not connect to projector
2. Mirror output to projector (most common setting)
3. Extend desktop to projector

8. Click APPLY.

9. Then go back to CHANGE RESOLUTION. Now the focus is on the resolution setting on lower part of the right side. This number has to be set to match the projector’s resolution.

– If the resolution is set to high, the projector may be unable to use it (and will display nothing).
– If the resolution is set to a widescreen format (as many laptop monitors are) and the projector is not widescreen it will either compress the image or add black letterbox bars (neither is a good option), so the resolution will need to be set to a 4×3 aspect ratio (eg. 1024×768 is the most common).

10. Click APPLY, exit the control panel and get on with the presentation – yeah!

– Troy @ TLC

By |2016-09-16T09:45:10-07:00August 28th, 2009|Resource/Misc, Software/Add-Ins, Tutorial|
Go to Top