powerpoint

Why Resize Slide Erases All Formatting (part 2)

The previous post showed how template formatting is often stripped out of a presentation when it is resized.

SlideResize-1      SlideResize-9

So here is my simple, non-tech description of what is happening inside PowerPoint (Note: If you really want details on templates and themes, I highly recommend Echo Swinford and Julie Terberg’s excellent book: Building PowerPoint Templates Step by Step with the Experts).

The resize “bug by design” will only happen with presentations and templates developed in PowerPoint 2013 and above.  Files created in PPT 2007 and 2010, even if edited in 2013, do not have the resize issue because those versions of PowerPoint do not have the troublemaking feature. With PowerPoint 2013, a new option for templates was added, VARIANTS. Variants will eventually be a great feature, but currently they are not really used and the “Super Theme Templates” they open the door to create are so difficult to develop, I only know a few designers in the world who really understand them and are willing to tackle them (and I am not one of them).

Variants, which you see in the Ribbon on the Design Tab, are basically template styling options.

SlideResize-5

When resizing slides, PowerPoint needs to use a variant. If there is not a custom variant already there from a Theme, PowerPoint reapplies the Microsoft Default Theme. The default theme, called “Office Theme,” is what you get when opening a new blank presentation (boring, white, no stylized formatting).

SlideResize-10

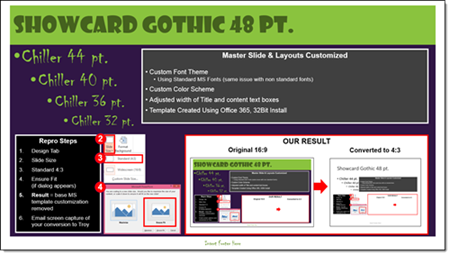
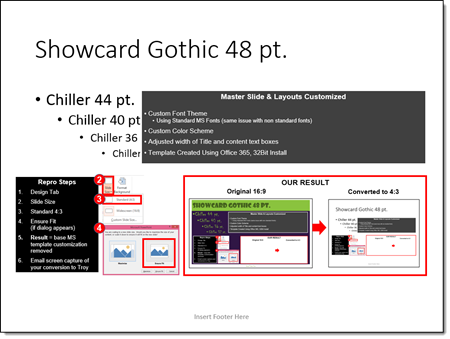
When the default theme, and its variants, are applied, all formatting to the master slide and layouts are replaced with this “default” setup. What this means is nicely designed slides lose their existing template styling attributes. See the previous post for a downloadable sample slide you can test and see formatting stripped.

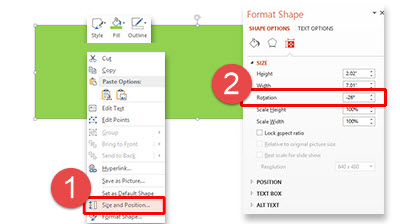
Here are 2 ways I do a quick check to see if a provided file is going to have an issue if it needs to be resized:

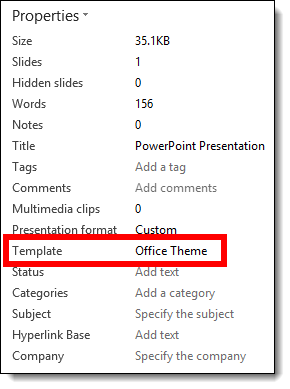
1. Go to FILE > PROPERTIES > expand to see all properties > TEMPLATE

– If the TEMPLATE property is BLANK or has “OFFICE THEME,” I know it is almost 100% certain to have formatting issues if resized

SlideResize-6

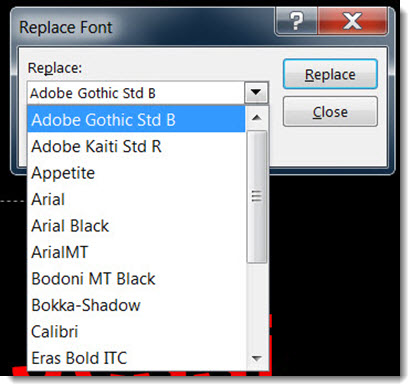
2. Or I look at the DESGIN tab >> VARIANTS section and see what variants are available (Note: If there are no variant thumbnails, that is covered in part 3, and it is okay)

SlideResize-11

The next post, part 3, is a step-by-step solution to avoid PowerPoint adversely affecting slides when resized.

– Troy @ TLC

By |2016-06-16T14:07:02-07:00August 17th, 2015|Tutorial|

Resize Slide Erases All Formatting! (part 1)

Here is the scenario: you have a 16×9 presentation that needs to be changed to 4×3. Easy! PowerPoint has a great feature to change the aspect ratio (via Page Setup) and it keeps everything proportional (eg. circles stay round) and adjusts the position of everything to fit the new slide layout – but things don’t go as smoothly as planned.

1. Here is your 16×9 slide (download this PowerPoint 2013 Resize Test Slide):

SlideResize-1

2. Go to DESIGN > SLIDE SIZE > STANDARD 4×3

Resize14

3. Here is the disaster you get when converting to 4×3

SlideResize-9

Note: This problem is not the size selected (4×3), it happens when going from any size to another size. And this is not a bug, but by design (I really like how Echo Swinford  describes this as “a bug by design”). What you end up with is:

– Correct page size – yay!

– Custom background – gone

– Custom fonts – gone

– Custom color scheme – gone

– Any template customization – gone

Part 2 and 3 of this series detail what is happening behind the scenes in PowerPoint and a (fairly) simple step-by-step solution.


– Troy @ TLC

By |2016-06-16T14:09:24-07:00August 14th, 2015|Tutorial|

Find and Replace Double Spaces in a Presentation

[text]Presentations are the creation of many people copy/pasting content into a single slide deck. One of the common content edits is double spaces in sentences. Here is a quick and easy method for removing them.[/text]
[text]1. On the Home ribbon, select “Replace” on the far right.[/text]

replace double spaces 1

[text]2. Under “Find what:” Hit the space bar 2x. Then, under “Replace with:” Hit the space bar 1x. Click “Replace all.”[/text]

replace double spaces 2

[text]3. PPT will find all instances of double spaces and replace with a single space with 1 click! It searches the Notes section as well as slides, but it’s certainly very helpful in catching the ones hiding in slide content.[/text]

replace double spaces 3

[text]4. If you wanted to see exactly where the erroneous double spaces are, you can opt to click “Find Next” and PPT will take you slide by slide highlighting where the spaces are. You can then choose which ones to change by clicking “Replace” rather than “Replace all.”[/text]

replace double spaces 4

By |2016-08-10T09:02:39-07:00July 22nd, 2015|Tutorial|

PowerPoint for Print Poster Design

“PowerPoint Documents” is our internal term for using PowerPoint as the design tool for print/PDF documents. These do not use slide transitions, animations, or other “presentation” features. This example is a part of previous post project (sync’ing narration to animated slides), where in addition to the presentation design we developed a 24″x36″ poster that visually coordinated with the presentation design.

SofnetPosterImage_1 SofnetPosterImage_2

Note: Typically we would design this in Adobe InDesign for assure print quality, full bleed design, etc.

The request was to develop in a PowerPoint so edits could be completed by the client for each talk. We setup with a custom page size, optimized the graphics for the larger slide size, added the requested content. The end deliverable was the 2 posters, 2 slides in a PowerPoint document. The client was able to revise content, create PDFs to send out or print (and we included print quality specifications regarding PDF from PowerPoint resolution).

– Troy @ TLC


By |2016-08-10T09:05:34-07:00July 8th, 2015|Portfolio, PowerPoint|

Talk Narration in the Presentation

With audio being so easy to embed into PowerPoint, we are having many clients request we create a version of the presentation with their talk embedded into the slides.

PowerPoint does have audio recording features, but we opt for pre-recorded audio that is recorded distraction free of the slides, higher audio quality and we can edit in an audio editing program. We also develop 1 audio file per slide (if a client provides one audio file for the entire presentation we chop it into multiple files using Adobe Audition, or directly in PowerPoint by trimming the file to each slide needs).

Sofnet_1

For this specific project, we were provided individual audio clips for each slide. We sync’d the animations to the audio narration, which is a great end result, but a tedious process of listening and re-listening to the entire audio file while adjusting the animation timing to get everything perfect (an animation timeline feature I would really like to see the Microsoft PowerPoint team update!). Slide transitions and all animations were set to automatic.

Sofnet_2

We provided 3 deliverables for this project:

1. Editable PowerPoint, with on-click animation and transitions.

2. Editable PowerPoint presentation with audio narration embedded and animations & transitions set to auto.

3. A video version of the presentation (exported direct from PowerPoint).

– Troy @ TLC

By |2016-08-10T09:06:05-07:00July 6th, 2015|PowerPoint|

PowerPoint vs. Word vs. InDesign – Which Should I Use?

Every program has strengths and weaknesses. Below is what the TLC Creative Services design team views as the strengths and weaknesses of designing for print among the 3 major applications we use. So here is how Microsoft Word, Adobe InDesign and Microsoft PowerPoint fight it out in the boxing ring:

PPT_Print_Applications

Adobe InDesign   PPT_Print_Adobe Application

– PRO: Professional desktop publishing software that has the highest level of control of layouts, print specific output, multipage control, unlimited master layouts with finite control, and no size or resolution constraints. Excellent image control and color use tools (in RGB, CMYK, Spot, etc.).

– CON: large learning curve, specialty software that costs more (and usually not provided across corporate users).

Microsoft WordPPT_Print_ Word Application

– PRO: Installed on virtually every computer (and many tablets & Smartphones). Very good control over text flow, line wraps, and text across multiple pages. Good output to print needs.  Easy and professional table and chart creation. Very good color use tools (if setup in document template correctly).

– CON: No bleed or printer crop marks, limited (or difficult to setup/use) multiple master layouts, difficult working with inserted graphics/tables/charts that do not align to column layout.

Microsoft PowerPointPPT_Print_PowerPoint Application

– PRO: Installed on virtually every computer (and many tablets & Smartphones). Great multiple master layout capabilities, great layout customization per page, excellent image control. Easy and professional table and chart creation. Very good color use tools (if setup in document template correctly).

– CON: Limited to low resolution output (it does not matter if you have a high res 300DPI image, it is output the same as lower res images). No bleed or printer crop marks (although, there are tricks to manually adding – but it is not like InDesign’s automatic features).


AND THE WINNER IS…. PPT_Print_8

There is no clear winner. Everything depends on what application you use most, what application you have installed and what the final print document is going to be used for. But for TLC Creative Services, the order is:

1. InDesign: This is the industry standard, the best option for print layout projects, and we have a professional team of designers that know this application. This is our go-to application when we are working with print-houses, publishers, etc.

2. PowerPoint: We are presentation design focused, so we know PowerPoint. PowerPoint’s multiple master layouts and flexible per page layout options are wins for us in developing custom layouts, similar to how we approach layouts in Adobe InDesign. We use PowerPoint for print-to-PDF (where a PDF document is the final “print” piece) because it allows clients the flexibility to update documents on their own.

3. Word: The few advantages Word offers (multipage text flow, image wrap, etc.), do not win over the flexible nature of PowerPoint – unless it is client request.

Up next, some examples of PowerPoint-to-Print projects.

– Troy @ TLC


By |2016-08-10T09:07:41-07:00March 4th, 2015|Resource/Misc|

PowerPoint for Print Document Design (Really!?)

PowerPoint is designed for visual presentation design and projection. I clearly remember several meetings and discussions with Microsoft as they worked on PowerPoint 2007 about improving the print capabilities of PowerPoint – the laser printer, handout, PDF capabilities. Fast forward to Office 365 and PowerPoint 2013 and I am seeing a significant number of project requests and forum questions on how to use PowerPoint to design print documents. For this full month, ThePowerPointBlog is focusing all posts on using PowerPoint for print document design.

PowerPoint for print 2

Before we dive in with showing examples of PowerPoint for Print projects TLC Creative has done or providing tutorials on how to setup PowerPoint for print, let me establish a few technical terms and perspective:

  • Quick Print and Laser Print: This is printing a document on a black/white or color laser printer, it can be sitting on your desk or a large system at a Kinkos. They all have the same traits, digital printing and not capable of printing to the edge of the paper.
  • Offset Printing: This is “real” printing. Print design files are output to separated film and each plate is applied as individual passes of ink. From the printer, the paper needs to go to finish cutting to have a ready-to-use print document. Note: Offset printing can have the print image go to the edge of the paper.
  • Resolution: Web and presentation images are 72DPI – or low resolution (and this is a big generalization for the sake of an easy conversation). Print (eg. offset press) is 300DPI – or high resolution.
  • Vector Graphics: Images, or text, that are based on geometric shapes and mathematical equations (see that high school geometry class was important after all!). Note: Vector graphics can be enlarged to any size without quality loss.
  • Raster Graphics: Images that are created from dots or pixels. Note: The image is at a set size and enlarging lowers the visual quality.
  • Bleed, Printer vs. Reader spreads, CMYK vs. RGB, and many other print industry terms need to be understood by those using PowerPoint to create print documents.


So, why am I qualified to lead a discussion on PowerPoint-for-Print? Because before digital printers had quality output, and before PowerPoint (Flash, Director, and Harvard Graphics) made it easy enough for virtually anyone to create layouts, I worked in the print industry turning design files into separated film plates for the printing press operators. I am not saying I am old, but as a youngster I was lucky enough to enter the design industry as the digital revolution was in process. I experienced the true printing process and learned the classics of visual design – all great things that carry over into the wonderful world of PowerPoint presentations.

PowerPoint for print 3

Because now, everyone has a computer – tablet – and smartphone that has PowerPoint (thanks Microsoft for making Office available everywhere!), everyone can now use PowerPoint to design more than slides. In addition, the ease of sourcing images, video, custom fonts, design accent graphics and low cost printing all have created an environment in just the past few years for PowerPoint to become the default print design application – if only it did not have so many limitations!

Next post is “PowerPoint vs. Word vs. InDesign – which should I use?

– Troy @ TLC

By |2016-08-10T09:08:03-07:00March 2nd, 2015|Personal, Resource/Misc|

Set An Angle In PowerPoint

As everyone that has worked in PowerPoint knows, matching rotated items to the same angle can be a challenge. This is especially true when using the rotation handle (the click and drag method). To take the frustration out of this task, let us walk you through manually setting the angle and easily getting multiple items exactly aligned with the same rotation!

Here is our sample slide being created. It has a green rectangle (not a triangle, so we can know the exact angle), and a text box matched to the same rotation as the green rectangle.

Set Angle 5

1. First add a rectangle.

Set Angle 1

2. Next, bring up the Format Options Dialogue Box either by going to Format tab on the tool bar or by right clicking the shape.

– Select SIZE AND POSITION from the right-click pop up menu.

– The Format Shape pane opens to Size and Properties tab.

Set Angle 1a


3. In the SIZE section is the ROTATION box.
4. Enter any angle needed (this has a live update, so you can see the angle applied to selected item). For this sample, we used -26 degrees.

Set Angle 2
5. Add a text box and type (we added TLC CREATIVE SERVICES).

Set Angle 3

6. With the text selected, we followed the same steps above to rotate the text. Using the Format tab on the tool bar, or by right clicking the text, bring up the Format Options Dialogue Box.

– Select SIZE AND POSITION from the right-click pop up menu.

– In the ROTATION box, enter the angle as the rectangle (-26 degrees in our sample).

Set Angle 3a

7. Position the angled text box above the rectangle.

Set Angle 4

8. Select both the rectangle and text box and move to the lower right of the slide for a great visual layout using perfectly aligned and angled elements for your design!

Set Angle 5

– Troy @ TLC

By |2016-08-10T09:08:31-07:00February 27th, 2015|Tutorial|

Slide Design Idea – Negative Space Text

A very nice design strategy used in print design is creating callouts and bold graphics with text created from the negative space.

Negative Space Text-7

This same style is easily created within PowerPoint for slide design. The above example image was created in PowerPoint 2013 – here is how (thanks to Michelle on the TLC Creative design team for this tutorial).

By using PowerPoint Combine Shapes tools (Combine, Intersect, Fragment, Subtract), the process is pretty easy.

1. Add a shape of your choice – I am using a tall vertical bar.

Negative Space Text-1

2. Add a separate text box with the text of your choice and format as desired – I am using “TLC Creative” in a typography styled stacked layout.

Negative Space Text-2

3. Select both objects – Note: Select the RECTANGLE first.

4. With both objects selected, go to FORMAT >> Merge Shapes >> Combine

Negative Space Text-3

Negative Space Text-4

5. The text is “cut out” of the rectangle. Note: The text is no longer editable as it has been converted to a custom vector shape.

Negativce Space Text-5

6. The shape is editable, like any other shape. All shaping styling options are available: fill color, gradient fill, transparency, bevel, drop shadow and more.

To really see the effects, place an image behind the new shape. A few examples:

Negative Space Text-11Negative Space Text-9NegSpaceText-8

By |2016-08-10T09:09:57-07:00February 16th, 2015|Resource/Misc, Tutorial|

Replace Font Dialog Update

Back on October 10, I did a post about a key feature missing in PowerPoint 2013 “Replace Font Dialog, PowerPoint 2010 vs. 2013.” Unfortunately, no solution has been added to PowerPoint 2013, the font type icons are still missing.

PowerPoint 2010 has font type icons (with no icon indicating the font is not installed on the computer):[br]
ReplaceFont-2010

PowerPoint 2013 does not have the font type icons:
ReplaceFont-2013

One area I did not include in the original post – and the reason for this post – is that the font type icons have not been completely removed from PowerPoint 2013. The font type icons can be seen in the Font drop down menu on the Home tab.[br]

Font_icon_1

That’s all. Just a clarification to the earlier post. Hopefully in the near future I can do another post on this same topic showing that the font type icons have been restored to the Replace Fonts dialog.

– Troy @ TLC

By |2016-08-10T09:14:24-07:00December 19th, 2014|Resource/Misc|
Go to Top