Tutorial

Office 2013 SP1 Released

Last Wednesday, Microsoft released the first Service Pack (SP) for Office 2013. The list of updates to PowerPoint is fairly short and deals only with stability issues – no new features or refinement of current features. If you want the details, here is the Microsoft KB article on Office 2013 SP1.

The world of MS Office is now split into two types of installs: MSO (installed from an actual installer app) and CTR (click-to-run which is a cloud based install). How you get SP1 depends on what type of install you have.

Unfortunately, there are not labels on the About Screens that tell if an install is MSO or CTR. Here is one way of identifying the install type:
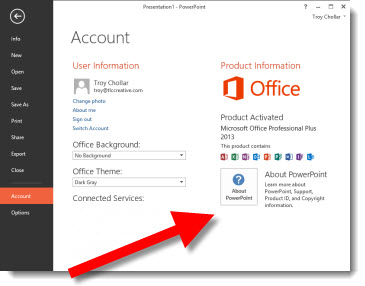
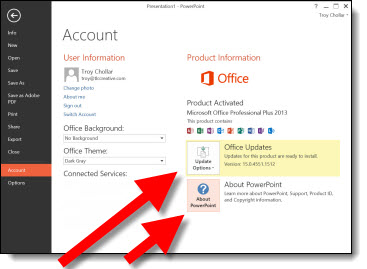
Go to FILE >> ACCOUNT >> look at the info in right pane.

If there is only 1 box “About PowerPoint” – it is an MSO install.
If there are 2 boxes “About PowerPoint” and “Office Updates” – it is a CTR install.
If you have MSO (traditional installer), the update should be available through Windows Update. Or, you can go direct to Microsoft and download the SP1 installer.
32-bit Office = https://www.microsoft.com/en-us/download/details.aspx?id=42017
64-bit Office = https://www.microsoft.com/en-us/download/details.aspx?id=42006

If you have CTR, SP1 will automatically install when you are online.

– Troy @ TLC

By |2016-08-10T09:50:12-07:00March 3rd, 2014|PowerPoint, Resource/Misc, Tutorial|

Cut off part of a video in PowerPoint using Trim

PowerPoint has made the trips over to video editing software less and less with the new tools. One of the tedious items was changing the in/out point of videos. That is where the video starts and ends. This can now be easily set in PowerPoint.

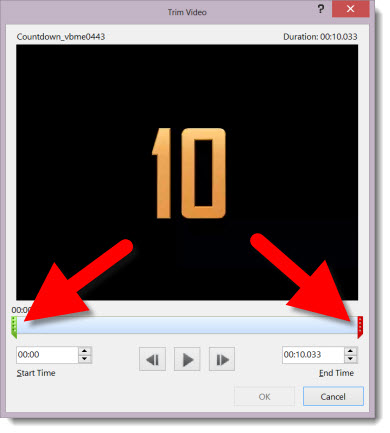
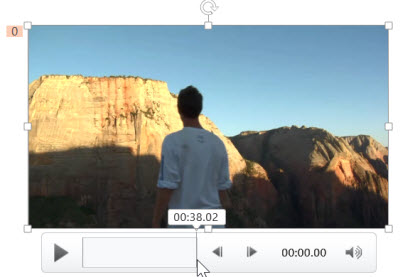
1. Here is my sample video. For an easy visual, it is a countdown from 10 to 0. But I need a video that counts down from 5 to 0.

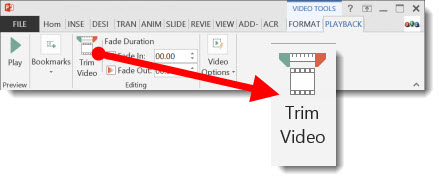
2. Select the video, and in the Video Tools/Playback tab, click TRIM VIDEO.

3. The Trim Video dialog box opens, showing the selected video AND the start and stop points.

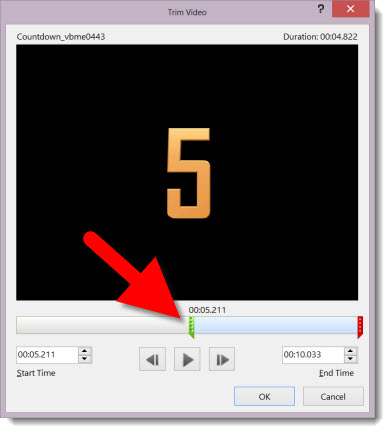
4. Sliding the green start point marker to the right adjusts where the video will begin playing from. I just slide until I see the number 5 on the video.

5. Now the slide shows the start of the video at the needed location and the presentation is set to go (all without opening a video editing application!).

– Troy @ TLC

By |2016-08-10T10:07:45-07:00November 18th, 2013|Tutorial|

PowerPoint As a Video Editor – Combine Video Clips

PowerPoint has some very good video features, such as the ability to play multiple video formats, embed videos into the slide deck file, visually stylize the video and export video from the PowerPoint.

It is the export video feature that is being used for this tutorial.
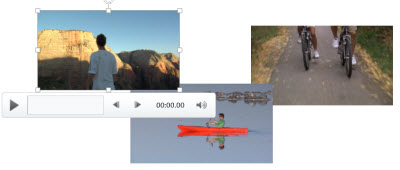
Here are three videos that are inserted into PowerPoint 2013.

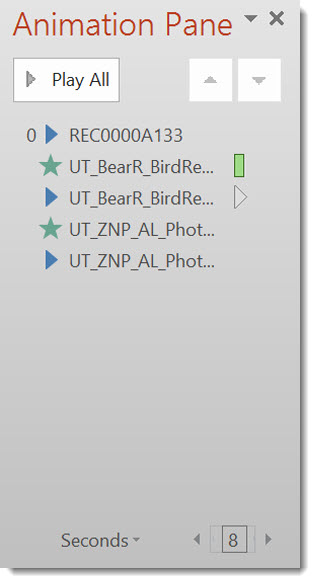
Each video is set to auto play, one after the other.

Then, go to FILE.

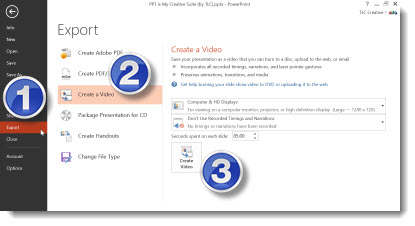
EXPORT >> CREATE A VIDEO >> CREATE VIDEO

The result is a single video file that was previously 3 separate videos.

– Troy @ TLC

By |2016-08-10T10:08:02-07:00November 16th, 2013|Tutorial|

Watermark Images Direct in PowerPoint

Watermarking an image is common in several scenarios. Identifying who owns the image and copyright and indicating it is a low resolution “proof” image are the two most common watermarking scenarios I see.

TLC Creative Services has a large library of royalty free images and subscribes to image sites which make developing visual presentations much easier. In both cases, our designers can download the low res, watermarked version of the image(s) they want to use in the presentation. Then, when the client approves the images, they can download the high resolution version of each image and replace the watermark images throughout the presentation. Of course, this routine takes a lot design time and it displays the company watermark vs. a generic watermark.

Note: “FPO” is an design industry standard phrase, “For Placement Only.”

TLC Creative Services creates all our watermark images directly in PowerPoint.

1. Here is our slide layout with high res (optimized for use in PowerPoint) image. But we do not release the slides with usable images until it has been approved.

Watermark images 1

2. Here is our PowerPoint stylize “FPO” text box.

Watermark images 2

3. We paste the “FPO” text box onto each slide and position over the image.

Watermark images 3

4. We then select the image and FPO text box and copy them.

5. Next we delete the image and FPO text box.

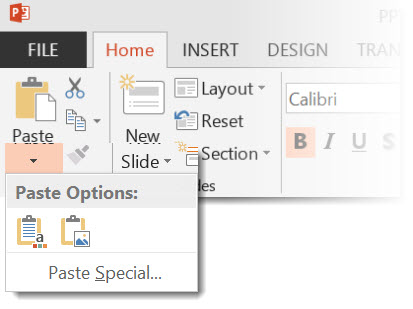
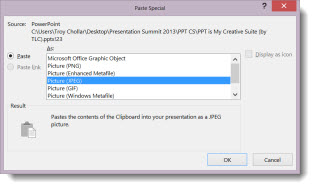
6. We then PASTE SPECIAL as a .png (this assures quality and eliminates issues if the text box extended paste the image).

Watermark images 4
Watermark images 5

7. This adds a new image to the slide that is watermarked.

Watermark images 6

8. We position the new watermarked image on the slide.

Watermark images 7

9. Last, we do a SAVE AS so the “real” presentation with the high res images is not lost.

By |2016-08-10T10:08:26-07:00November 14th, 2013|Tutorial|

SnagIt OneClick – How to Disable

As a designer, SnagIt is one of my most valued go-to apps. But even the best software sometimes creates problems. In the latest version of SnagIt, a new feature, “OneClick,” (at least this is the first version I have noticed it) just gets in the way. The concept is to have an onscreen button to activate SnagIt vs. a keyboard command.

OneClick puts a small red button at the top of your screen.

Click the red button and a small menu drops down, allowing easy access to many of the SnagIt tools and settings.

The dilemma is that the button is ever present, sitting on top of everything: windows, apps, slide shows! This is not good and something that took a bit of investigating to figure out how to turn off. Half the effort is knowing the name of this unwelcome feature – OneClick.

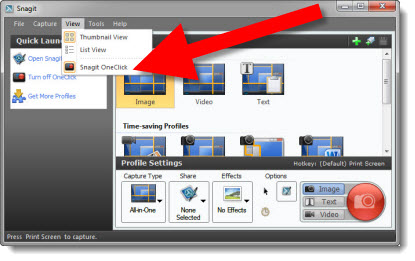
To turn off, open SnagIt, click the VIEW menu and click SNAGIT ONECLICK. This is an on/off toggle, so it should now be removed from your screen. You may also see a TURN OFF ONECLICK option in the Quick Launch dialog in the left action pane.

– Troy @ TLC
By |2016-08-10T10:12:50-07:00October 9th, 2013|Personal, Software/Add-Ins, Tutorial|

Does PowerPoint Know I Need a Font?

There are dozens, actually 1,000s, of ways to display your ABC’s. Font styles are created to display each letter in unique ways. Microsoft supplies a set of fonts with Office. Adobe supplies many fonts with the Creative Suite (now Creative Cloud) software packages. And there are many ways to download and add custom fonts to your computer.

If you use a custom font in a presentation, and that custom font is not installed on the computer that is viewing the presentation, a font default – or substitution – is used. We cannot control which font is used as the default and we cannot guarantee what the slide will look like with the default font in use.

PowerPoint has a few tools to help with this situation. The tools are not extensive, and definitely do not do enough to aid us users in identifying font issues and resolving font issues.

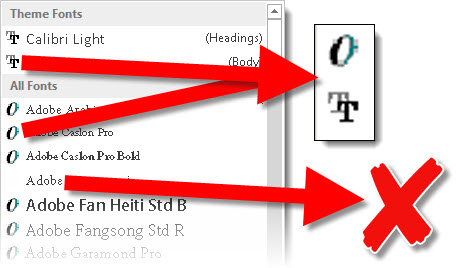
The first step is to identify if PowerPoint is using fonts on the computer or substituting fonts. The tool is very simple, and simplistic. Select a text box, then on the home tab click the font selection drop down. In this menu, each font has 1 of 3 icon options to the left of the font name.

1. The Open Type icon is a large stylized “O.”
2. The True Type icon is two letter “T”s overlapping.
3. NO ICON, just blank space, lets you know PowerPoint recognizes a font is needed, but it is not installed on this computer. When there is no icon, PowerPoint is substituting that font with a default font (of its choice).

– Troy @ TLC
By |2016-08-10T10:28:04-07:00July 22nd, 2013|Resource/Misc, Tutorial|

Help – Cannot Move/Delete/Rename/etc. PowerPoint File!

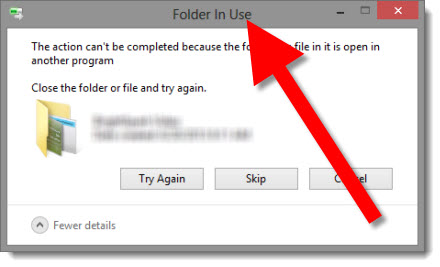
Have you encountered this error dialog:

In this case, I was moving a project folder. I had just finished editing a presentation, closed the file and PowerPoint. But I was unable to move the entire folder. Frustration!

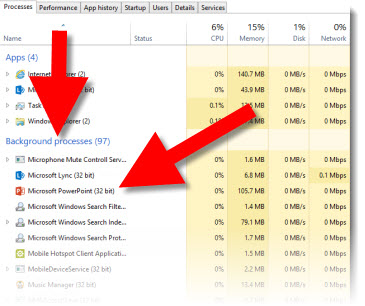
Often, PowerPoint is still open as a background application even though it has been closed. Why – I do not know, but it definitely causes lots of user frustration.

Solution:
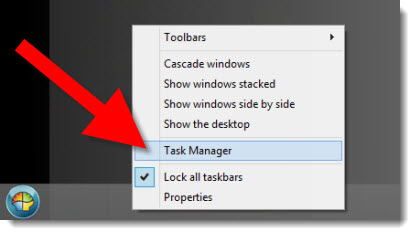
1. Right-click on the bottom task bar and select TASK MANAGER

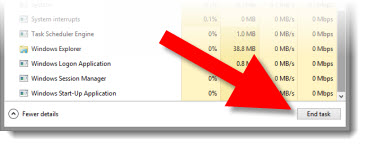
2. Scroll down, past the active Apps into the BACKGROUND PROCESSES and look for MICROSOFT POWERPOINT (it will be the same name with all versions of PPT).

3. Select it and click END TASK.

4. Now click TRY AGAIN on the error dialog and all should do as you wanted (move, delete, rename, etc.).

– Troy @ TLC
By |2016-08-10T10:29:42-07:00July 15th, 2013|Tutorial|

Add Twitter Feed To Slides

We were recently at a show to handle the presentations, and the presenter encouraged the audience to tweet about the conference daily events. During the break, we were asked to show the twitter feed. Advanced planning is great – this was not it.

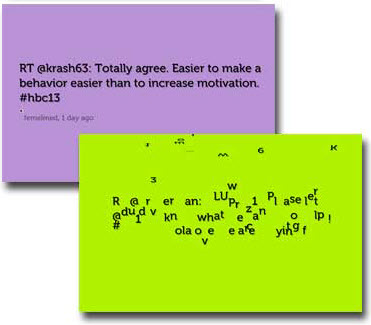
We used Visibletweets.com to provide a solution. Visibletweets.com is a Flash based website with no download (other than the Flash player if not installed). On the website, you are prompted to type in a hash hag, search a term, or use someone’s twitter id.

Then one tweet at a time fills the page, each animates to the next. There are 3 types of animation to choose from: Letter by Letter (which is our favorite), Rotation, and Tag Cloud.

If you use the option to run the show in the web browser full screen, the background automatically changes colors.

There are 3 options for using visibletweets.com during a presentation.
Option 1: Run the website from a backup computer (with internet access) and toggle it to the screen.
Option 2: Have a link to the website on a slide and use it to switch from presentation to web browser (going back to the presentation requires using ALT+Tab or closing the web browser – so not as seamless and elegant).
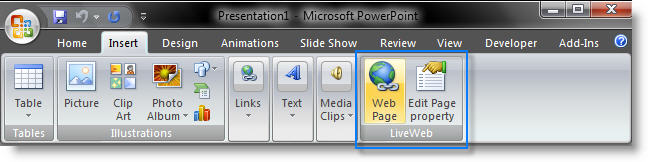
Option 3: Use Shyam’s LiveWeb add-in to display a webpage directly on your presentation slide (this is a FREE add-in that can be downloaded here).

– Troy @ TLC

By |2016-08-10T10:31:07-07:00July 10th, 2013|Resource/Misc, Software/Add-Ins, Tutorial|

Stop PowerPoint from Getting the Animation Jitters!

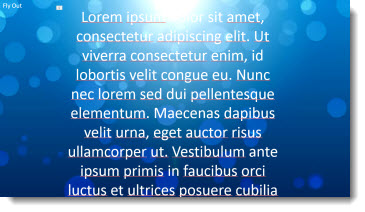
Long scrolling animations worked great back in PPT 2003. But with the new .xml format (.pptx) came a new render engine for animations and it caused these same animations to stutter and “jitter” as they played.

You can fix these with a registry edit (Note: the registry controls the computer and in general mistakes in here can be very bad).

First, download this test file and run (download here, 3.7MB). Take note of how smooth, or jittery, the text animation is.

Close PowerPoint.

To update a computers PowerPoint settings:

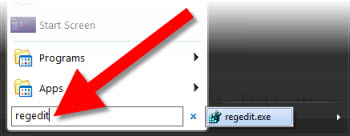
1. Start >> search bar “regedit”

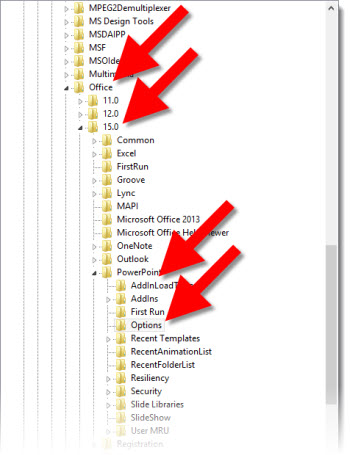
2. Go to Hkey Current User>>Software>>Microsoft>>Office>>15.0>>PowerPoint>>Options
– Note: This is the path for PPT 2013. For PPT 2010, it will be “12.0” vs. 15.0.

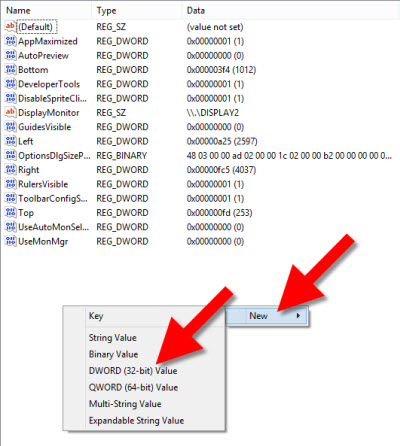
3. In the right section, right-click and select NEW >> DWORD (32-BIT) VALUE

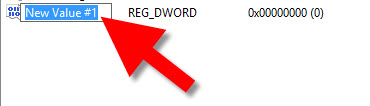
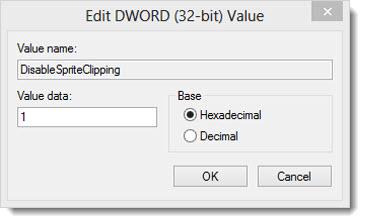
4. Name it “DisableSpriteClipping”

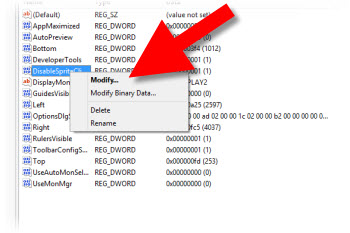
5. Find the new entry and right-click and select MODIFY

6. In the VALUE DATA box, enter “1” (BASE can be Hex or Dec) and click OK

Start PPT and run the test file again. Take note of how smooth, or jittery, the text animation is.

Many thanks to Steve Rindsberg of PPTools for making me aware of Microsoft’s Chris Maloney’s shared bit of coding that works wonders for anyone fearful of animation jitters!

– Troy @ TLC

By |2016-08-10T10:31:29-07:00July 8th, 2013|Resource/Misc, Software/Add-Ins, Tutorial|

Get Back A File with Windows “Previous Version” Feature

Windows 7 and 8 have a built in feature to allow you to go back in time and recover files that have been deleted, become corrupt, overwritten, etc. – and it is great! Josh, a designer and IT pro on the TLC Creative Services staff recently showed me this feature – and saved the day by recovering a large project that had become corrupt. So Josh is the star of this post explaining how to use the “Previous Version” feature.

A little known feature in Windows 7 and beyond, Previous Versions is often overlooked and underutilized. Its simplicity of use, easily restoring, copying, or just viewing contents of previous versions of files changed or lost make this feature a “must have” in any power users toolkit. Luckily for us, it’s built right into the OS. Before we get into configuration and enabling previous versions (this should be enabled on the system drive by default), let’s have a look at how the feature works:

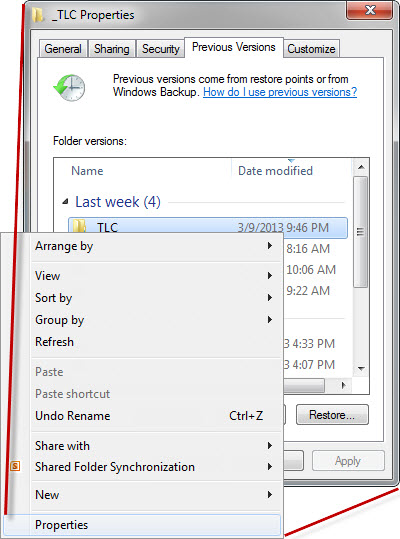
Open any folder, right click on the canvas area, folder, or file, and hit properties.

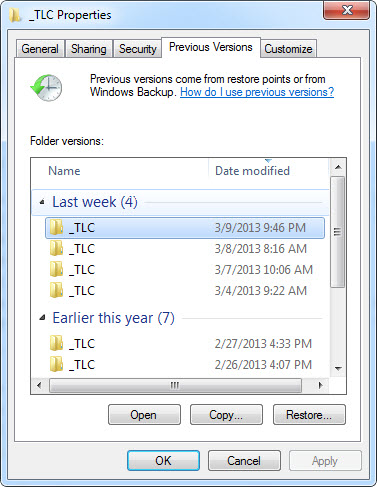
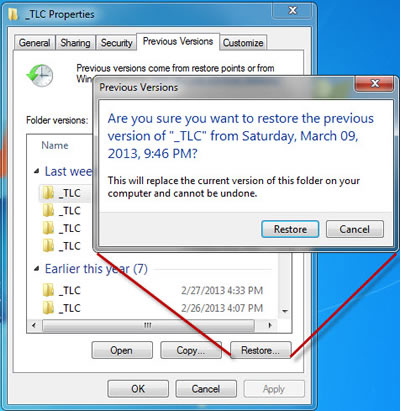
Clicking on the previous versions tab in a folder where you’ve deleted or modified some files will result in some form of the screenshot below, with previous versions of files or folders listed.

Restoring files is as easy as selecting the folder, and hitting restore.
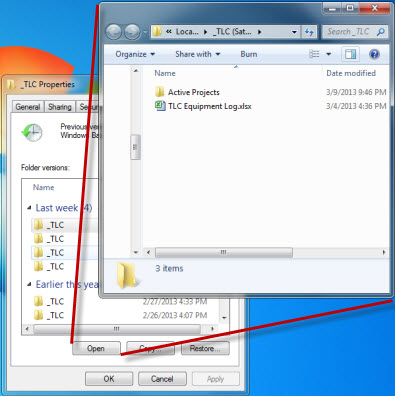
Alternately, you can open any folder by double clicking, and copy, or even open and edit single files, as opposed to having to restore the whole directory.

You can open any previous version of a folder or file by double-clicking on it, or selecting the “Open” button.

How to setup or confirm System Protection is Enabled
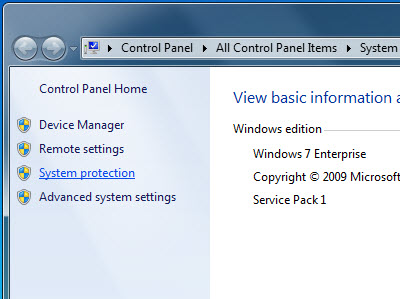
You can ensure Previous Versions is enabled through the “System Protection” window. This can be accessed by right-clicking on “My Computer” and selecting “Properties.” This will bring up the window below, wherein you will see a “System Protection” option on the left-hand pane.

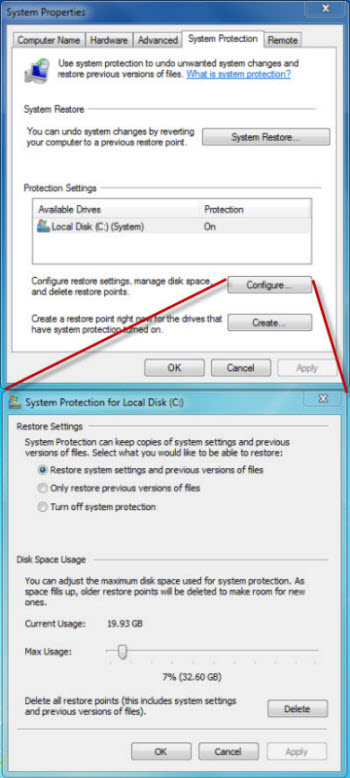
When opening System Protection, you will be met with the window below. Take note of any non-system drives, and enable protection on them if desired. You will not be able to restore previous versions of files on drives that do not have protection enabled. Choose the desired space allotment via the “Configure” button. How many previous versions are available will directly depend on how much space you have allotted.

So there you have it, a few clicks and moments of configuration to put weeks or months of automatically generated backups at your fingertips.

– Josh @ TLC
By |2016-08-10T10:33:34-07:00June 26th, 2013|Tutorial|
Go to Top