Tutorial

#6 – Video and Audio Options

The Microsoft development team has added some really, really great usability options for working with video and audio files!

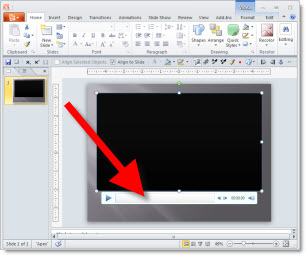
First, when a video or audio file is inserted it can easily be previewed from the edit view with full playback controls:
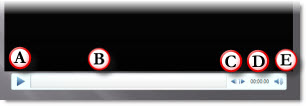
A. Play/Pause
B. Playback duration, which is draggable
C. Step forward/back (approx. 1/4 second per click)
D. Timecode
E. Volume control

In slideshow a pop-up playback bar can be activated – just move the mouse to view it (note: the pop-up playback bar can also be disabled during a slideshow (my preference)) that has play/pause, playback duration indicator (also draggable) and volume control.
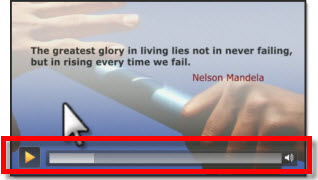
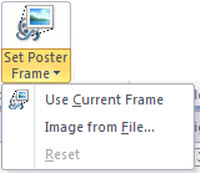
When a video is inserted it by default shows the 1st frame of the video (often black) which is called the “Poster Frame”. In PPT 2010 the Poster Frame can easily be set to any frame in the video or an external image!
Here is the new Ribbon tab to Edit video files:
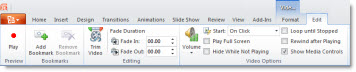
It makes many of the current options easy to find and set. It also adds some new features, like the “Trim Video” button.

The Trim Video button opens a new dialog box that most of the time replaces the need for video editing software!
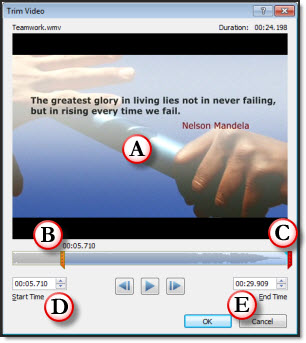
A. Playback preview
B. The orange left bar can be moved to any point and the video begins playback from there (called ‘trim’).
C. The red right bar can be moved/slide to any point, but not past the begin/orange bar, and the video ends there
D. Shows the timecode position of the begin/orange bar
E. Shows the timecode position of the end/red bar

There are even more fine tuning options for both videos and audio files. PPT 2010 really opens PowerPoint to the power of multimedia integration!

– Troy @ TLC
By |2016-09-16T09:21:21-07:00November 14th, 2009|PowerPoint, Tutorial|

#5 – Thumbnail Zoom to 200%

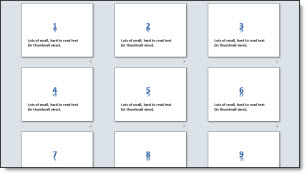
Okay, this one will probably be overlooked by most, but to me it ranks in the top 5 new features! Looking at slide sorter view is great for storyboarding and quickly finding a specific slide – if you can read the content. Note: All screen captures are same monitor resolution and PPT window, only the zoom level changes.

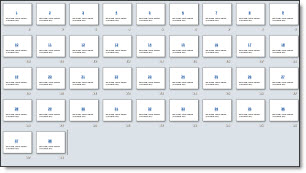
Here is my sample deck viewed in Thumbnail, or slide sorter, at 40%. Very difficult to identify content on the slides.

If your monitor is stuck at 1024×768 thumbnails viewed at 100% are discernable. But view those same thumbnails on a 1900×2000 (HD) monitor and they are small blobs of color and squiggly lines where the text is.

Here is the sample deck viewed at 100%, the current maximum. Large content may be legible, but the small stuff is still illegible.

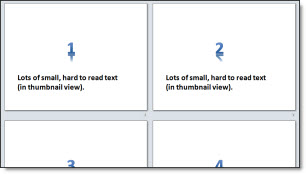
But zoom in 150% or 200% and everything is legible! The zoom bar in the lower right now goes past 100% up to 200% which is great!

Here is the sample deck viewed as thumbnails, zoomed to the new maximum of 200%. Everything on the slide can be read and identified.

– Troy @ TLC

By |2016-09-16T09:22:03-07:00November 12th, 2009|PowerPoint, Tutorial|

#4 – Slide Transitions

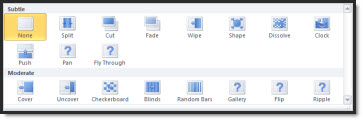
Transitions also benefit from #1 – Performance. In my pre-beta version there are a number of new transitions that are really exciting!

– Pan (my new animation favorite!)
– Gallery
– Flip
– Ripple
– And the full application will have more new transitions than just these!
New Transitions Sample Video is converted to low-res .gif “movie”. Note on the PAN transitions the background stays in place while the content moves/transitions!

Plus the legacy transitions also get some fantastic updating. As example the WIPE, CLOCK, RANDOM BARS, transitions leads with a soft gradient edge. The DISSOLVE and CHECKERBOARD transitions are screens full of soft edged squares (that I might use again after ignoring since 2004).

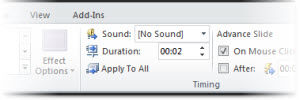
The interface has been updated too. First, Transtions now have their own tab (no longer shared with Animations).

Almost all of the adjustments are controlled directly in the Ribbon (vs. opening a separate dialog):

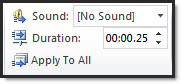
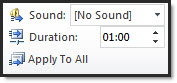
We now have precise control over animation duration, ranging from a full minute:

To a very quick 1/25th of a second:

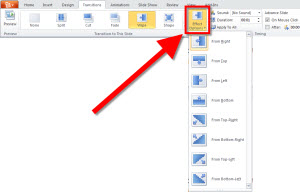
The updated interface also limits the list of transitions by adding any transition options in the new EFFECT OPTIONS menu. Here I have WIPE selected and I can choose the direction from the drop down menu.

Just another GREAT feature that adds new features and improves the existing.

– Troy @ TLC

By |2016-09-16T09:22:30-07:00November 10th, 2009|PowerPoint, Tutorial|

#3 – Insert and EMBED Virtually ANY Audio File

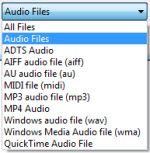
Just like the videos, PPT 2010 supports a whole host of audio formats and embeds them all! Take a look at the audio formats supported (Yes, all flavors of quicktime, .mp3 and more are supported!):

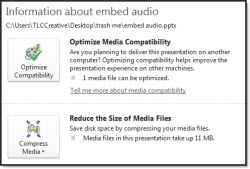
PowerPoints backoffice also recognizes when audio files have been inserted and offers conversion and optimization options.

– Optimize Media Compatability: converts audio files to Microsoft’s preferred/native format, .wma.
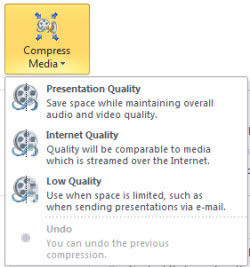
– Reduce The Size of Media Files: will convert (same as above) and also offer a range of compression levels.
In this sample I inserted a 7.5MB .m4a and converted to a .wma at the highest quality (presentation) to have a 100k audio file embedded – without any noticeable quality difference.

– Troy @ TLC

By |2016-09-16T09:22:50-07:00November 8th, 2009|PowerPoint, Tutorial|

#2 – Insert ANY Movie Type and EMBED

PPT 2007 brought the new .pptx file format. PPT 2010 starts taking full advantage of the new file format with the ability to truly embed video files!

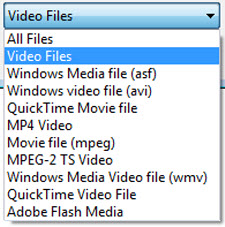
Just look at the INSERT >> VIDEO >> VIDEO FROM FILE options listed (Yes, that is Quicktime, .mp4, and mpeg2!).

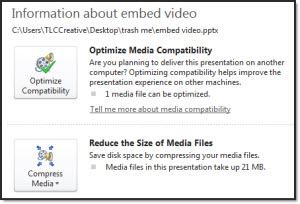
In the presentation info section is details about the EMBEDDED video.

– Optimize Compatability: I inserted a quicktime video (which plays no problem). But Microsoft really wants its own format (.wmv) and this feature will convert all embedded videos to .wmv (which it does very well, maintaining quality and producing small file sizes).
– Reduce The Size of Media Files: .wmv files can be compressed in 3 quality levels, choose the level needed here (note: you can go directly to this feature, skipping “optimize compatability”). It also has an ‘undo’ option. I have been optimizing videos, reviewing in slideshow and deciding if the quality was maintained, if not I just ‘undo’. For this sample I inserted a 21MB .mov and it was compressed to a 1.5MB .wmv with no visible quality difference.

The embed video functionality (and the video options detailed later) will revolutionize the use of video in presentations. Microsoft has eliminated linking issues, forgotten files (Yes, Mr. Client you need to have both the presentation and the video files on your computer – in the same folder) and format issues (no, Mr. Client, I am sorry but Microsoft and Apple do not play together when it comes to using Quicktime videos in a presntation).

– Troy @ TLC

By |2016-09-16T09:23:27-07:00November 6th, 2009|PowerPoint, Tutorial|

Slideshow vs. Reader Views

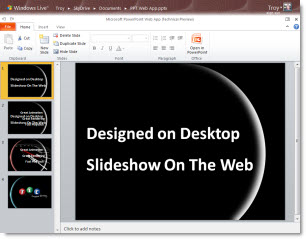
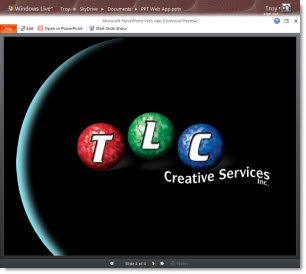
In yesterday’s post I captured my sample online slideshow in PowerPoint’s new “Reader View” – which is somewhere between the traditional edit view and a full slide show. My reason was simple, it made it clear the presentation was running on the web.

There are 3 view options with the PPT Web App.

1. Edit

2. Slideshow

3. Reader

The “Reader” view is in all the MS Webb Apps and in the upcoming Office 2010. Click “view” presentation and this is the default view. To see as a full screen slideshow click the “slideshow” button from this view.

The reader view default shows animations, slide notes, the web browser window is resizable and relies on SilverLight for best performance.

The control bar at the bottom the reader view is used to advance through slides and animations. Unlike the preview animation feature in PowerPoint, the reader view maintains animation timings and pauses for each on-click animation – just like running the slideshow.

– Troy @ TLC

By |2016-09-16T09:25:36-07:00October 30th, 2009|Tutorial|

PowerPoint Web App – Use It Today!

Everyone is eagerly awaiting the release of Office 2010 and the new PowerPoint (or they should be – it is the best release/improvement since PowerPoint XP!). With the new version Microsoft offers a new set of tools with its Office Web Applications for PowerPoint, Excel, Word, and OneNote. For a limited time anyone can start using the public beta (up to the first 50k or so users).

– You need a Microsoft email account (hotmail, live.com, etc.)

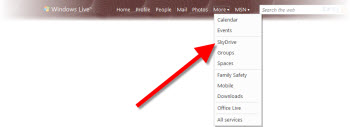
– If you have not setup a Sky Drive (virtual hard drive) you will need to do so

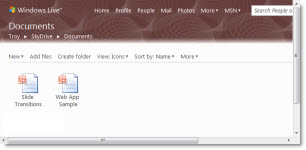
– Go to your Sky Drive documents folder and drag a .pptx file there

* The first one uploaded will be recognized as a Microsoft document and then offer you the opportunity to participate in the Office Web Apps public beta – accept and you are all set!

I have a few more posts set to review the use and features, but here is my personal opinion of the PowerPoint Web App as of today. Microsoft has pulled together a major amount of code development in a short amount of time. The functionality is very limited.

But I can clearly see how it will rapidly improve and become a mainstay in presentation use. It lives in the ‘cloud’ and updates do not have to wait for the standard upgrade time of services pack or new versions. I think the web apps will have the quickest development within Microsoft over the next several years – one we will directly benefit from.

I view the PowerPoint Web Apps as 2 sided:
1. Sharing a presentation online (which is very easy and very well done). Microsoft has this use incredibly far down the developement cycle. It works.

2. Creating or editing a presentation online. This is definitely a 1.0 release and the feature set is limited, a bit frustrating, and will definitely get better and more usable.

– Troy @ TLC

By |2016-09-16T09:26:17-07:00October 27th, 2009|Tutorial|

Everything Is Jumping (Again) – Fix Selecting Objects

This same problem seems to pop up for many reasons. It is definitely a Windows Vista, and potentially Windows 7, issue. But it effects all versions of PowerPoint. It recently came up again on some of my computers after some Microsoft updates.

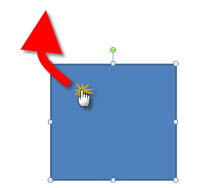
The problem is clicking on any object (text box, shape, image, chart, etc) and it jumps slightly. Very annoying.

The solution is (re)setting one of the application options.
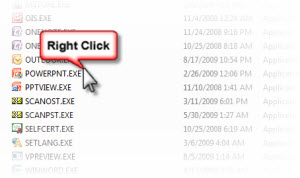
1. Locate the actual PowerPoint .exe file. For Vista/Windows 7 it will be here:
c: >> Program Files >> Microsoft Office >> Office12

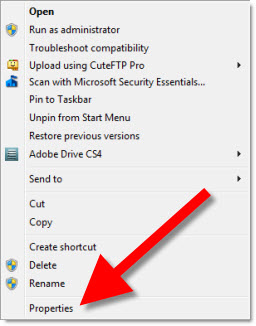
2. Right-click and open the PROPERTIES

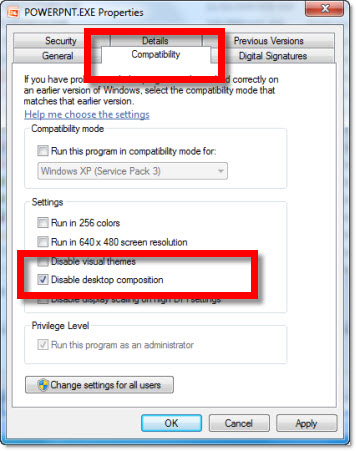
3. Go the the COMPATIBILITY TAB and be sure the DISABLE DESKTOP COMPOSITION is checked.

Run PowerPoint and all should be resolved!

– Troy @ TLC

By |2016-09-16T09:28:46-07:00October 23rd, 2009|Tutorial|

Cutout Text Effect

There are lots of great Photoshop quality effects that can be easily created in PowerPoint. Here is how I create a cutout effect for text.

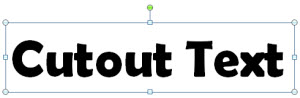
1. Here is our sample text. Just black text.

2. I change the text color to white.

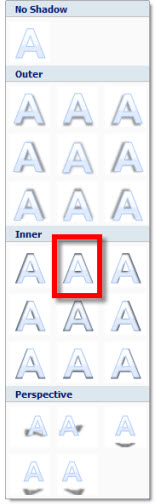
3. Then apply one of the preset INNER SHADOWs.

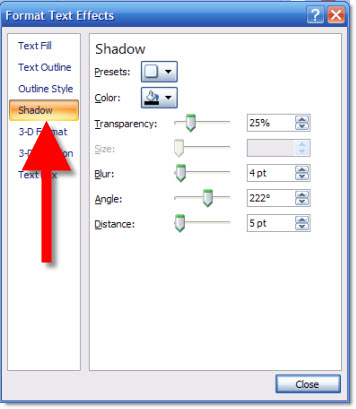
4. I modify the preset settings to be darker (transparency), less blur, more distance.

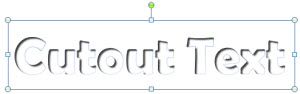
5. Here is my text now with the cutout effect.

6. Finally, here is the same text set on top of a textured background where it really shows the cutout effect.

– Troy @ TLC

By |2016-09-16T09:44:35-07:00August 30th, 2009|Tutorial|

Use Nvidia Control Panel to Set Mirrored or Extended Desktop

PowerPoint presentations given to a live audience usually involve the computer being attached to a projector. And sometimes the technical issues of getting the computer and projector to cooperate are the downfall of the presenter…

Here is what I hear a lot:
– I have a great laptop!
– I hooked up the projector (via VGA or DVI cable).
– I clicked the Function + F4 keys.
– Nothing happened, my presentation would not show up!

It happens and there are technical complexities, but I run anywhere from 1 to 12 computers outputting to projectors for any given meeting. Here is my approach to assuring the presentation shows up on the projector (note: the following tutorial is based on the Nvidia Control Panel as most of show computers currently run their graphics cards).

1. First, I do not use the Function+F4 key. This is just a shortcut to the control panel that does not show me any of the real settings.

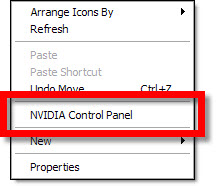
2. I open the graphic card control panel. My preferred method is to right-click the desktop and select “NVIDIA CONTROL PANEL”

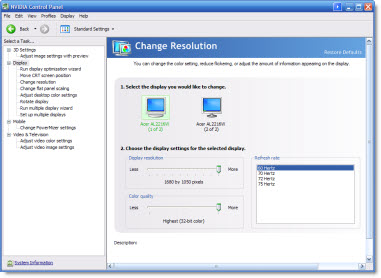
3. This opens the Nvidia Control Panel. From here you can see and adjust every aspect of how images are put onto any monitor, or projector, connected to the computer/laptop.

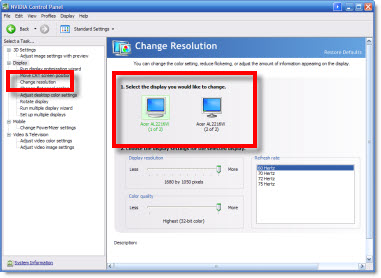
4. I first go to CHANGE RESOLUTION. I can quickly see on the right if the computer ‘sees’ the 2nd monitor/projector by the two display icons.

5. If 2 icons are seen I go to #6. If only 1 icon is seen (the laptop monitor) I then have a few steps:
A. Check cable is plugged into computer.
B. Check cable is plugged into projector (or switcher).
C. Verify projector is powered on and set to correct input.
D. If using a docking station for the laptop (as I do), check docking station has power by checking power supply has light, is plugged into dock and dock has power lights (video out from all docks is not passive and will not work if dock does not have active power).
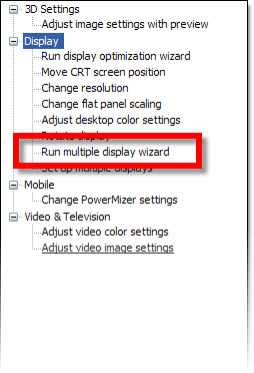
E. Run the RUN MULTIPLE DISPLAY WIZARD to force the graphics cards to identify and recognize the external monitor.

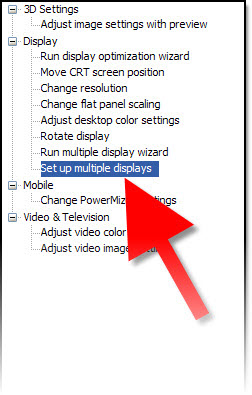
6. To setup a projector I go to the SETUP MULTIPLE DISPLAYS option.

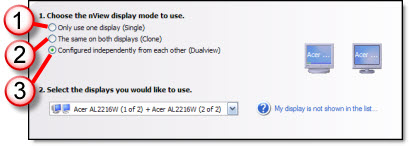
7. On the right I can tell the computer how I want to use the projector.

1. Do not connect to projector
2. Mirror output to projector (most common setting)
3. Extend desktop to projector

8. Click APPLY.

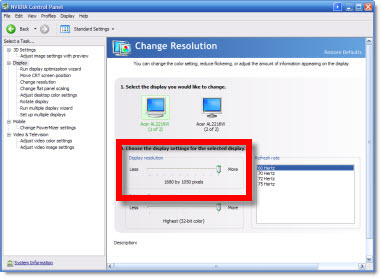
9. Then go back to CHANGE RESOLUTION. Now the focus is on the resolution setting on lower part of the right side. This number has to be set to match the projector’s resolution.

– If the resolution is set to high, the projector may be unable to use it (and will display nothing).
– If the resolution is set to a widescreen format (as many laptop monitors are) and the projector is not widescreen it will either compress the image or add black letterbox bars (neither is a good option), so the resolution will need to be set to a 4×3 aspect ratio (eg. 1024×768 is the most common).

10. Click APPLY, exit the control panel and get on with the presentation – yeah!

– Troy @ TLC

By |2016-09-16T09:45:10-07:00August 28th, 2009|Resource/Misc, Software/Add-Ins, Tutorial|
Go to Top