images

Make Your Images RGB in Photoshop

When creating or editing an image in PhotoShop – be sure it is set to RGB. I recently encountered a situation with a clients files that was perplexing (aka: extremely frustrating). They were scanning photos at a print resolution (300 dpi and very large) and also as CMYK images. I figured out their problem, corrected the images in the current presentation and gave them a scanning tutorial so future efforts will work better.

For any images you will be using in a PowerPoint presentation, make sure your images being edited in Photoshop, or any image editor, are set to RGB. In Photoshop:

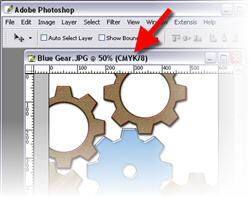
○ Check the top information bar of your image to see what color mode it is currently set to. Common mode are RGB, CMYK and INDEX

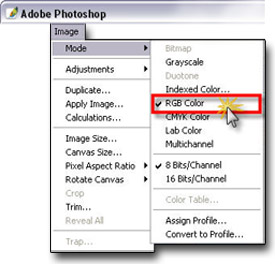
○ To change your image to RGB go to IMAGE >> MODE >> RGB

Done.
You now know your image is compatible with PowerPoint and one potential conflict/problem has been eliminated!

Troy @ TLC

By |2016-11-17T14:05:22-07:00July 10th, 2006|Tutorial|

Animation : Morph Images By Rotating In/Out

Sometimes you want to give a little pizzazz to entrance of a new image. Here I added movement with a rotation to the images for something unique.
iame

This requires a bit of preparation, but everything is done inside PowerPoint.
○ Insert both images on the slide
○ The first image, that will be fading out, apply a FADE OUT and SPIN animation. I set the spin to be 40º and CLOCKWISE
○ For the second image, right-click and choose FORMAT PICTURE. Go to the SIZE tab and set the ROTATION (I set mine to 20º)
○ Apply a FADE IN and SPIN animation. Set the spin to COUNTER CLOCKWISE and the same rotation you set in the step above (mine is set to 20º)
○ Set all animations to WITH PREVIOUS
○ Set the animations for the second image to begin at a .2 second delay

The sample presentation can be downloaded here.

Troy @ TLC

By |2016-11-17T14:03:28-07:00June 30th, 2006|Tutorial|

Online Movie Tutorial : Export image from PPT to add PhotoShop Dropshadow

I have just completed a screen capture tutorial that walks through the process of exporting an image from a presentation, opening it in PhotoShop, adding a soft dropshadow, properly saving it out and then inserting back into the presentation. This is a 4 minute narrated online movie, because if a picture is worth a 1,000 words, seeing a real demonstration is worth hours of frustration! To view click here.

– Troy @ TLC

By |2016-11-17T14:03:10-07:00June 28th, 2006|Tutorial|

Animation from One Photo

Working on presentations is always rewarding when the client or an audience member comments on the presentation. Sometimes I am caught off-guard by what is being praised, something I view as simple but they view as great. Here an example from a recent show.

Part of the project involved using a series of photos of the company product in use to create a walk-in looping presentation. I was given the photos, was to use black background and add some animation and slide transitions – GREAT freedom to have fun! One of the animation techniques I used in various ways was to duplicate the image a number of times, crop each duplicate, position and apply a streaming animation to add a little movement. Here is the one of those slides:

Here is what was done:
○ Duplicate the image four times (to have 5 images)
○ Crop four images down to just the person
○ Resize each cropped image to they became progressively smaller
○ Position in an arch
○ Apply a FADE IN and FADE OUT animation to each
○ Adjust the timing of the animations in the advanced timeline

○ Position the original, full image, and apply a FADE IN animation
The result is a simple slideshow on a single slide that moves the snowboarder across the slide finally resolving to the full shot. After 7 seconds the show auto advanced to the next slide.

The nifty thing is all of the work was done inside PowerPoint using the crop, resize tools and animations tools. Download the presentation here
(note: this is a widescreen 16:9 presentation)

Troy @ TLC

By |2016-11-17T14:02:48-07:00June 26th, 2006|Tutorial|

PhotoShop’s Trim Feature

When creating presentations I spend a lot of time in PhotoShop. And a lot of that time is spent creating images with no background around the object so it can float anywhere on the PowerPoint slide. The TRIM feature in PhotoShop is invaluable – yet few designers have heard of it!

(1) So you have an image like this.

(2) You spend time in PhotoShop “cutting out” the image so it sits on a transparent background.

(3) Now you are going to save it as a .png with transparency. But any space around the image is only going to make for a larger file size (it is transparent space, so you don’t need it, or want it). Enter the TRIM tool.
In Photoshop go to IMAGE >> TRIM.

(4) Make sure the settings are like these.

(5) PhotoShop will crop the image down to the exact pixel dimensions of the image!

Now when you save the image as a .png with transparency you are assured of only saving the necessary file size!

Troy @ TLC

By |2016-11-17T13:54:02-07:00May 20th, 2006|Tutorial|

PPT + .png transparent images = ugly print

If you have ever printed a presentation that contained a .png image with transparency the results were certainly less than desirable. Here is the printed slide with a number of transparent .png images – not so good…
Tech Table
Note the jagged edges around the 3D spheres, Missing portion of background, solid/jagged dropshadow around the person.

○ The solution is a few easy steps and provides ‘picture’ perfect printouts.
○ Go to SAVE AS and export all slides to .JPG images. It is a good idea to save all of these to a new folder (Note: For higher quality images I use the PPTXtreme Import/Export add-in for this process. I export slides at 1600×1200 pixels for better quality).
○ Create a new presentation
○ Import all of the .jpg images/slides using the Photo Album feature, PPTXtreme’s Import/Export add-in, or Shyam’s Image Importer add-in.
○ Print

Here is a slide that was exported as a .jpg, then placed on a slide and printed
Tech Table

Side Note: If you delete all slides from real presentation, do a SAVE AS, then insert all of the .jpg slide images the master slide, header/footer and properties information will be preserved.

Troy @ TLC

By |2016-09-16T11:26:34-07:00February 23rd, 2006|Tutorial|

Resize Images Instantly!

Placing oversized images into a presentation only makes the presentation file oversized. I could suggest everyone go through my process; open each image in PhotoShop, crop, resize, optimize color, save as a .jpg or .png (as appropriate). But that is a lot of effort, and not the fastest process for a general use presentation.

Or, thanks to my brother-in-law who introduced me to Microsoft PowerToys, you could use Image Resizer. Once installed, simply right-click the image file in Windows Explorer, choose Resize Pictures and from the simple dialog choose a size and you are done! This free Microsfot application is somewhat limited in what it can accomplish, but it makes the process nearly instantaneous – produces good quality images – and works with .jpg and transparent .png images. Check out the details here.

Troy @ TLC

By |2016-09-16T11:18:34-07:00January 25th, 2006|Tutorial|

iStockPhoto

Looking for a great royalty free photos for your presentation? I do, practically on a daily basis. I do have a large library of royalty free images and subscriptions to several online services. But I still cannot find the perfect image for some projects. This just happened and in searching I found a super new resource that only has a great selection and quality, but is an incredible value!

Check out iStockPhoto. Images cost 1-3 credits, with a credit basically equal to $1.00 each.

Troy @ TLC

Here is the design proof of the ad that used three iStock Photo images in its collage:
(more…)

By |2016-09-16T11:12:45-07:00January 2nd, 2006|Software/Add-Ins|
Go to Top