powerpoint

Dynamic Quotes with Background Fill!

Here is one of our favorite visual tricks at TLC Creative Services for making slides with a key quote stand out. Background fill!

I am doing this as a 3-post series: this one shows the end result (see above) and PowerPoint formatting, the next post will detail our development process in Adobe Illustrator, and the third will show a PowerPoint only development process for the graphics. Thanks to Amber, a TLC staff designer, for creating the sample images for this series.

Using the quote mark .emf graphics, they are not very impressive without some styling applied and a special option for their fill color. Insert the .emf graphic (download here).
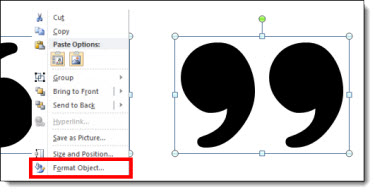
1. Right click on a quote mark and select FORMAT SHAPE.

2. Go to FILL and select SLIDE BACKGROUND FILL

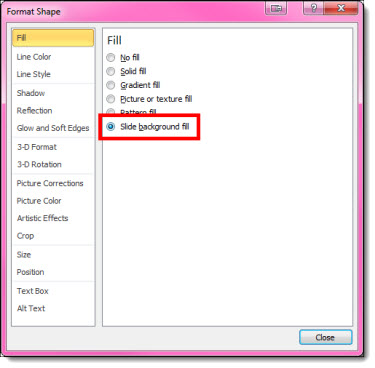
3. The Quote marks will disappear on the slide because they are set to be the same background color as the slide.

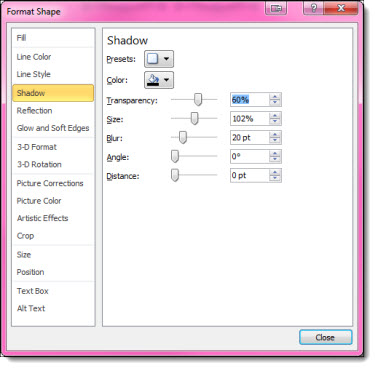
4. Add a shadow effect, bevel, outline, glow or other styling effects to your quote marks. For ours, we have added a subtle drop shadow.

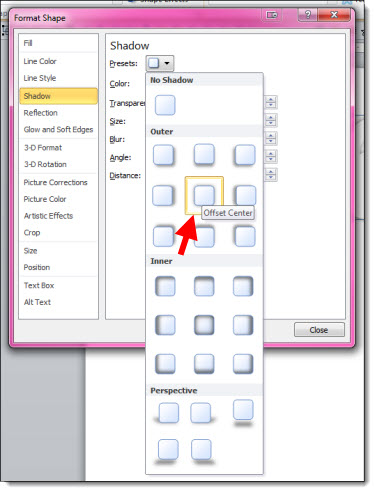
5. Still not super dynamic, but the quote marks are looking more styled.

6. But when placed on a colorful image background – dynamic! Move the quote mark graphics to any part of the slide and their fill updates.

Note: The slide background needs to be set with the Background Fill, not an image on the slide for this effect to work.

– Troy @ TLC

By |2016-08-10T09:48:55-07:00March 10th, 2014|PowerPoint, Templates/Assets, Tutorial|

Webinar by Troy – PowerPoint 2013, What’s New, Better, and Different

AudioSolutionz has asked me to present a live webinar on PowerPoint 2013. It will be this Wednesday, February 19 at 10am PT/1pm ET.

I have a large list of features that are new for the application, the designer, and the presenter.

Knowing where the PowerPoint 2013 new features are, how to turn them on, and how to use them can be a frustrating experience of trial and error. This is a one-stop overview the new features demonstrated and explained. Session Highlights:
• Learn what is new with video: playback, export and usable formats
• Discover 6 menus that are no longer pop-up dialogs – and have added formatting features
• Instantly apply any color on the screen to a shape or text in 2 clicks!
• Explore all the new slide transitions
• What are Smart Guides, and what is “Equidistant?” – they are both in PowerPoint 2013
• Widescreen is now the default, but it is not the same as the old widescreen
• Presenter View is now useable
• Learn how to zoom in on a slide – during a presentation
• and more, plus Q&A

Details and registration is here.
Use the promo code “Troy 20” for a $20 discount.

– Troy @ TLC

By |2016-08-10T09:51:01-07:00February 17th, 2014|PowerPoint, Resource/Misc|

Star Wars Template (Portfolio)

With the Star Wars franchise rebooting, we have had some very fun projects focused on the Star Wars universe. Here is one of the dynamic PowerPoint templates we were excited to develop.

This template also featured a “flowing lava” effect on the left edge, which was accomplished with layering .png images and looping video.
video. The glowing light sabers is all PowerPoint animation.

[youtube src=”https://youtube.com/embed/SfyWbroK_oM?rel=0″]

– Troy @ TLC

By |2016-08-10T10:00:00-07:00December 20th, 2013|Portfolio|

Cut off part of a video in PowerPoint using Trim

PowerPoint has made the trips over to video editing software less and less with the new tools. One of the tedious items was changing the in/out point of videos. That is where the video starts and ends. This can now be easily set in PowerPoint.

1. Here is my sample video. For an easy visual, it is a countdown from 10 to 0. But I need a video that counts down from 5 to 0.

2. Select the video, and in the Video Tools/Playback tab, click TRIM VIDEO.

3. The Trim Video dialog box opens, showing the selected video AND the start and stop points.

4. Sliding the green start point marker to the right adjusts where the video will begin playing from. I just slide until I see the number 5 on the video.

5. Now the slide shows the start of the video at the needed location and the presentation is set to go (all without opening a video editing application!).

– Troy @ TLC

By |2016-08-10T10:07:45-07:00November 18th, 2013|Tutorial|

PowerPoint As a Video Editor – Combine Video Clips

PowerPoint has some very good video features, such as the ability to play multiple video formats, embed videos into the slide deck file, visually stylize the video and export video from the PowerPoint.

It is the export video feature that is being used for this tutorial.
Here are three videos that are inserted into PowerPoint 2013.

Each video is set to auto play, one after the other.

Then, go to FILE.

EXPORT >> CREATE A VIDEO >> CREATE VIDEO

The result is a single video file that was previously 3 separate videos.

– Troy @ TLC

By |2016-08-10T10:08:02-07:00November 16th, 2013|Tutorial|

Watermark Images Direct in PowerPoint

Watermarking an image is common in several scenarios. Identifying who owns the image and copyright and indicating it is a low resolution “proof” image are the two most common watermarking scenarios I see.

TLC Creative Services has a large library of royalty free images and subscribes to image sites which make developing visual presentations much easier. In both cases, our designers can download the low res, watermarked version of the image(s) they want to use in the presentation. Then, when the client approves the images, they can download the high resolution version of each image and replace the watermark images throughout the presentation. Of course, this routine takes a lot design time and it displays the company watermark vs. a generic watermark.

Note: “FPO” is an design industry standard phrase, “For Placement Only.”

TLC Creative Services creates all our watermark images directly in PowerPoint.

1. Here is our slide layout with high res (optimized for use in PowerPoint) image. But we do not release the slides with usable images until it has been approved.

Watermark images 1

2. Here is our PowerPoint stylize “FPO” text box.

Watermark images 2

3. We paste the “FPO” text box onto each slide and position over the image.

Watermark images 3

4. We then select the image and FPO text box and copy them.

5. Next we delete the image and FPO text box.

6. We then PASTE SPECIAL as a .png (this assures quality and eliminates issues if the text box extended paste the image).

Watermark images 4
Watermark images 5

7. This adds a new image to the slide that is watermarked.

Watermark images 6

8. We position the new watermarked image on the slide.

Watermark images 7

9. Last, we do a SAVE AS so the “real” presentation with the high res images is not lost.

By |2016-08-10T10:08:26-07:00November 14th, 2013|Tutorial|

PowerPoint for Website Mockup

This year, TLC Creative Services finally updated its website (which is still in process). I am very happy with the new site and additional information it provides. When developing applications, and websites, PowerPoint can be a great tool in the initial stages.

For example, here is the TLC website mocked up in PowerPoint.

Each item is a separate, and editable, PowerPoint shape. The navigation labels can be revised, their order adjusted and the drop down menus revised.

Just another example of using the flexibility of PowerPoint to accomplish more than just “slides.”

– Troy @ TLC

By |2016-08-10T10:10:49-07:00October 30th, 2013|Portfolio, PowerPoint, Resource/Misc|

(Update to) PowerPoint Video Test Toolkit

Earlier this week, a post released a copy of our internal PowerPoint Video test slides. It was drawn to my attention that there were 2 errors in the slides (1. the .avi was not set to play automatic like all others, 2. the .mpg1 was a really badly rendered video). Thank you for the those that sent emails!

The original post’s download link has been updated with a revised version of the PowerPoint Video Test Toolkit and here is same link:
Download here.

– Troy @ TLC

By |2016-08-10T10:12:22-07:00October 11th, 2013|Resource/Misc, Software/Add-Ins, Templates/Assets|

PowerPoint Video Test Toolkit

For TLC Creative Services, I developed a slide deck that the 5 most common video formats. To test a computer’s setup, we just open this PowerPoint presentation, go to the video format we want to confirm the computer is configured to play and see what happens. If the video plays, we know the computer and PowerPoint are setup for that format and then can troubleshoot the client file with the knowledge that it is not the computer or PowerPoint.

Feel free to download our PowerPoint Video Test Toolkit and use as needed.
Download here (24 MB).

Also, check out the Sept 11 post of the video reference chart to know if a computer’s configuration is going to play a video format.

– Troy @ TLC

By |2016-08-10T10:13:10-07:00October 7th, 2013|Resource/Misc, Software/Add-Ins|

Video of Animated Map From PowerPoint

Here is an amazing video showing a 1000 years of border history in Europe.

[original video no longer available from source]

Yes, you could fairly easily develop this video in PowerPoint. It would be what we internally call a “Flip Book” animation. One static slide per border change. Then set all slides to auto transition (with the CUT transition) and .01 to .05 seconds for the AFTER setting. When played, it will give the same effect as the above video – although sourcing the data and customizing the country shapes to each border would be a very large project! The video creation would be a simple as FILE>>EXPORT>>CREATE A VIDEO.

Here is a quick video I developed in PowerPoint using the Flip Book animation styling with a vector map of the United States (which was missing in the above video) and exported as a video.
[youtube src=”https://youtube.com/embed/Fpqd3v9gl7A?rel=0″]
57 slides, no animation, auto transitions, exported as video.

– Troy @ TLC

By |2016-08-10T10:15:18-07:00September 27th, 2013|PowerPoint, Resource/Misc|
Go to Top