powerpoint

Type a Trademark

If you need to add a Trade mark to your text the common solution is to:
– Go to INSERT
– GO to SYMBOL
– Go to NORMAL TEXT and hunt for the trademark symbol

But there is a an easy and quick way that never has your fingers leave the keyboard. Just type “(TM)”. Done.

– Troy @ TLC

By |2016-09-16T10:30:27-07:00April 18th, 2009|PowerPoint|

Type a Copyright Symbol

If you need to add a copyright symbol to your text the common solution is to:
– Go to INSERT
– GO to SYMBOL
– Go to NORMAL TEXT and hunt for the registration copyright symbol

But there is a an easy and quick way that never has your fingers leave the keyboard. Just type “(C)”. Done.

– Troy @ TLC

By |2016-09-16T10:30:50-07:00April 16th, 2009|Tutorial|

Type a Registration Mark

If you need to add a registration mark to your text the common solution is to:
– Go to INSERT
– GO to SYMBOL
– Go to NORMAL TEXT and hunt for the registration mark symbol

But there is a an easy and quick way that never has your fingers leave the keyboard. Just type “(R)”. Done.

– Troy @ TLC

By |2016-09-16T10:31:16-07:00April 14th, 2009|Tutorial|

Where are the File Properties in PPT 2007?

The ribbon interface was designed to be intuitive and make things easy to find. But there are exceptions to everything, like not having an ‘Insert Slide’ on the Insert tab and finding the file properties for the presentation.

In PPT 2003 you go to FILE >> PROPERTIES and this dialog appears:

To find this information in PPT 2007 it is not as obvious, although it does have a nice layout when found. To open the file properties in PPT 2007:
1 – go to the OFFICE BUTTON
2 – go to PREPARE
3 – select PROPERTIES

The properties information appears inline just above your slides.

– Troy @ TLC

By |2016-11-17T12:00:08-08:00April 6th, 2009|Tutorial|

Another – BETTER- Way to Nudge/Move a Chart in PPT 2007

I received an email from my friend Ute, a PowerPoint MVP from Germany who directed me to one of her video tutorials with the clue that “strg” means CTRL.

You can watch the tutorial here (it is in German).

Here is my sample chart. Note the full selection line around it when clicked.

But if you CTRL CLICK on the chart you get a different selection, 4 dots.

With the CTRL CLICK selection the arrow keys allow you to move the chart!

Thanks Ute!

– Troy @ TLC

By |2016-09-16T10:38:17-07:00April 4th, 2009|Tutorial|

Move a PPT 2007 Chart

Here is my PPT 2007 slide with a nice stylized chart:

The frustration is when you want to nudge the chart into position using the arrow keys it does not move… Each click of the arrow key just changes the selected item within the chart:

My solution is this – a standard autoshape box:

When you select a chart in PPT 2007 AND any other object, the focus is now on the group of items, not the individual chart. So using the arrow keys moves both items.

Move the chart into position, then delete the temporary box. Done.

– Troy @ TLC

By |2016-09-16T10:40:05-07:00April 2nd, 2009|Tutorial|

PPT Art – Captain Jack Sparrow

How is this PowerPoint art?

When it is created in PowerPoint with hundreds of autoshapes! Just the mustache is made up of what looks to be over 200 autoshapes (I stopped counting after 75)!

This incredible work by the UK’s Colin Neal can be downloaded from the PowerPointHeaven site. Look for the entry called “Captain Jack Sparrow.” Click here.

– Troy @ TLC

By |2016-09-16T10:50:00-07:00March 16th, 2009|PowerPoint, Resource/Misc|

PPT Reflection Example

This is just 2 quick slides from a recent project, that were actually supplied to client before the real production began. The request was what could be done with all of the supplied images to give them a professional and consistent appearance.

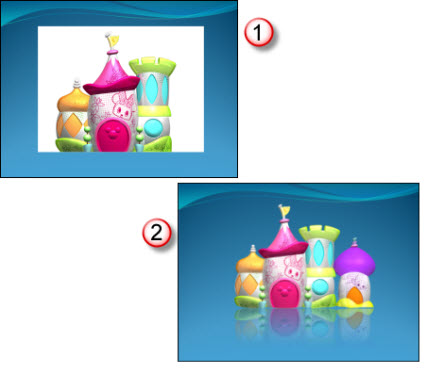
I took this supplied image and first removed the background. I worked in Photoshop to do this. PPTs eyedropper would be an option, but it would remove any of the white inside the towers, which would really affect the right one. In Photoshop with the background removed it was saved out as a .png with transparency. The reflection was applied in PPT 2007.

I also grouped in another image (far right) to show how multiple images could easily be added to the layout, which was not an option with the opaque background on the originals.

Client liked the overall effect, approved it and then I got to work on slides and the other 30-40 images…

– Troy @ TLC

By |2016-09-16T11:04:36-07:00February 16th, 2009|Portfolio|

Multimedia Lecture

This is the lecture mentioned in the previous post. This is a great use of PowerPoint and is a great teaching tool!

For this project I was supplied with two items:
1. Raw video recording of the instructor/presenter (recorded by professional video crew with monitored audio recording).
2. PowerPoint slide deck instructor used.

The project process was:
1. Edit video to remove long pauses, audience comments (no handheld microphone for audience, so to quiet to hear on recording), pan & zoom (crop) to bring presenter to full screen (especially important as video of instructor is small).
2. Optimize PowerPoint deck for use in video.
3. Sync lecture and slides (this is time consuming when there is no cue sheet or wide angle recording to see both the presenter and the projected slides – but I did learn a lot about molecular genetics as I listened to the full lecture 3-4X’s!).
4. Setup the interactive table of contents.
5. Render video(s), which were .flv format. Instructor at 29.97 FPS and slides at 5 FPS.
6. Prep for CDROM playback.
7. Prep for local computer (hard drive) playback.
8. Develop custom installer to automate process of copying files to computer, creating shortcuts, etc.
9. Develop the launch/install app. outlined in previous post.
10. Test, test, test.

– Troy @ TLC

By |2016-09-16T11:05:49-07:00February 12th, 2009|Portfolio|
Go to Top